In this tutorial, learn how to download and install Eclipse IDE for JAVA Developers on Windows 10.
What’s Eclipse?
– Eclipse is a free Integrated Development Environment (IDE) software / open source platform-independent software framework for delivering what the project calls “rich-client applications”. Eclipse is also a community of users, constantly extending the covered application areas.
– Eclipse was originally developed by IBM as the successor of its VisualAge family of tools.
– Eclipse is now managed by the Eclipse Foundation, an independent not-for-profit consortium of software industry vendors.
– Eclipse is one of the most popular software among java developers at the industry level.
– Since Eclipse is free it’s very much recommended to use eclipse ide to develop java projects.
Now before installing Eclipse IDE, you also need to install Java JDK in your Operating System. So for that let’s first check whether java has already been installed or not. To do that, open Command Prompt, type java -version and press Enter.
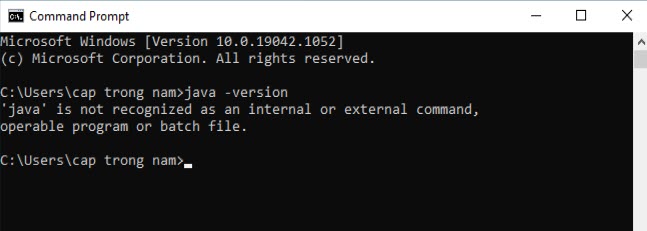
As you can see that java is not recognized as an internal or external command… which means java is not installed on your Windows PC. Now we will show you how to install Java in Windows 10.
See more: How To Install Java JDK 16 in Windows 10
How to download and install Eclipse IDE in Windows 11/10/8/7
1. To download and install Eclipse IDE, go to the official website of Eclipse IDE https://www.eclipse.org/downloads/.
Then simply click on the Download button to download Eclipse IDE.
2. Once the download is completed, double click on the installation file to install. You will see this Eclipse IDE install wizard. Select Eclipse IDE for Java Developers.
3. Here you will see JDK installed directory and then the Installation Folder where the installation going to happen. If you want to change installation directory you can change that by clicking the browser button. Other just simply keep these all default and simply click on Install to install Eclipse IDE.
4. After completion of Eclipse IDE installation, you will be greeted with Eclipse IDE Launcher. In here this is going to be default workplace for all of your projects. You can easily change your default workplace by clicking on the browse button, other wise just simply click on use this as the default and simply click on the Launch button.
5. Click on Create a java project for creating a new project in your Eclipse IDE.
6. Enter a project name, and keep your environment JRE as JavaSE-16 and simply keep on Finish.
7. After creating a new project you might see this “Failed to init” error in your console. This is because environment path is not set.
8. Simply navigate to Windows > Preferences and then just simply search “Installed JRE” and then simply click on add.
9. In here you need to paste your java JDK installed directory, i.e “C:\Program Files\Java\jdk-16.0.2” in JRE Home.
10. Restart your Eclipse IDE, and you will see that the error is gone!
You have successfully instaled Eclipse IDE and you have run your first Java Program.
In this video, we are gonna show you how to download and install Eclipse IDE for JAVA Developers on Windows 10.
Hope something helps you.


 & Mac OS")

![How to Configure Proxy Settings on Android Devices [FREE]](https://windows10freeapps.com/wp-content/uploads/2024/12/setting-up-a-proxy-for-a-wi-fi-network-1-150x150.jpeg "How to Configure Proxy Settings on Android Devices [FREE]")
