When trying to compile Java applications on Windows using Command Prompt, many individuals get an error message that says “Javac is not recognized as an internal or external command“. Checking the current version of the Java compiler may also result in this error.
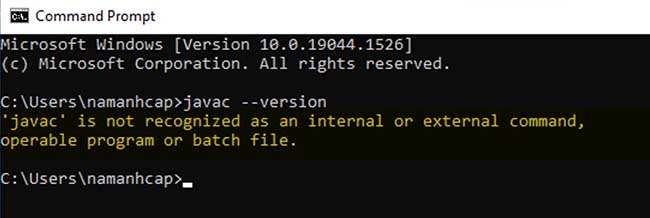
‘javac’ is not recognized as an internal or external command .. or batch file
What is JavaC?
The main Java compiler included in Oracle’s Java Development Kit (JDK), is called Javac (pronounced “java-see”). Using the Java Virtual Machine (JVMs) and the Java Language Specification (JLs), the compiler turns source code into Java bytecode (Java Virtual Machine Specification).
What causes the Javac is not recognized error
When the Command Prompt is unable to locate the Java PATH variable, the error “Javac is not recognized as an internal or external command” appears. The following are two possibilities:
- The Java Development Kit (JDK) is missing from the machine – This usually occurs when a user expects that the Java Compiler (javac) is installed with the Java Runtime Environment.
- The path to Javac is not set or is incorrectly set — The system needs to know where Javac is located to compile from Command Prompt and ensure that other app server tools work properly. If this is the case, you will have to manually set the path.
Step 1: Installing the Java Development Kit (JDK)
One of the most common causes of this issue is when users who are just learning Java mix up the Java Runtime Environment (JRE) and the Java Development Kit (JDK).
Although the JRE is included in the JDK, it is usually downloaded independently. The Java Runtime is included in the installation packages of many programs that utilize it.
You could have assumed that Javac was already installed by JRE because there are a few reasons why you’d require the Java Development Kit (JDK) if you’re not interested in Java Development, but you’ll need to install the entire Java Development Kit.
If you believe this circumstance applies to you, here is a fast way to install the Java Development Kit (JDK) to fix the “javac is not recognized” error:
1. Download the latest available version of the Java Development Kit from this sourcee.
2. After the download is complete, run the JDK installation program and complete the installation by following the on-screen prompts.
4. In the next screen, make sure that both Development Tools and Source Code are set to be installed on your local hard drive, as well as all of their subfeatures, as shown in the picture.
Take note of the installation path under Install to. You’ll need it in Step 2.
5. Wait until you’ve installed the Java Development Kit. If you’re not requested to restart your computer when the process is finished, do it manually.
The path to JavaC must be specified correctly now that you’ve made sure that the correct package has been installed, so continue down to Step 2.
Step 2: Setting the Java environment variable & updating the system path
Before we get started, we need to make sure that the Java Development Kit is properly installed (Step 1).
If you’ve installed the JDK and are still getting the error “Javac is not recognized as an internal or external command,” you’ve just encountered one of the most typical technical problems that Java newbies confront. A set of manual actions must be completed in order to complete the Java Development Kit on Windows. Even if you upgrade the Java Development Kit, you should always complete these procedures after installing JDK.
The following is a step-by-step instruction for configuring the right Java environment variables and changing the system path:
PRO TIP: There are programs like Restoro Repair that may check your hard drive and replace any files that are damaged or missing. When the problem stems from system corruption, this method is usually effective. Download Restoro Now.
1. Press Windows key + R to launch the Run dialog box. Then, type “sysdm.cpl” and click OK to open the System Properties window
2. Go to the Advanced tab in the System Properties window and click Environment Variables.
3. When the Environment Variable window pops up, Under System variable section, click the New button.
4. In the New System Variable window, you should set the Variable name to JAVA HOME, and the Variable value should be the location of your JDK. Then, click OK to save the changes.
Note: If you followed our advice in Step 1 and wrote down the JDK installation path, you can simply paste it into the Variable value.
5. Now that you’re back in the Environment Variables window, look for a variable called path under the System variables section. When the Path variable is selected, click the Edit button to get to the next step.
6. In the Edit environment variable window, click on the New button to add a new environment variable to it.
7. Name the newly created environment variable %JAVA_HOME%\bin and click OK.
8. This is the last thing you need to do to make sure your Java environment works. You will now be able to compile applications from the command line or check your Javac version from the command line.
Bonus step: Checking if the configuration was successful
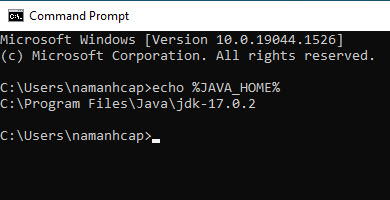
You can go through one more step in Command Prompt to ensure that you’ve successfully configured the Java environment variable path. To check if your configuration is working, follow the steps below:
1. Open Command Prompt as Administrator.
2. When the Command Prompt window appears, type echo %JAVA_HOME% and press Enter to see which return you get. If you see a print with the directory to the JDK, Step 2 was successful and your JAVAC is operating well. To fix this, go back to Steps 1 and 2 and make sure the environment variable has been correctly set.
Check this video for more help:
That’s about it.

![How to Configure Proxy Settings on Android Devices [FREE]](https://windows10freeapps.com/wp-content/uploads/2024/12/setting-up-a-proxy-for-a-wi-fi-network-1-150x150.jpeg "How to Configure Proxy Settings on Android Devices [FREE]")
 & Mac OS")


