Get access to millions of Android apps and games on your Windows 11 PC.
With its new design language and polished feel, Windows 11 is already catching the attention of macOS users. But for Microsoft, it’s not just about looks; starting with Windows 11, you can run Android apps natively.
Although this Amazon Appstore is the only official store for downloading Android apps on Windows 11, if you don’t mind fiddling around with your computer, you can also download the Google Play Shop and enjoy the library of millions of apps available.
Special thanks to ADeltaX, a third-party developer who created the WSAGAScript program that allows you to install Google Play Store on any Windows 11 PC.
Getting your Windows 11 Computer Ready for Google Play Store
You’ll need to enable the ‘Windows Subsystem for Linux (WSL)’ and ‘Virtual PC Platform’ capabilities on your machine before you can install the Play Store.
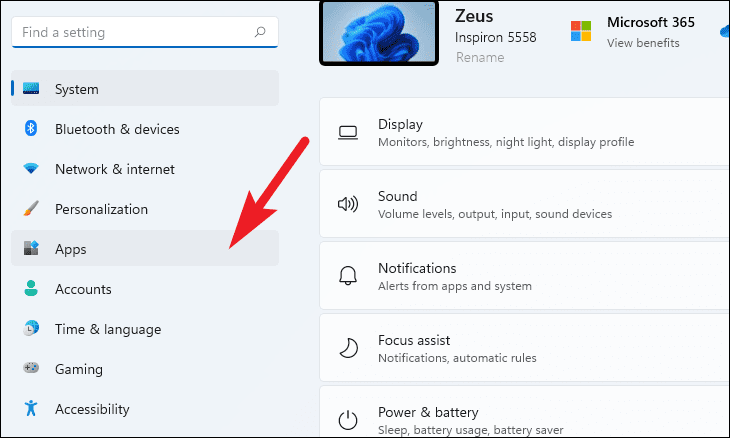
To use it, open the Settings program from your PC’s Start Menu or by hitting the Windows+I buttons on your keyboard simultaneously.

Then, on the left sidebar of the Settings box, click on the ‘Apps‘ tab.
Afterward, from the right column of Apps settings, select the ‘Optional features‘ tile.
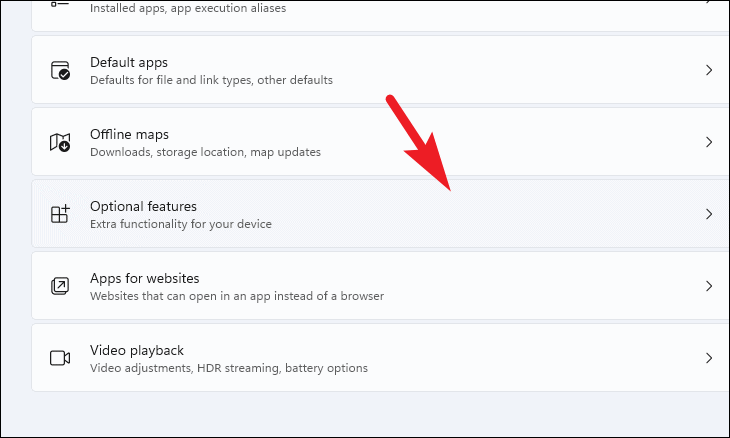
Next, scroll down to the ‘Related settings’ area and select the ‘More Windows features‘ tile from the ‘More Windows features’ tile. This will open a new window on your computer screen.
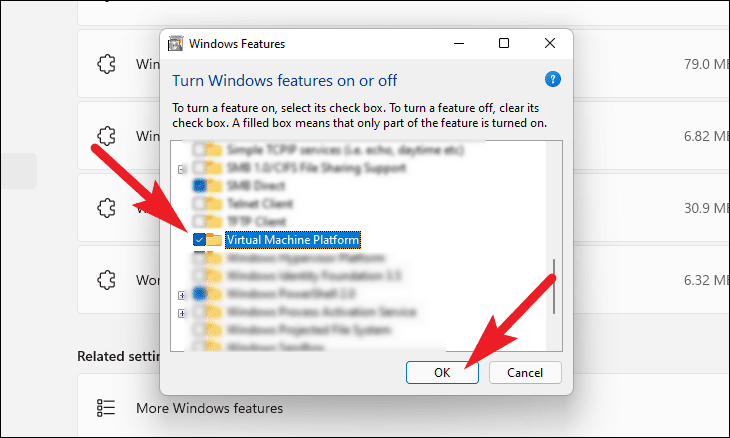
Scroll down to the ‘Windows Subsystem for Linux‘ option in the Windows Features window and tick the checkbox next to it to select it.
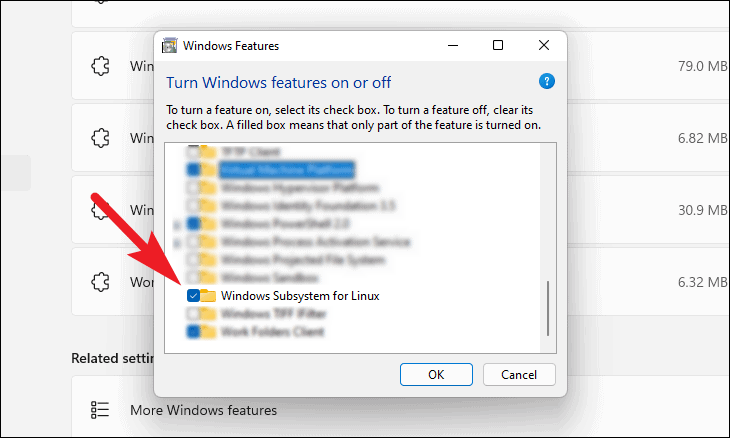
Then, in the same window, look for the ‘Virtual Machine Platform‘ option and tick the checkbox next to it to pick it. Then, to install both of these features on your PC, click the ‘OK‘ button.
It may take a while for Windows to install these capabilities on your computer. Please be patient as the process takes place in the background.
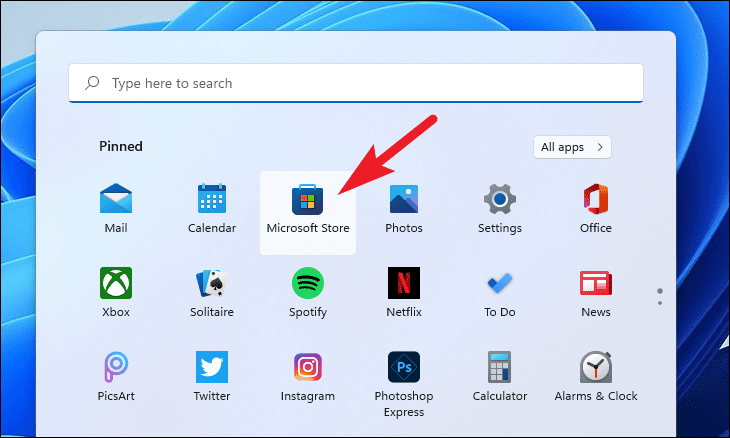
After the features have been installed, access Microsoft Store on your PC by searching for it in Windows Search or from the pinned programs part of the Start menu.
Click the search box at the top of the Microsoft Store window, type Ubuntu, then hit Enter.
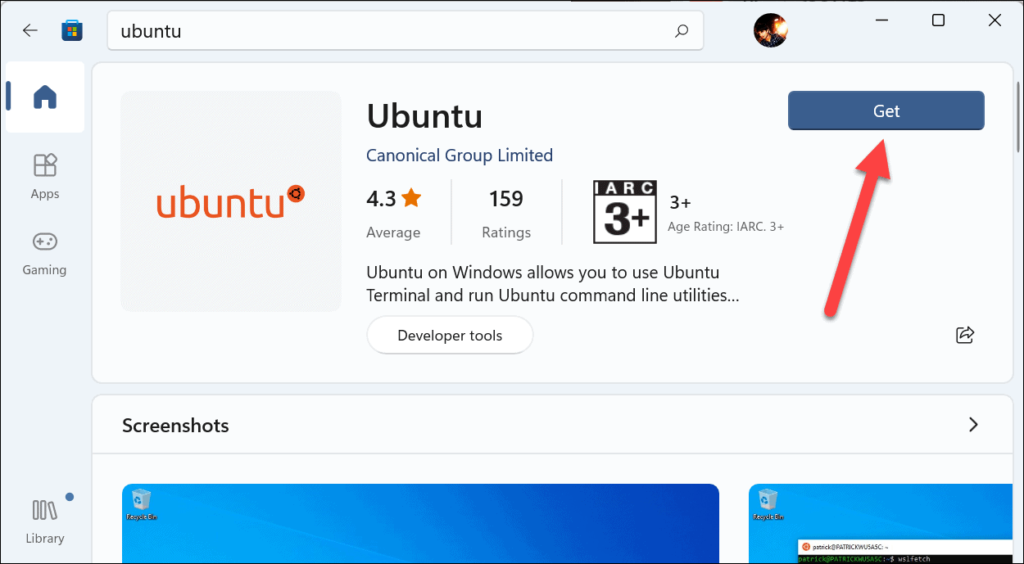
Then, on the Ubuntu tile from the search results, click the ‘Get‘ button to install it on your system.
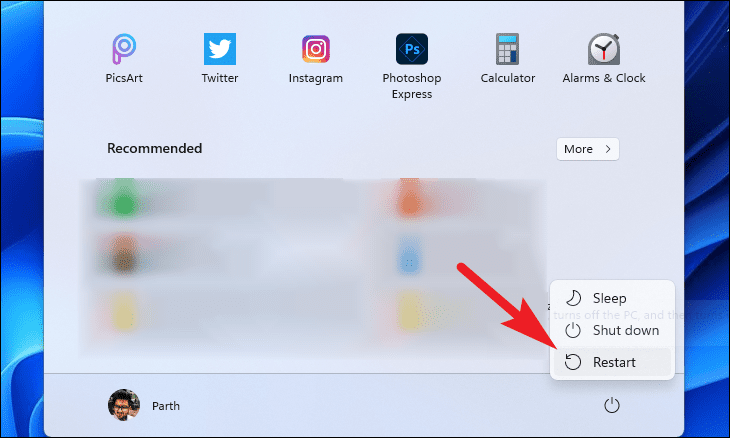
Once you’ve installed all of the features, you may need to restart your PC for the modifications to take effect. To do so, go to the Start Menu and select the ‘Power’ icon, then the ‘Restart’ option.
Manually Install Google Play Store along with Windows Subsystem for Android
The ‘Windows Subsystem for Android‘ is a component layer made up of the Linux kernel and the Android operating system that allows your machine to run Android apps and is important to understand.
Nevertheless, because we’ll be modifying the Windows Subsystem for Android to support and run the Google Play Store, we’ll need to do so. It is essential that you have the package’s standalone installer.
Pre-requisites
1. Windows Subsystem for Android msixbundle (Link)
ProductId: 9P3395VX91NR, Ring: SLOW
2. Google Apps package installer (64-bit | ARM64)
3. File Archiver Tool (WinRAR, 7-Zip, etc.)
Install Google Play store Using Linux PowerShell
It’s not easy to set up Google Play Store on your computer. Said that it isn’t difficult; simply follow the steps below and Google Play Store will be loaded on your system before you know it.
To begin, go to the folder where you got the WSA (Windows Subsystem for Android) package installer (msixbundle) from the pre-requisite section’s link.
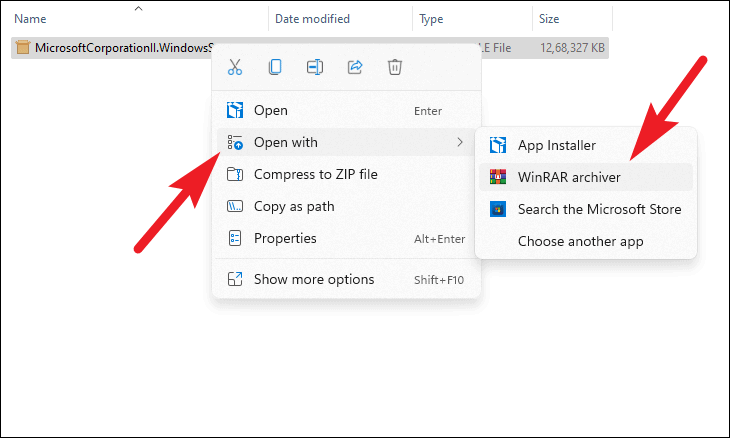
Then, right-click the .msix file, hover over the ‘Open with‘ option, and choose your computer’s installed file archiver from the list.
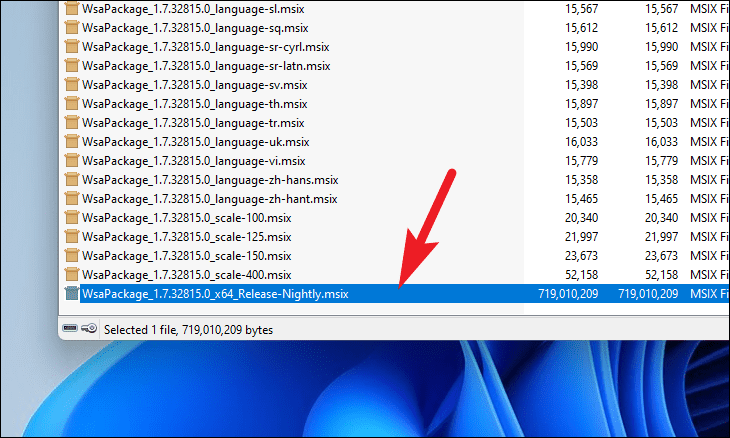
Locate and double-click the .msix package in the list to open it. Then, using the Ctrl+A shortcut on your keyboard, pick all of the files and copy them with the Ctrl+C shortcut.
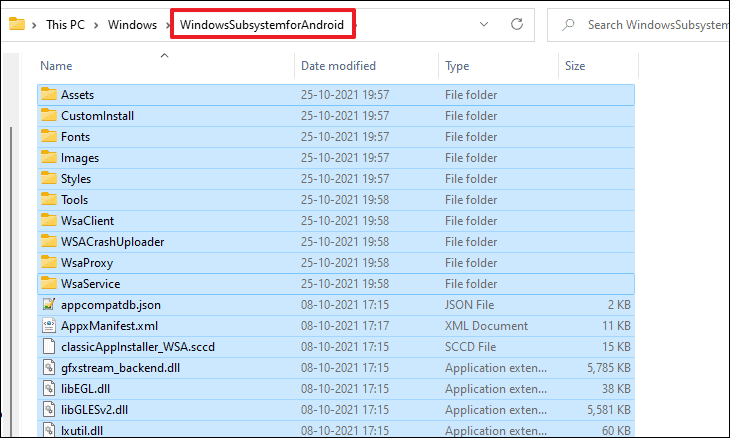
After that, go to the installation drive for Windows (C Drive in most cases). Make a new folder called Windows Subsystem for Android and put it in. Then, by pressing the Ctrl+V shortcut on your keyboard, paste all the copied files from the msix bundle into this folder.
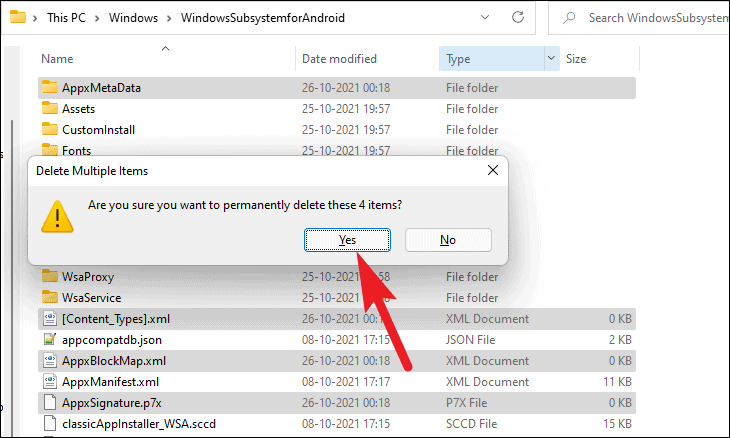
After the files have been copied, go to the accessible files and folders and delete AppxBlockMap.xml, AppxSignature.p7x, [Content Types].xml, and AppxMetadata folder. To confirm the delete operation, a prompt will display on your screen; click the ‘Yes‘ button to proceed.
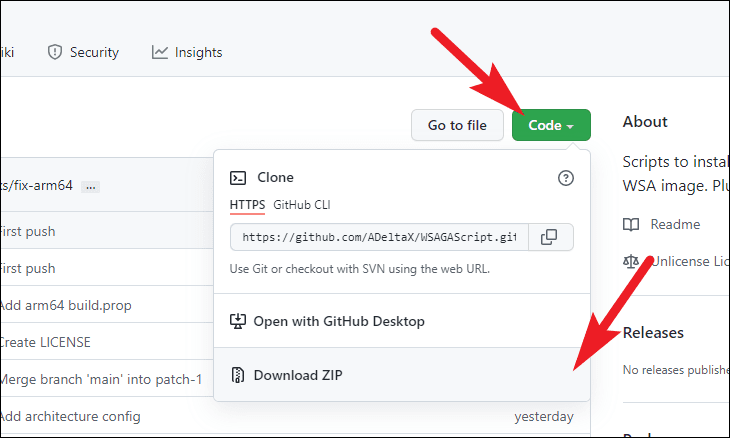
Using your favorite browser, navigate to the Github repository github.com/ADeltaX. Then, on the ‘Code’ button, select ‘Download ZIP’ from the drop-down menu.
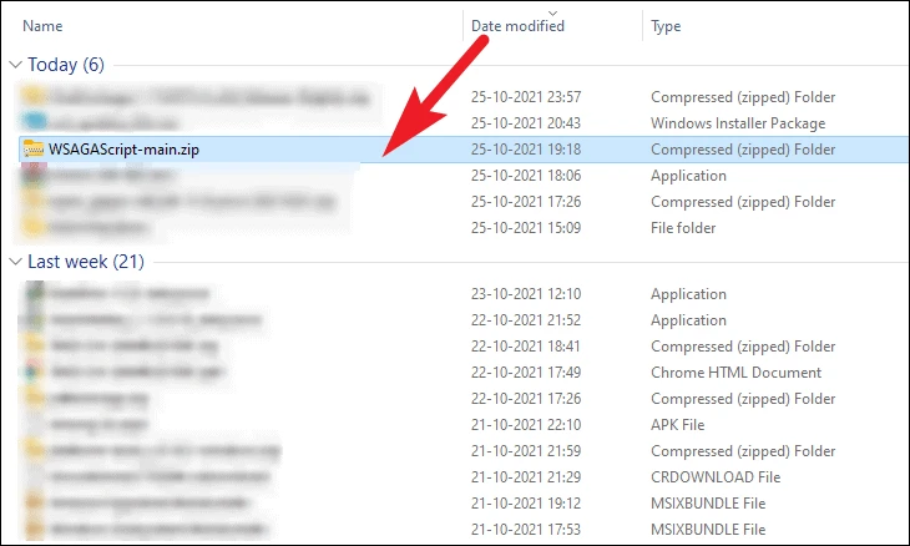
Locate the WSAGAScript-main.zip file in the downloads directory once it has been downloaded. Then, to open the file, double-click on it.
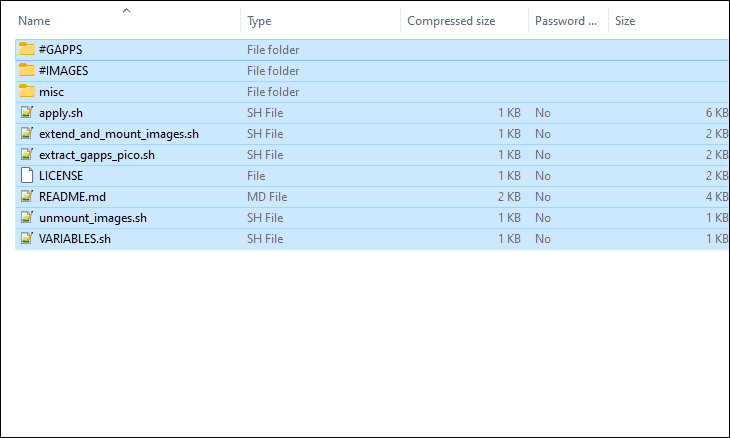
Then, using the Ctrl+A keys, select all of the files and folders inside the zip file, and then copy them using the Ctrl+C keys.
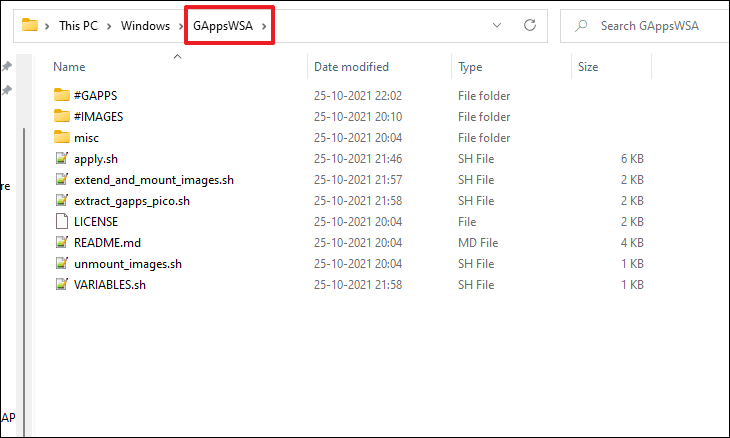
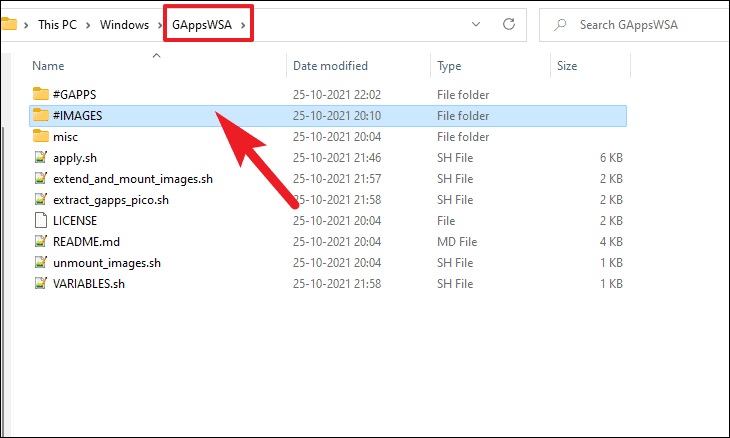
Return to your Windows installation drive now (C drive in most cases). Create a new folder and call it GAppsWSA once more. Then, in this new folder, paste all of the copied files.
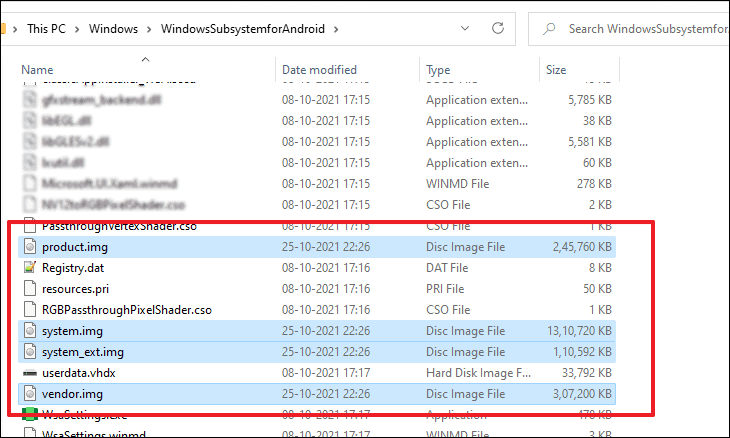
Select the vendor.img, system.img, system ext.img, and product.img files from the ‘Windows Subsystem for Android‘ folder you established earlier. Then, on your PC, hit the Ctrl + C key to copy them.
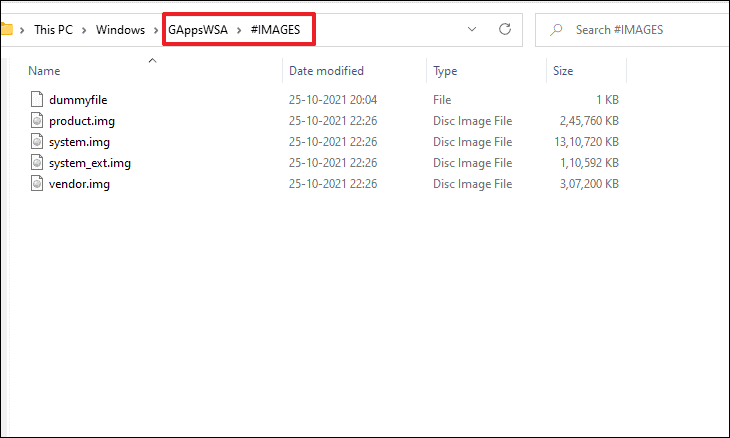
Then, under the ‘GAppsWSA’ folder, you just established, double-click on the ‘#IMAGES’ directory to access it.
Then paste all of the files you copied into this folder.
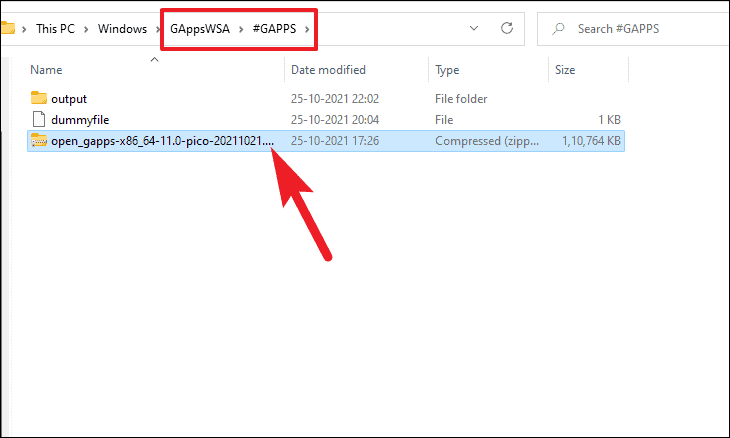
Then go to the folder where the Gapps zip file is located and pick it. Then, on your PC, hit the Ctrl + C key to copy the zip file.

Open the ‘#GAPPS’ folder in the ‘GAppsWSA’ directory once more. Then, in this area, paste the copied zip file.
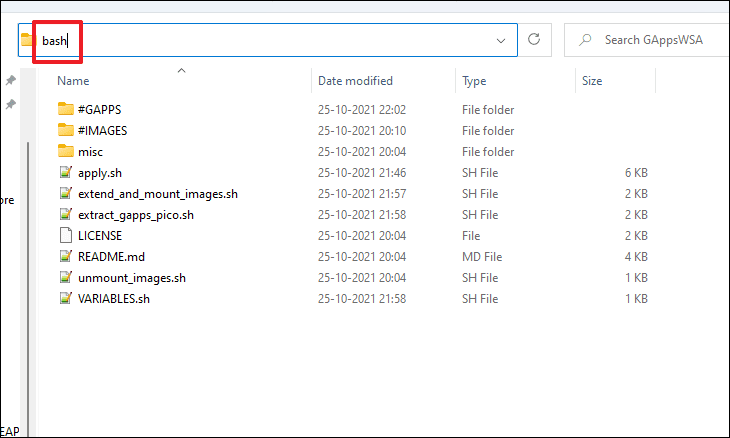
Return to the ‘GAppsWSA’ folder, type “bash” in the window’s address bar, and press Enter to launch a WSL window with the current directory configured as the default.
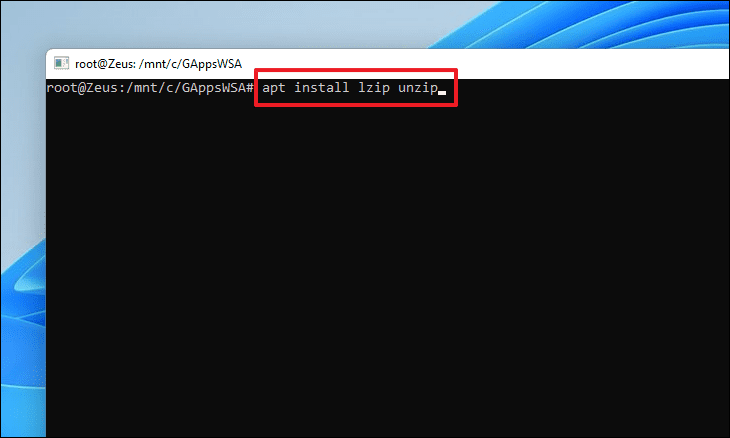
Now type the following command into the WSL window and press Enter. If the system asks for your permission to download, select Y to proceed.
apt install lzip unzip
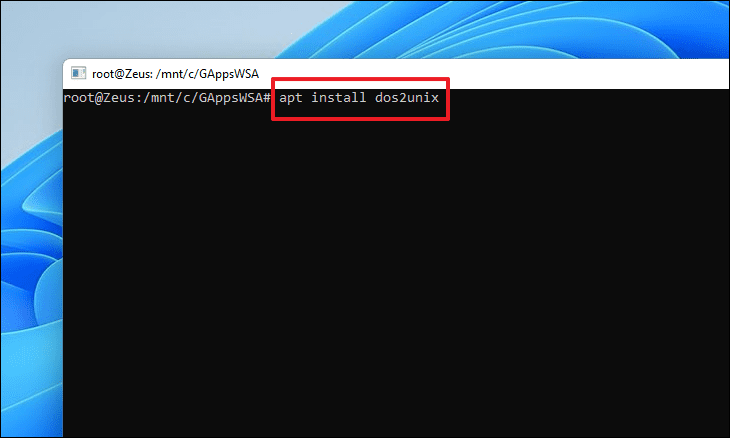
Then, in WSL, run the following command to install the dos2unix converter tool.
apt install dos2unix
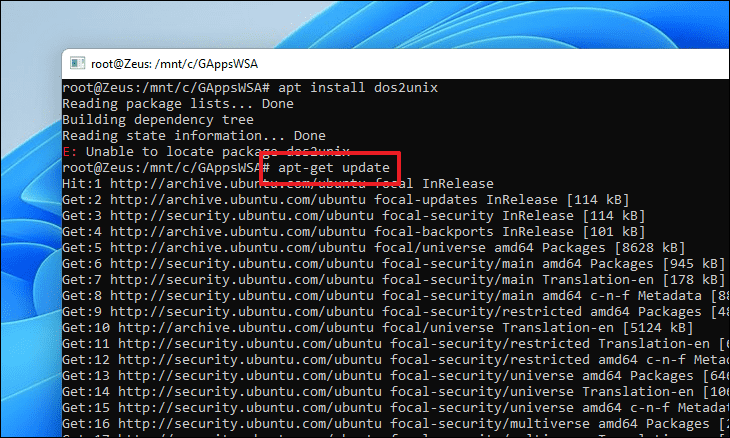
If the WSL window displays the error ‘Unable to locate package dos2unix,’ run the commands below one by one to resolve the issue.
apt-get update
apt-get install dos2unix
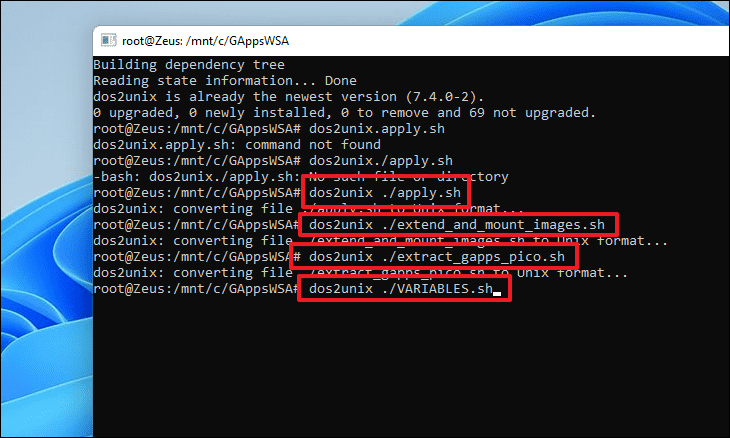
You’ll need to convert some files now, so type or copy+paste the commands below one by one and press Enter to run them.
dos2unix ./apply.sh
dos2unix ./extend_and_mount_images.sh
dos2unix ./extract_gapps_pico.sh
dos2unix ./unmount_images.sh
dos2unix ./VARIABLES.sh
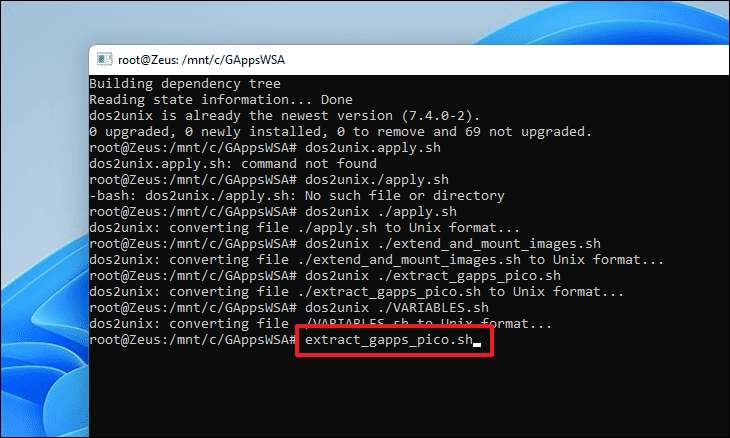
To begin installing the Google Apps package on your machine, run the following command after you’ve converted the files.
./extract_gapps_pico.sh
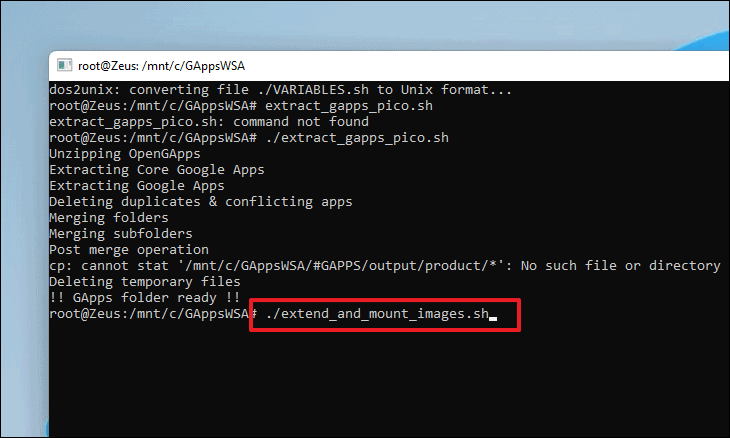
To mount the images, use the following command.
./extend_and_mount_images.sh
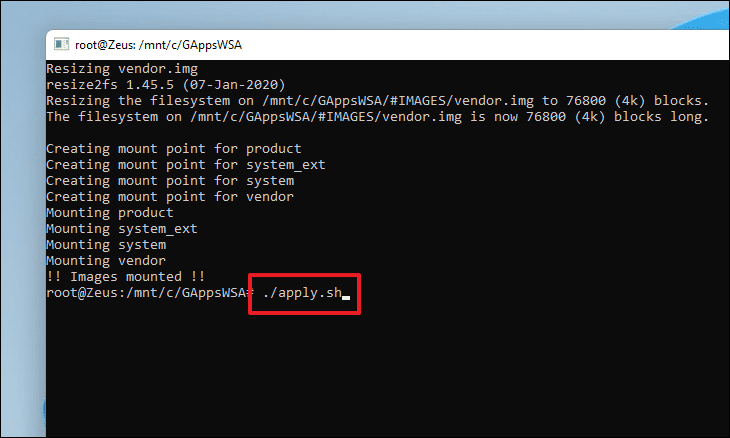
After the pictures have been mounted, type the following command and press Enter.
./apply.sh
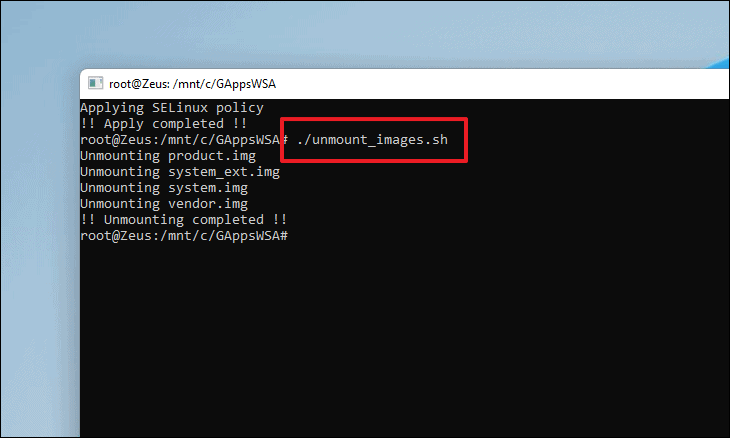
Then, using the following command, unmount all of the images we previously mounted.
./unmount_images.sh
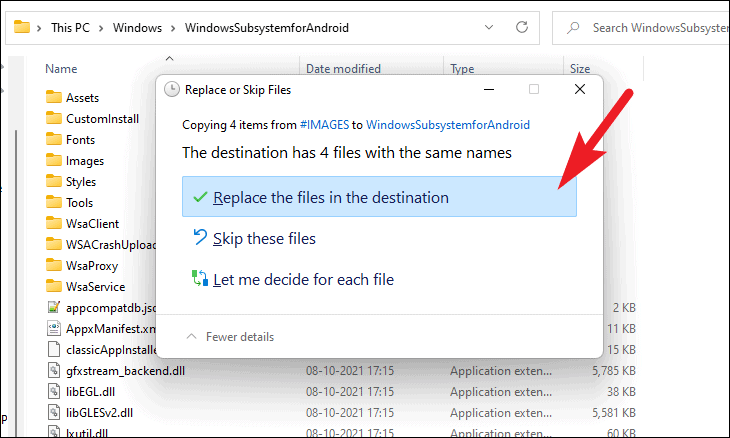
Once the images have been successfully unmounted, go to the ‘#IMAGES’ folder in the ‘GAppsWSA’ directory on your Windows installation disk (most likely C drive) and copy all of the files by using Ctrl + A to select all files and then Ctrl + C to copy the files that have been selected.

Next, use the Ctrl + V key to paste the files into the ‘Windows Subsystem for Android’ folder you created earlier on your Windows installation disk. If the same files are already existing in the directory, a Windows prompt may display. To continue, select the ‘Replace files‘ option.
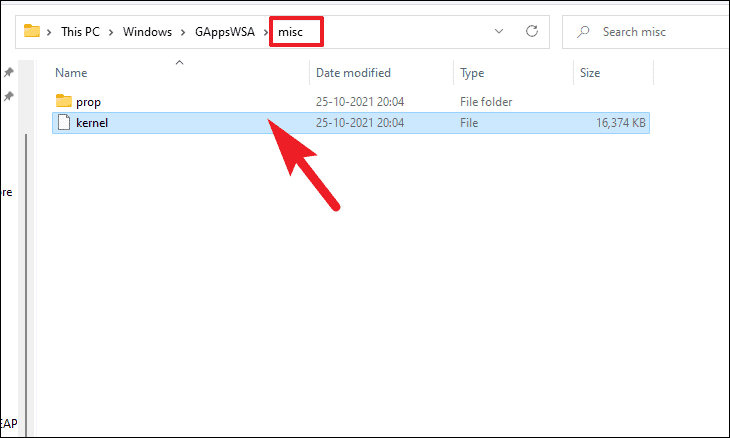
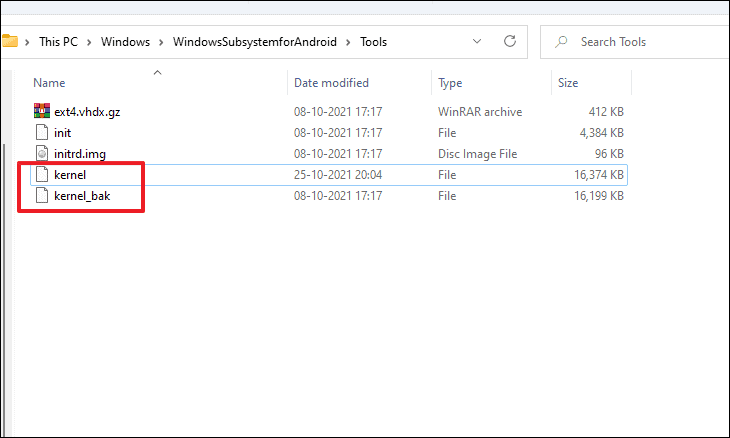
Then, within the ‘GAppsWSA’ directory, go to the ‘misc’ folder and copy the ‘kernel’ file there by first clicking on it and then pressing the Ctrl + C key.
To open the ‘Tools’ folder, go to the ‘Windows Subsystem for Android’ directory and double-click it.
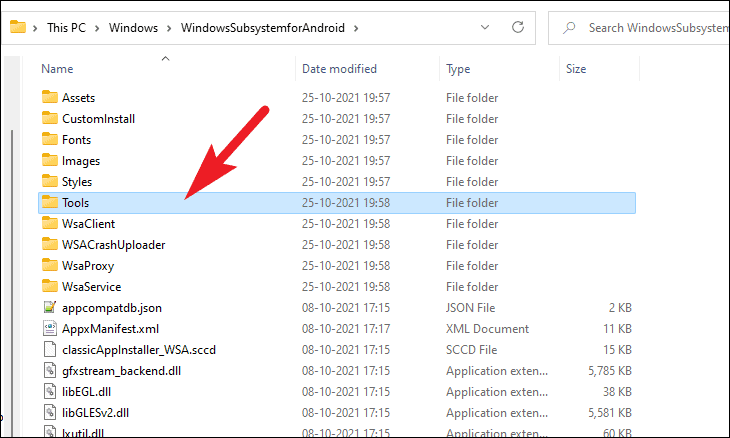
Then, rename the existing kernel file to kernel_bak as a backup in case something goes wrong. Then, using the Ctrl + V combination, paste the copied ‘kernel’ file from the previous folder.
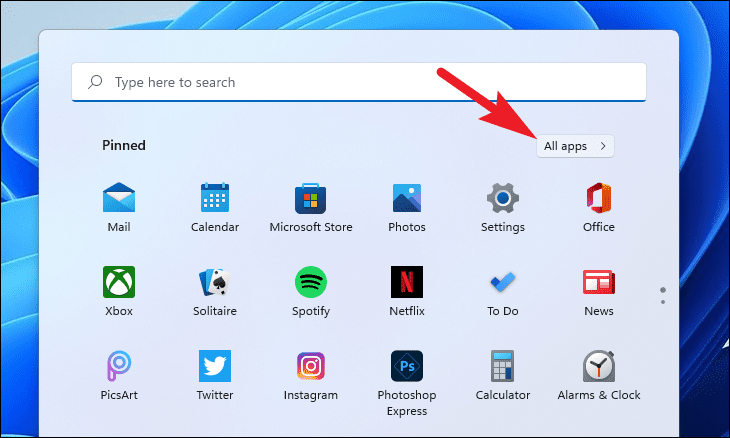
After that, go to the Start Menu and select the ‘All apps‘ button in the upper right corner.
Now scroll down to find the ‘Windows Terminal‘ tile, right-click it, and select ‘Run as administrator‘ from the context menu.
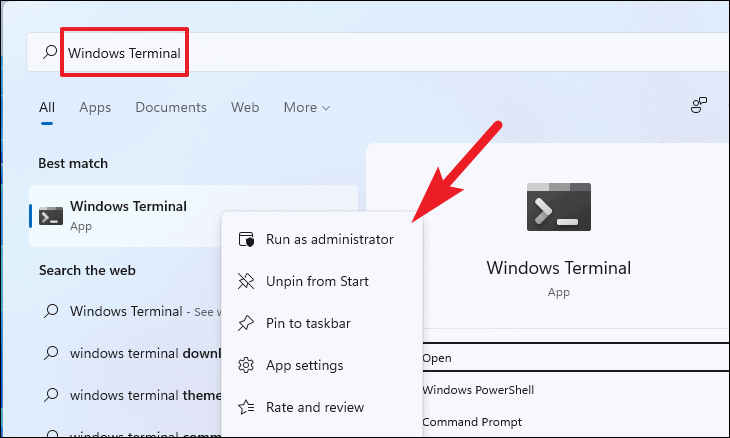
Then, on your screen, a UAC (User Account Control) window may appear. To continue, click the ‘Yes‘ button.

In the Terminal window, make you’re on the Windows PowerShell tab and excute the following command.
Add-AppxPackage -Register C:\WindowsSubsystemforAndroid\AppxManifest.xml
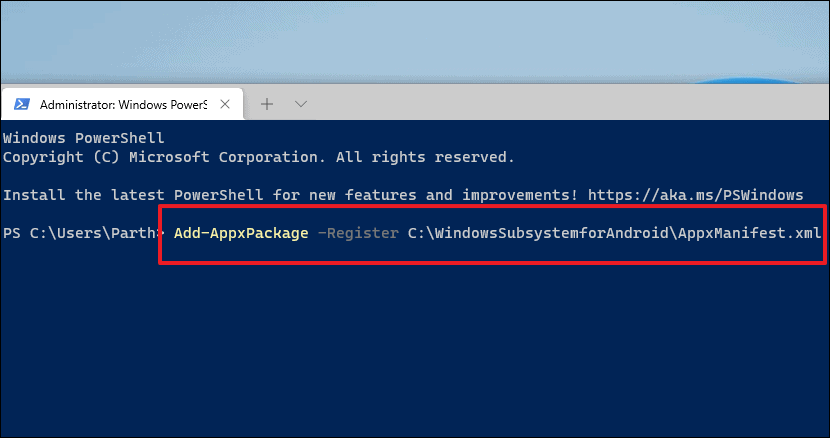
PowerShell will now download the package on your machine; please wait until it is finished.

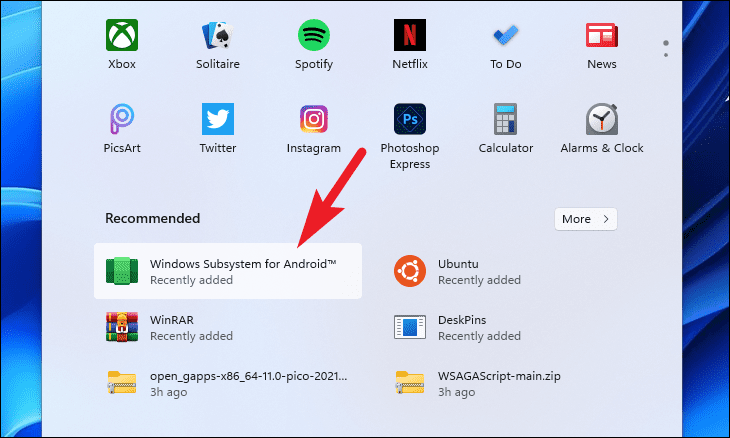
Finally, open the Start Menu and go to the ‘Recommended‘ section to find the ‘Windows Subsystem for Android‘ program.
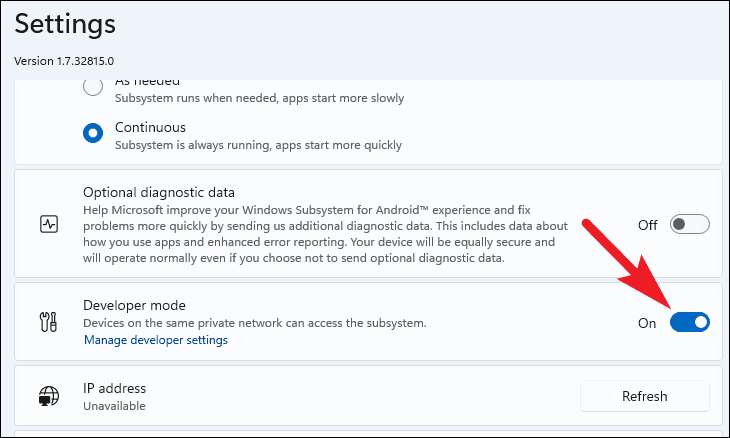
Locate the ‘Developer options‘ tile in the WSA window and toggle the switch next to it to the ‘On‘ position.
Then, on your Windows 11 PC, select the ‘Files‘ option to start the Android OS and the Play Store.
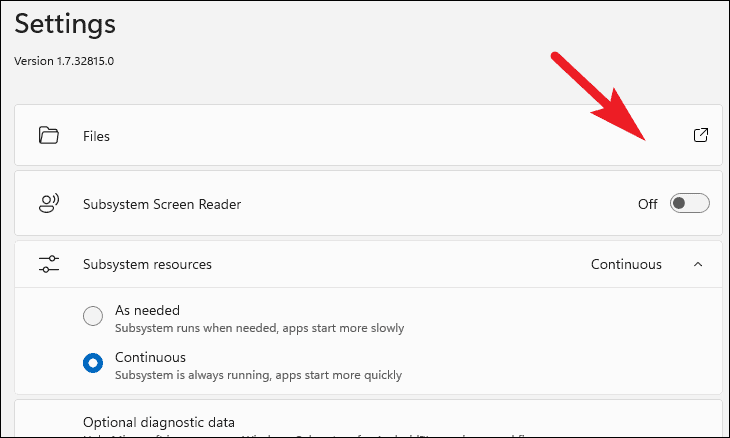
If an optional diagnostic data question appears on the screen, uncheck the checkbox next to ‘Share my diagnostic data‘ before clicking the ‘Continue‘ button.

Finally, to open Play Store on your computer. To do that, go to the Start Menu, type “Play Store” and select it from results.
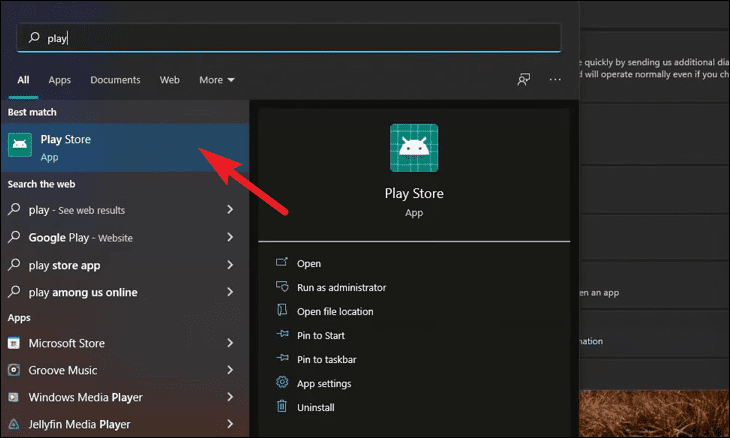
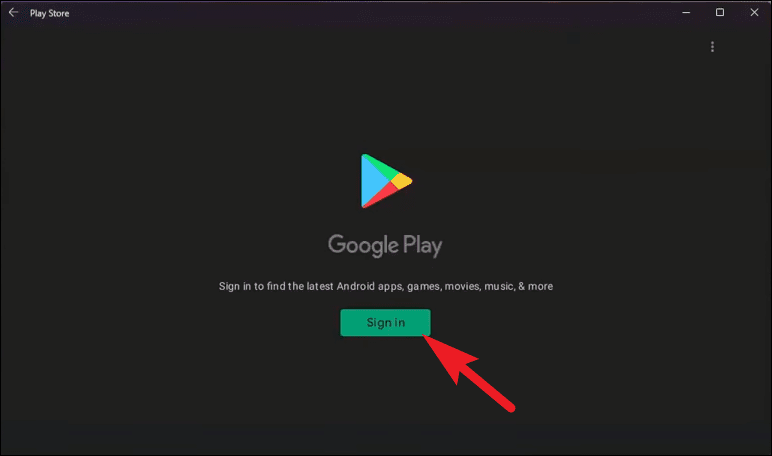
Then, from the Play Store window, click the ‘Sign in‘ option and enter your credentials.
That’s about it.


")

