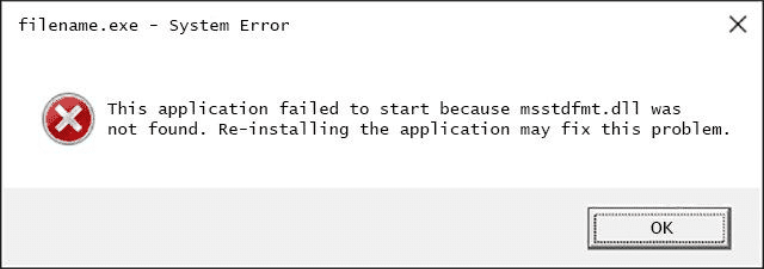
When trying to access or install an application on your Windows 10 or Windows 11 PC, you may see an error message such as “Msstdfmt.dll Not Found” or “The file msstdfmt.dll is missing” according to many customers. Similar error messages may appear, all suggesting the same thing.
The msstdfmt.dll error can occur as a result of a condition that results in the deletion or damage of some of the files in msstdfmt.dll, a registry issue, a malware attack, or damage to the hardware.
Fortunately, there are a few solutions that can assist you in resolving this problem. Let’s have a look at how.
See more: How To Fix Missing DLL Files Errors on Windows 10/8/7
How To Fix Msstdfmt.dll Not Found or Missing Error In Windows 11/10
Method 1: By Running SFC /Scannow
Step 1: On your desktop, click the Start button and type Command Prompt into the search bar. To open Command Prompt in administrator mode, right-click on the result and select Run as administrator.
Step 2: Type the following command into the Command Prompt window and press Enter:
sfc /scannow
It will take some time for the scan to complete, so be patient. Any inaccuracies found will be corrected immediately.
This should resolve the problem; but, if you are still unable to access the apps, try the second option.
Method 2: Using Registry Command
Step 1: On your desktop, click the Start button and type Command Prompt into the search bar.
Step 2: To open Command Prompt in administrator mode, right-click on the result and select Run as administrator.
Step 3: In the Command Prompt window, type the instructions listed below one by one and press Enter.
Step 4: Close Command Prompt and go to the following link to get the DLL file:
https://www.dll-files.com/msstdfmt.dll.html
It will display all 32-bit versions’ URLs. Get the most up-to-date DLL file.
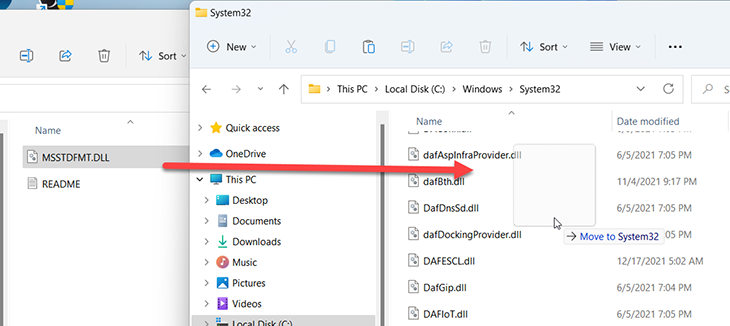
Step 5: In File Explorer, open the downloaded zip file and drag the MSSTDFMT.DLL file to the desktop.
Step 6: To open the File Explorer, press the Windows + E buttons on your keyboard together. On the left, click the This PC shortcut, and then on the right, click to open the C drive.
Step 7: From the address bar, navigate to the following location:
C:\Windows\System32
Note: If you have a 32 bit PC, instead of going to the above path, go to the path listed below.
C:\Windows\SysWOW64
Step 8: Copy the MSSTDFMT.DLL file from your desktop and put it in the appropriate spot.
To provide the administrator paste permissions, click Continue in the prompt that displays.
Step 9: As in Method 1, launch Command Prompt in admin mode once more. Execute the following two commands one by one, pressing Enter each time:
regsvr32 c:\windows\system32\msstdfmt.dll
regsvr32 c:\windows\syswow64\msstdfmt.dll
In this video, we are gonna show you how to fix the “Msstdfmt.dll Not Found” or “The file msstdfmt.dll is missing” while trying to access or install a program on Windows 11, Windows 10:
That is all there is to it. Restart your computer now, and the issue should be gone.

 & Mac OS")

")
