In this tutorial, learn how to fix NVIDIA Control Panel missing issue. You can try out solutions mentioned below and bring your NVIDIA Control Panel back.
A lot of NVIDIA Graphics card users have reported that the NVIDIA Control Panel is missing on the desktop context menu. And even, a few number users can’t also look for it in Control Panel on their Windows 10 computer. This usually appears when waking your computer from sleep mode or upgrading from a previous version of Windows. So, how do I get to my NVIDIA Control Panel? Don’t worry, because this tutorial is helpful for you.
Read more: How To Fix Unable to connect to NVIDIA in Windows 10
How To Fix NVIDIA Control Panel Missing Problem
Solution 1. Unhide your NVIDIA Control Panel
Your NVIDIA Control Panel may be hidden by software that has accidentally changed the graphics settings or by Windows during the upgrade from a previous version. In order to fix this problem, you need to open NVIDIA Control Panel in Control Panel and then show it in your desktop context menu. To do that, follow these steps:
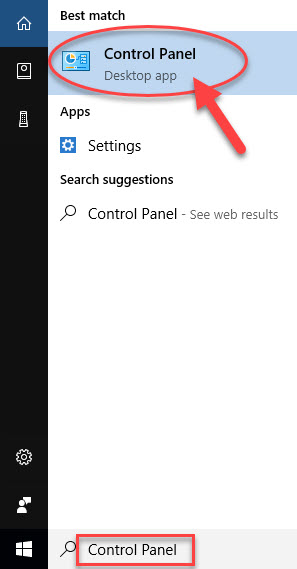
1. Click Start menu and type “Control Panel” in the search box. Then select Control Panel from the results.
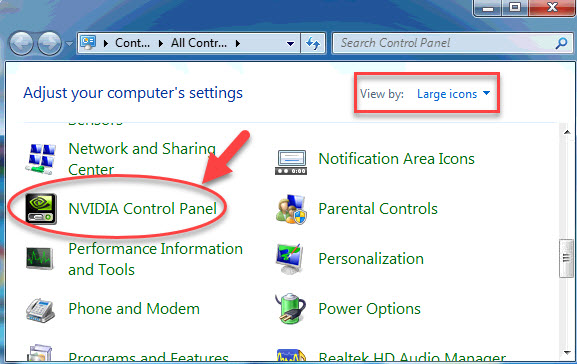
2. In Control Panel, click View by > select Large icons.
3. Locate and select NVIDIA Control Panel.
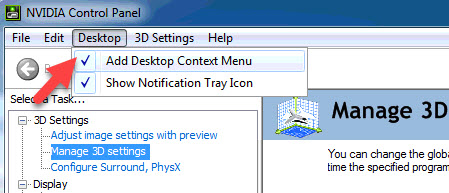
4. When the NVIDIA Control Panel window opens, click Desktop (or View). Make sure that the Add Desktop Context Menu option is checked.
Now, you right click on the desktop and check if your NVIDIA control panel reappears in the desktop context menu.
Here is the video for illustration of this method:
Solution 2. Reinstall your NVIDIA display drivers
If you are using the wrong graphics driver or it is out of date or corrupted, NVIDIA Control Panel may disappear on your Windows 10. In this case, you can try uninstalling then reinstalling your NVIDIA display drivers in Device Manager.
You may aslo like: How to Properly Uninstall and Install an NVIDIA Graphics Driver
Step 1. To uninstall your current NVIDIA display drivers from your system, follow these steps:
1. Open Control Panel (Large icons).
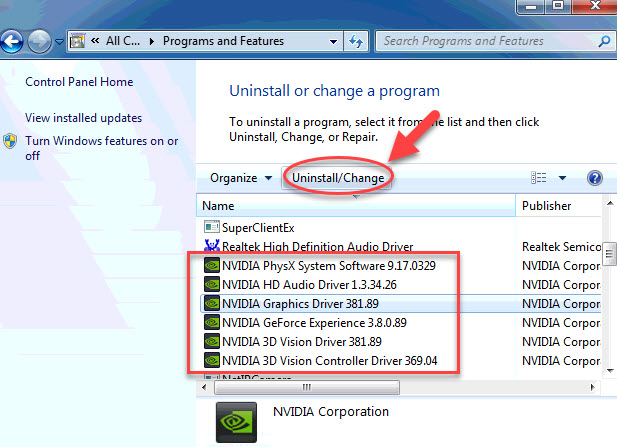
2. In the Control Panel window opens, select Programs and Features and then select the NVIDIA Windows Display Drivers from the list of installed programs.
3. Click Uninstall/Change to remove the NVIDIA drivers from your system.
4. Once the driver files have uninstalled, restart your computer.
Step 2. Go to the NVIDIA Download Drivers page to download the driver.
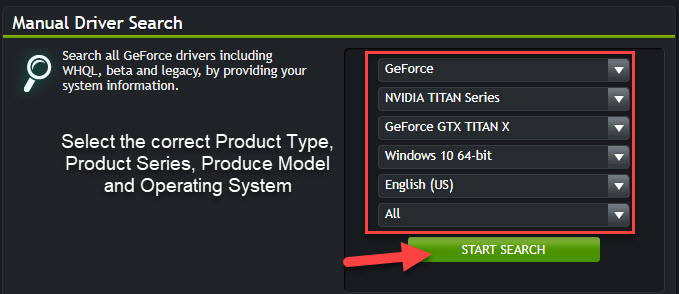
Note: you need to select the correct Product Type, Product Series, Produce Model and Operating System.
1. Download the latest NVIDIA display driver.
2. After the driver has downloaded to your computer, right-click the file and click Run as administrator.
3. Follow the on-screen instructions to complete the installation.
4. Restart your computer.
If you don’t have computer skills to reinstall your graphics driver manually, I highly recommend you do it automatically with the Driver Talent tool. Driver Talent can smartly detect your NVIDIA graphics driver issue.
Hope something helps you. Please let me know if you have any questions. Please feel free to contact me if you need any further information.
")
![How to Configure Proxy Settings on Android Devices [FREE]](https://windows10freeapps.com/wp-content/uploads/2024/12/setting-up-a-proxy-for-a-wi-fi-network-1-150x150.jpeg "How to Configure Proxy Settings on Android Devices [FREE]")


 & Mac OS")
