A lot of Windows users report that their PC cannot project to another screen after installing the latest Windows 10 updates.
Windows 10 comes with native ability to project to another screen (wireless or wired). All you need to do is press Windows + P and it will display options to manage the extended display. However, sometimes you might face the following error message – “Your PC can’t project to another screen. Try reinstalling the driver using a different video card”. This prevents you from projecting your PC to the other screen.
We have discussed some easy methods to solve this issue.
How to fix Your PC can’t project to another screen error in Windows 10
Method 1. Check your hardware settings
Another thing to do is to check the cables connects your computer and extra monitor all are plugged into the correct ports, like HDMI, VGA, and make sure the connections not loosely.
Method 2. Update the display adapter drivers
If the issue is with the display adapter drivers, updating them could help in resolving the problem. Here are the steps to update the Graphics Driver:
1. Press Windows Key + R then type “devmgmt.msc” in the Run dialog box. Click OK to open Device Manager.
2. Expand the list of Display adapters. Right-click on the graphics card driver and click Update driver.
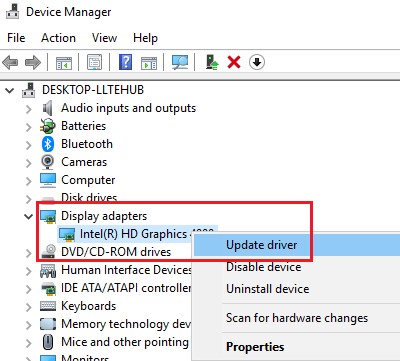
3. Reboot your system once done.
You could also consider downloading the display drivers from the manufacturer’s website and installing them.
Method 3. Reinstall your video drivers
Reinstalling your video drivers are some of the first things to do in this case. Here are the steps:
1. Open Device Manager > go to Display Adapters.
2. Right-click on the problematic graphics adapter and select Uninstall.
3. Next, you can go to Action > Scan for Hardware Changes.
4. Then, reboot your computer.
However, as recommended, you can also download the latest drivers directly from your manufacturer’s website, like NVIDIA, Intel, AMD.
Be careful, especially if you’re not confident playing around with drivers manually, but there are tools such as Driver Easy that can automatically update all your drivers with just a single click.
Method 4. Run the Hardware and Devices troubleshooter
Another easy method is to run the Hardware and Devices troubleshooter. Follow these steps:
1. Click on Start and go to Settings > Updates and Security > Troubleshoot.
2. Locate the Hardware and Devices troubleshooter from the list and run it. Follow the on-screen instructions to complete the process.
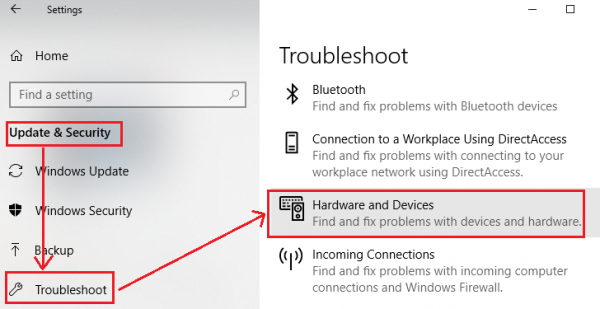
3. Once it is complete, restart the system.
Method 5. Clean boot your computer
At times, various programs and apps may interfere with your projector, preventing your computer from connecting to it. In oder to fix this issue, you need to start your computer using only a minimal set of drivers and programs. Follow these steps:
1. Press Windows Key + R then type “msconfig” in the Run dialog box. Click OK.
2. When the System Configuration window opens, click on the Services tab, check the “Hide all Microsoft services check” box. Click Disable all.
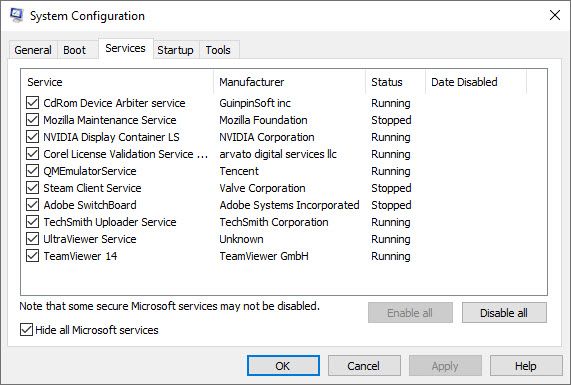
3. Close Task Manager and reboot your system.
In this video, we will show you how to fix the Your PC can’t project to another screen error.
Hope something helps you.
")


![How to Configure Proxy Settings on Android Devices [FREE]](https://windows10freeapps.com/wp-content/uploads/2024/12/setting-up-a-proxy-for-a-wi-fi-network-1-150x150.jpeg "How to Configure Proxy Settings on Android Devices [FREE]")
