New Steam games are automatically installed in the same area where you installed Steam, which is normally Program Files > Steam > SteamApps > Common. When you try to establish a new Steam library, however, some issues arise, especially if the library is stored on an external SSD or HDD disk.
This issue does not only occur in this setting, and it can be caused by a variety of factors. Even so, you can try any of the methods listed below to cure the problem quickly!
How to Fix New Steam Folder Must Be Writable Error
Solution 1: Make Sure the Folder is not Read-Only
Whether the issue happened during the download or update of a Steam game, try navigating to your library folder and checking to see if the directory has the read-only option switched on. If it does, please turn it off and see if it solves the issue.
1. Firstly, let’s cancel the downloading process so that it can be restarted. By right-clicking the Steam client’s icon in the system tray and selecting Exit, you can entirely shut down your Steam client.
2. Go to C:\Program Files (x86)\Steam\steamapps\downloading directory, delete the numbered folder matching to the issue game. This number here may be found by searching for your game and looking at the AppID number next to it.

3. If you can’t delete the directory, you may need to gain control of it. Click the Security tab after right-clicking the folder and selecting Properties. Toggle the Advanced option on. The window for “Advanced Security Settings” will display. The Owner of the key must be changed here.
4. Next to the “Owner:” label, click the Change link. The window Select User or Group will display.
5. Choose the user account using the Advanced button, or simply type it in the ‘Enter the object name to select field and hit OK. Create a user account for yourself.
6. Choose the check box “Replace owner on subcontainers and objects” in the “Advanced Security Settings” window to alter the owner of all subfolders and files inside the folder. To change the owner, click OK. After that, try deleting it.
Afterward, we’ll try to eliminate the read-only property from the library directory you’re utilizing, which helped the majority of users quickly address their issues.
1. Find the library location where your games should be downloaded and installed. Go to C:\Program Files (x86)\Steam\steamapps. However, the issue normally occurs when you navigate to a user-added directory, so make sure you go there.
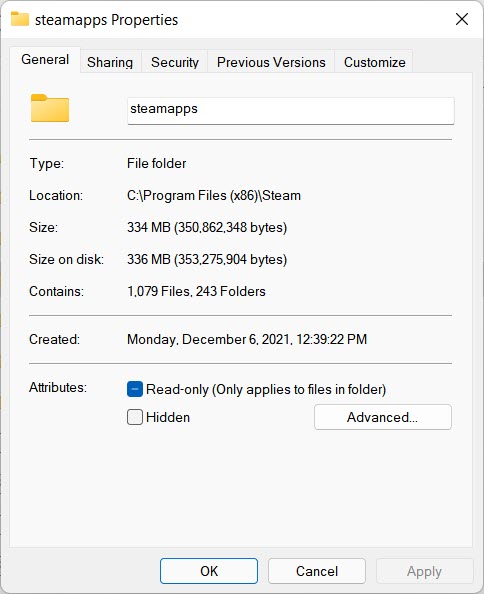
2. Select Properties from the context menu by right-clicking on the damaged folder. Continue to the General tab and scroll down to the Attributes section. Before leaving, clear the box next to the Read-only option and click Apply. Check to see if the issue is still present.
Solution 2: Reinstall the Problematic Game
It could just be a bug that can be fixed by rebuilding the game if the trouble arises during an update for a current game on your computer and it did not show up before for the same game and folder.
Because you’ll have to re-download the game files, it’s a simple but time-consuming procedure. The good news is that because it’s linked to your Steam account, you won’t lose any of your progress.
1. Firstly, make sure you’re logged in as an administrator because you won’t be able to delete applications if you’re not.
2. To ensure that you don’t lose your in-game achievements, make sure your data are backed up using Steam Cloud.
3. Open Control Panel by browsing for it in the Start menu. If you’re using Windows 10, you may also open the settings by clicking on the gear icon.
4. Select View as Category in the top right corner of Control Panel, then click Uninstall a Program under the Programs section.
5. If you’re using the Settings app on Windows 10, selecting Apps should bring up a list of all the programs you’ve downloaded.
6. Click Uninstall in the Control Panel or Settings to remove the offending game.
7. After a short time, the Steam client should load, asking you to confirm your selection and remove the game system files. Make sure you accept your selection and wait for the procedure to complete.
8. Reinstall the game by going to your Steam client’s Library section and selecting it from the list on the left side of the window. Choose the Install game option from the right-click menu on the game. It should immediately begin the downloading and installation process. Check to see if the mistake is still occurring.
Solution 3: Perform a Folder Fix from the Client
Even when faced with these issues, the Steam client includes a means to easily solve the current library folder, and this functionality has shown to be handy. Many users indicate that this easy procedure solved their problem after the alternatives above flopped, so give it a shot!
1. Double-click the Steam client’s symbol on the Desktop to launch it, or look for it in the Start menu and select the first match.
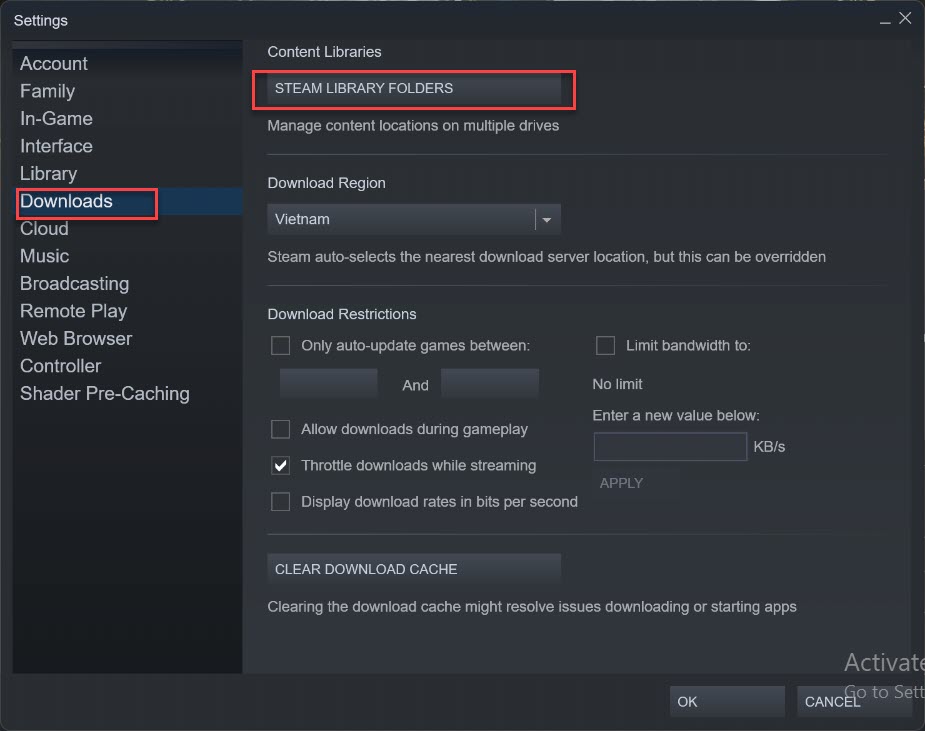
2. Select Settings from the Steam option in the menu at the top of the client’s window. Go to the Downloads tab in the Settings window and click the Steam library folders button at the top of the window.
3. Find the directory that contains your affected game. The usual library folder ( C:\Program Files (x86)\Steam), as well as any directories you’ve added manually, should be visible. Select the one you wish to fix, right-click it, and select Repair Library Folder from the menu.
4. After you confirm any UAC prompts, a Steam Client Service window with a “Command-Prompt-like” interface should open. Wait for the folder to repair itself—it should close on its own—then check to see whether your issue was resolved.
Solution 4: Use a Folder Other Than Program Files
If the Program Files directory on your machine has become write-protected in some way, you should change the default library folder on your computer to a new one, which should solve the problem. Best of luck!
PRO TIP: If the problem is with your pc or laptop/notebook, use Restoro Repair to scan the repositories and fix any corrupt or missing files. This performs in the vast majority of cases where the problem is caused by a system flaw. Restoro can be downloaded by Clicking Here
1. Make a directory wherever you’d like. Because the faulty game will be installed in that folder, make sure there is sufficient room in that place. As with the second half of Solution 2, make sure the read-only property is disabled.
2. Pick Run as administrator by right-clicking on your Steam client on the Desktop or in the Start menu.
3. Then, go to the Steam menu at the top of the client’s window and select Settings from the drop-down menu. Navigate to the Downloads tab in the Settings window and click the Steam library folders button at the top of the window.
4. Select the folder you created in step 1 of this method when you click Add Library Folder. Every time you try to download and install a game now, you’ll be given the option of where to install it.
5. Remove the game by going to the Steam client’s Library tab, finding your game in the list on the left side of the window, right-clicking it, and selecting Uninstall.

6. Try installing it from the Library again, being sure you choose the new installation folder. Install the game by right-clicking on it in the Library. Check to see whether the issue has been resolved.
Solution 5: Restart Your Computer
This may appear to be the overly simplistic remedy that never did work, but there are many customers who just did not believe restarting the computer would cure the problem, but it did. Make sure you restart your computer frequently enough because bugs might occur when the system has been functioning for an extended period of time and restarting it fixes the problem.
Toggle between the Start menu and the power button. Wait for your computer to restart after selecting Restart. Check to see whether the issue has been resolved.
Solution 6: Check Your Drive for Errors
If the issue isn’t caused by Steam, it could be a hard drive problem or a bug that can be readily fixed. In any case, there is an easy approach to check your hard drive for faults (or any other storage device where your games might be located). This has aided a number of individuals, and it’s really simple to implement!
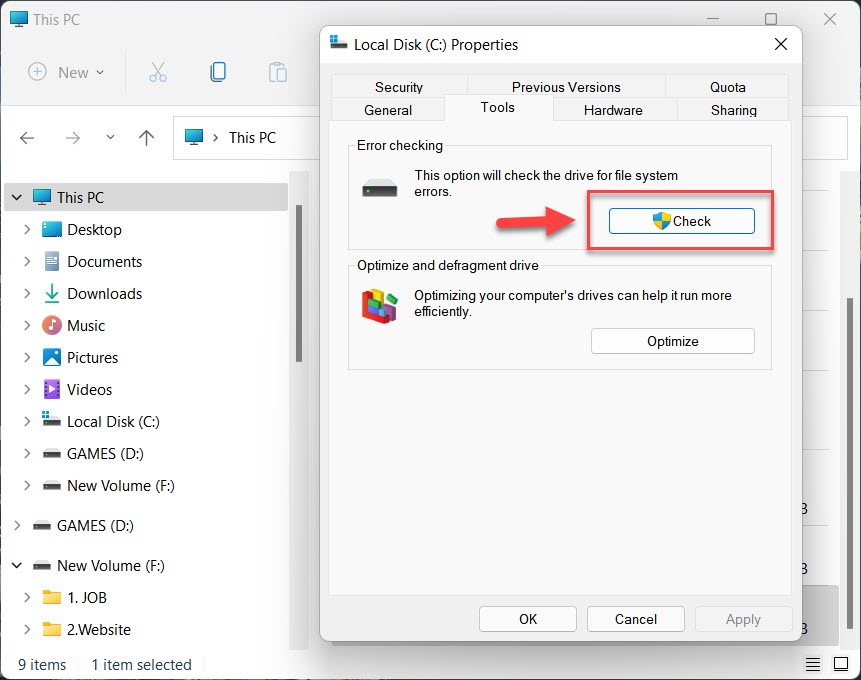
1. Depending on the version of Windows you have downloaded, go to This PC or My Computer. You may reach there by launching Windows Explorer and selecting This PC/My Computer from the left-hand navigation pane.
2. Select Properties from the right-click menu on the drive where your troublesome game is located. Navigate to the Tools tab in the Properties window and select Check under the Error-checking section.
3. To proceed, follow the on-screen directions and be calm as the utility scans your hard drive, which will take some time. After that, restart your computer to see if the problem has been resolved.
Solution 7: Make Sure You Add Steam to Antivirus’ Exceptions
Antivirus tools should not interfere with the operation of normal, trustworthy programs like Steam, yet they do, and this has been a known truth for years. This is common with free antivirus software like Avast or AVG, but the problem may be remedied by simply adding Steam to the exceptions list, without having to uninstall or replace your antivirus.
1. By double-clicking on the antivirus symbol in the device (bottom right of the window) or browsing for it in the Start menu, you can access the antivirus user interface.
2. Depending on the antivirus tool, the Exceptions or Exclusions setting is located in a different location. It’s usually easy to discover, however here are some brief recommendations on how to find it in the most common antivirus programs:
Kaspersky Internet Security: Home > Settings > Additional > Threats and Exclusions > Exclusions > Specify Trusted Applications > Add.
AVG: Home > Settings > Components > Web Shield > Exceptions.
Avast: Home > Settings > General > Exclusions.
3. You ought to go to Steam’s primary executable file in the box that appears, prompting you to do so. It should be in the same folder as when you first downloaded it (typically C > Program Files > Steam > Steam.exe). If you have a desktop shortcut, right-click it and select Open file location.
4. Check to check if the file can now be opened. If the problem persists, restart your computer and try again.
Solution 8: Take Ownership of the Folder and Give Write Permissions
If the warning message indicates that the directory is not writeable, it’s conceivable that you lack the necessary rights to write and read from it. This can happen for a variety of reasons, and if you have the patience, you can easily solve it.
1. Select the Security tab after right-clicking the library directory you’re using. Choose Advanced from the dropdown menu. A popup called “Advanced Security Settings” will pop up. The key’s Owner must be changed here.
2. Next to the “Owner:” label, click the Change button. The window to choose a user or a group will open.
3. Using the Advanced button, select a user account. Create an account for yourself.
4. Select the check box “Replace owner on subcontainers and objects” in the “Advanced Security Settings” window, if you want to alter the owner of all subfolders and files inside the folder. To change ownership, simply click OK.
5. Click Edit in the Security tab of the library folder’s Properties box to adjust access permission and pick the personal user account to which you assigned ownership. Apply the modifications after changing the permissions to Full Control. Check to see whether the issue still exists.
Check this video for more help:
That’s about it.

![How to Configure Proxy Settings on Android Devices [FREE]](https://windows10freeapps.com/wp-content/uploads/2024/12/setting-up-a-proxy-for-a-wi-fi-network-1-150x150.jpeg "How to Configure Proxy Settings on Android Devices [FREE]")
 & Mac OS")

