In this tutorial, learn how to take a screenshot on any Windows 10 computer, with multiple easy methods.
A screenshot is an image that shows the contents of a computer display. There are a variety of methods to take a screenshot on Windows 10
- Windows 10 offers several methods to take screenshots of your entire computer screen, or just a piece of it.
- The easiest method to take a screenshot on Windows 10 is by pressing the Print Screen or PrtScn button on your keyboard. There are various key combos to take a screenshot of part of your screen.
- Microsoft offers a Snipping Tool to capture a screenshot, or snip, of any object on the screen, and then draw, annotate, share the image, or save it on your computer.
- You can capture screenshots within games by using the Game Bar with the Windows + G keyboard shortcut.
See more: How to take a screenshot on a Dell laptop in Windows 10
If you need to take a screenshot of something on your computer screen, Windows 10 provides a few different ways for doing just that.
Whether you want to save the entire screen or just parts of it, this post has rounded up all the most common techniques for taking a screenshot on Windows 10.
How To Take a Screenshot in Windows 10
Method 1. Press the PrtScn key to copy the screen to the clipboard
The simplest method to save a copy of whatever is on your computer screen is to just press the “Print Screen” button on your keyboard. It’s usually labeled “PrntScrn“, “Print Scr”, “PrtScn” (or something similar) and is located between F12 and Scroll Lock.
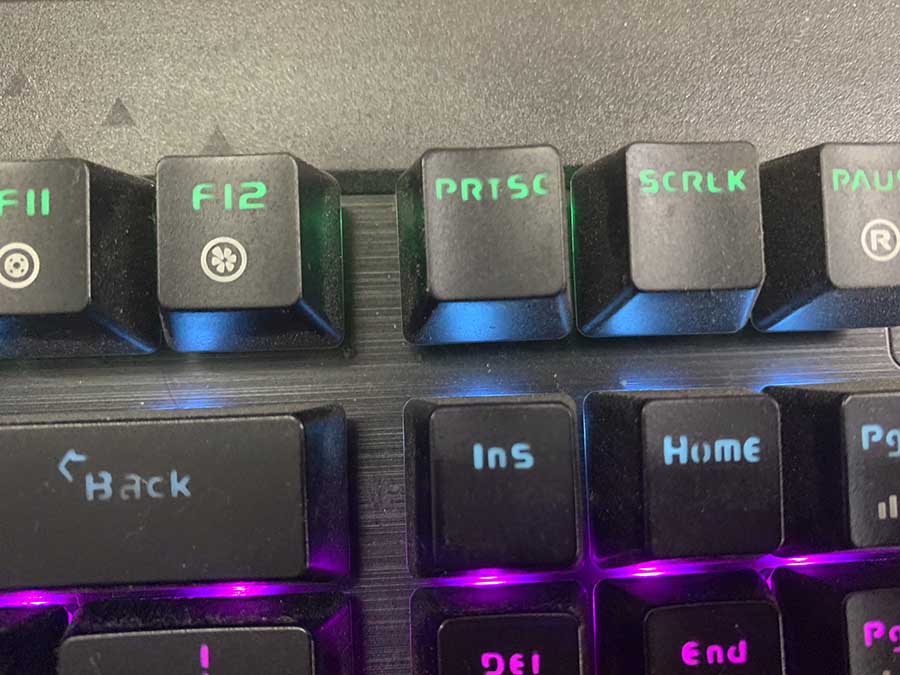
How to take a screenshot on Windows 10 with the PrtScn key
Note: On laptop keyboards, you might need to hold the “Fn” or “Function” key and then press Print Screen.
Here are several PrtScn variations in Windows 10:
- Press PrtScn – A screenshot of your entire screen is copied to the clipboard. Open a document editing app or photo editing app (such as Microsoft Word or the Paint app). Press Ctrl + V or select Edit > Paste to paste the screenshot wherever you like.
- Press the Windows logo key + PrtScn – This saves your screenshot as an image file. You can find it in a folder entitled “Screenshots”, inside your default “Pictures” folder. On some laptops, you may need to press the “Windows logo key + Fn + PrtScn” or “Windows logo key + Ctrl + PrtScn” keys instead.
- Press “Alt + PrtScn” – This copies the active window to the clipboard, which you can paste into another program. On some keyboards (particularly laptops), you might need to press the “Alt + Fn + PrtScn” keys instead. Check out how to use function keys without pressing Fn in Windows 10.
- Press the Windows logo key + Shift + S – Your screen will occur grayed out and your mouse pointer will change. You can click and drag to select a piece of the screen to capture. The screenshot will be copied to your clipboard, which you can paste it in any program by pressing Ctrl + V or choosing Edit > Paste. Note that this only works if you have the latest version of Windows 10 installed, called the Windows 10 Creators Update.
Method 2. Use the built-in Snipping Tool
Snipping Tool is a Microsoft Windows screenshot utility included in Windows Vista and later. It can take still screenshots of an open window, a free-form area, rectangular areas, or the entire screen and save it as an image file without first pasting the screenshot into another program.
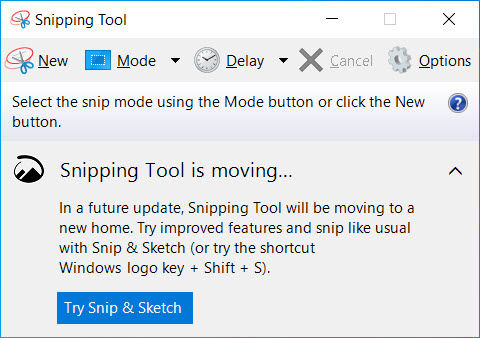
1. Open the Snipping Tool. To do that, type Snipping Tool in the search box on your desktop, and select Snipping Tool in the list of results.
2. In the Mode drop down, select the kind of screenshot shape you want – you can select anything from rectangular to a free-form shape to full screen.
3. Click New on Snipping Tool panel. You can then click and drag your mouse across the region you want to capture, then release your mouse button. The screenshot will then display in the Snipping Tool window.
4. Click Save Snip to save and then select the location to save your screenshots.
Method 3. Use the Game Bar in Windows 10
Game Bar is a software program included with Windows 10 that allows you to take screenshots and broadcast and record video games. Here’s how to use it:
1. Launch the Xbox app that came with Windows 10. Navigate to its settings. Under “Game DVR”, toggle “Take screenshots using Game DVR”.
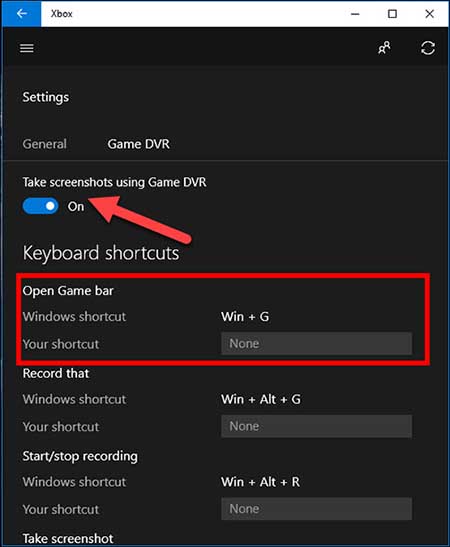
How to take a screenshot on Windows 10 with the Game Bar
2. While playing the game, press the Windows logo key + G. The Game Bar overlay should occur on top of games.
3. You can use the keyboard shortcut: Windows logo key + Alt + PrtScn, or click the camera icon to take a screenshot. You will see the screenshot appear as a .PNG file in “C:\Users\[your username]\Videos\Captures”.
If you’re playing a game on Steam, you can also press F12 on your keyboard to take a screenshot. It will be added to your screenshots folder on Steam.
Method 4. How to take a screenshot on Windows 10 with Snagit
If you don’t mind spending money, Snagit by Techsmith is a screenshot program that makes taking screenshots quickly and easily, has tons of features that allow you to take region snapshots, target specific windows, and even capture the full text of scrolling windows. Here are take a screenshot on Windows 10 PC, follow these steps below:
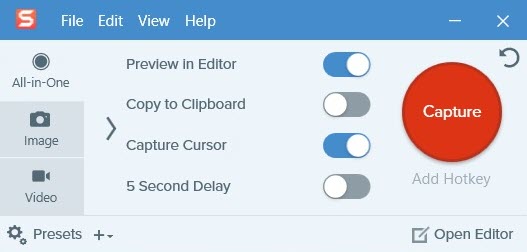
1. First, download and install Snagit on your Windows 10 PC. You can download Snagit for Windows 10 from this site.
2. Open Snagit.
3. After that, select the camera icon to take a screenshot of your screen.
4. Now, select the part of the screen you want to screenshot.
5. Your desktop image will be visible in the Snagit application. You can annotate, edit, copy, resize and save the clipped image from there.
6. Save your screenshot to wherever you want in your Windows 10 PC.
You can download Snagit from this site.
Hope this post helps in taking a screenshot on your Windows 10 PC.
See more:
VIDEO TUTORIAL: How to take a screenshot on a PC or Laptop in Windows 10
Hope something helps you
Related Posts:
") How to Mirror iPhone to Windows 11 for Free (3 Best Methods)
How to Mirror iPhone to Windows 11 for Free (3 Best Methods) How to Change the Boot Screen Logo on Windows 10/11
3 Methods to Extend C Drive in Windows 11/10 (Easily)
 How to Download and Install iTunes on Windows 11
 How to Burn Music Videos Onto a DVD Disc
 & Mac OS") Download CamHiPro For PC (Windows 11/10) & Mac OS
Download CamHiPro For PC (Windows 11/10) & Mac OS
