In this article, we will show you five ways to open Snipping Tool in Windows 10.
Let me explain first what is Snipping tool?
Snipping Tool is a Microsoft Windows screenshot utility included in Windows Vista and later. It can take still screenshots of an open window, rectangular areas, a free-form area, or the entire screen. Snips can then be annotated using a mouse or a tablet, stored as an image file or an MHTML file, or e-mailed.
How can you launch the snipping tool on Windows 10? Where can you find the Snipping Tool in Windows 10? This tutorial will guide you 5 quick ways to launch Snipping Tool in Windows 10.
You can download Screenshot Snipping Tool from here.
How To Open Snipping Tool in Windows 10
First, to the question “Where is the Snipping Tool located?”, the snipping tool program lies in your C drive, go to the path This PC > Local Disk (C:)> Windows> System32 and then find the snipping tool exe application. Here are the methods to run the snipping tool:
1. Open Snipping Tool from Start Menu
Click on the Start button. From the Start Menu, select All apps, select Windows Accessories and then click Snipping Tool.
2. Open Snipping Tool by searching.
To open Snipping Tool, click on the Start button, type “snipping tool” and then click “Snipping Tool” in the search results.
3. Open Snipping Tool from Run
Press Windows Key + R to open the run dialog box. Type “snippingtool” and click OK.
4. Open Snipping Tool from Command Prompt
Open Command Prompt, type “snippingtool.exe” and press Enter.
5. Open Snipping Tool from Windows PowerShell
Start Windows PowerShell, type “snippingtool” and press Enter.
How to create a shortcut of Snipping Tool in Windows 10 computer
1. Right-tap blank area, select New > select Shortcut from the sub-items.
2. Enter snippingtool or snippingtool.exe, and click Next in the Create Shortcut window.
3. Click Finish to have the shortcut created.
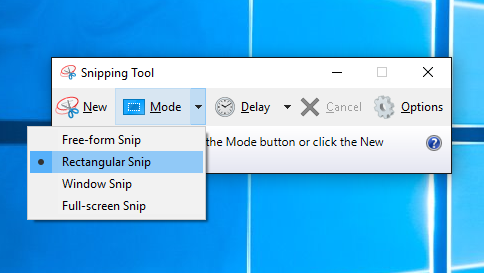
How to snip in Windows 10
After launching the snipping tool, you can click the icon behind New option and then get the drop menu: Full-screen Snip, Free-from Snip, Windows Snip, Rectangular Snip. You can select the one you wish and then click the New button. Moving on, you can use your mouse to select the area that you want to capture.
After that, you can edit the screenshot with the tools in snipping tool. You can also save the screenshot as JPEG, PNG, GIF or Single file HTML.
Hope something helps you.
Related Posts:
3 Methods to Extend C Drive in Windows 11/10 (Easily)
 & Mac OS") Download CamHiPro For PC (Windows 11/10) & Mac OS
Download CamHiPro For PC (Windows 11/10) & Mac OS How to Download and Install iTunes on Windows 11
How to Delete All Partitions Windows 11/10
") How to Mirror iPhone to Windows 11 for Free (3 Best Methods)
How to Mirror iPhone to Windows 11 for Free (3 Best Methods) & Mac OS For Free") Download AVSS For PC (Windows 11/10) & Mac OS For Free
Download AVSS For PC (Windows 11/10) & Mac OS For Free
