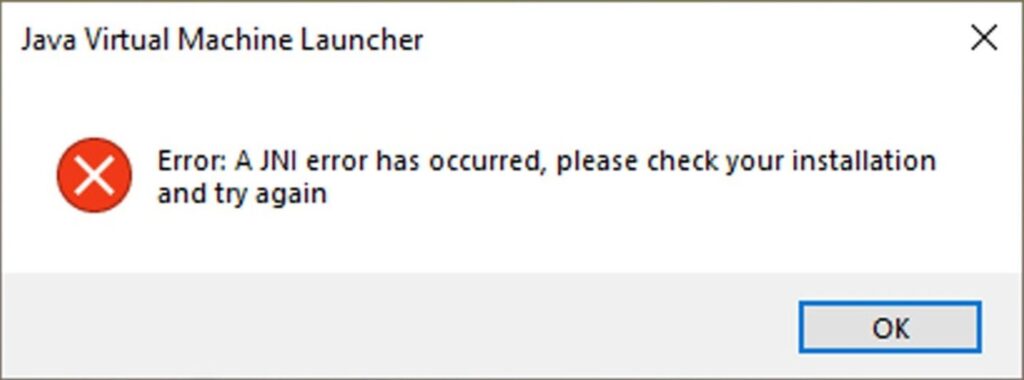
When some Minecraft players try to start the client (game) or the server (.jar), they get an error. “A JNI error has occurred, please check your installation and try again” says the error notice. This issue is most commonly reported in Minecraft versions 21w19a and newer, and it has been proven to happen on Windows 7, Windows 8.1, Windows 10, and Windows 11.
As it happens, there are several reasons why certain users may receive this problem when attempting to open Minecraft, and almost all of them are due to the Java installation.
The following are some of the most frequent causes of the “A JNI error has occurred, please check your installation and try again” message:
1. Java 16 JDK is missing – If you get this issue when trying to run Minecraft build 21w19 or newer, the first thing you should do is make sure your PC has the Java 16 JDK installation. This is the most common cause of this problem while trying to launch Minecraft on a PC. If you don’t have the Java 16 JDK installed on your machine, you can get it from the official sources.
2. Broken System Path for Java – Another causes you might encounter this error is if the system variable path for java is corrupted, tricking the Minecraft launcher into thinking Java isn’t installed on your PC when it is. If this is your case, you should be able to resolve the problem by removing the broken system PATH variable from the Environment variables.
Install the latest Java JDK version
When you try to run Minecraft or a Minecraft server on a PC that doesn’t have Java 16 or newer installed, you’ll get this error. Keep in mind that, as of Minecraft build 21w19, you’ll need Java 16 JDK installed on your PC to play the game; otherwise, it won’t start.
Simply update your current Java JDK to the latest edition available via official channels to resolve this issue.
Follow the instructions below for a step-by-step guide on how to achieve this:
1. Before proceeding to the following step, make sure the Minecraft launcher (Tlauncher or anything else) is entirely closed.
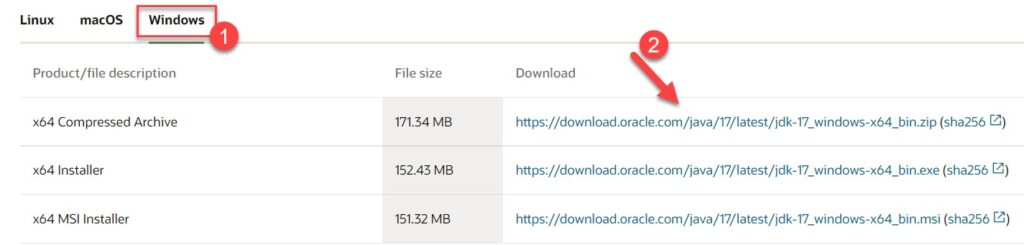
2. Open your default browser and go to the download page of the Java 15 Development kit.
3. When inside, select the Windows tab, then scroll down to the Windows x64 Compressed archive and click the related Download hyperlink.
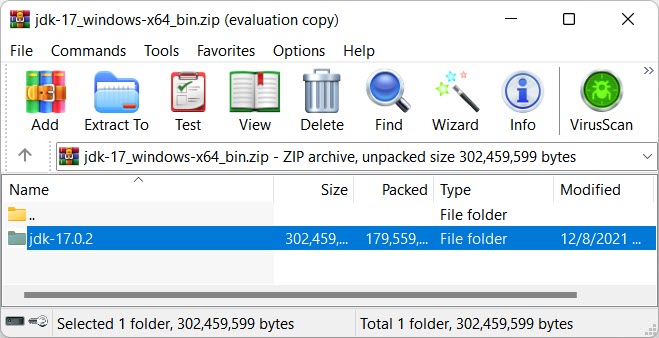
4. Wait for the download to finish before unzipping the zip archive with WinZip, WinRar, 7Zip, or the built-in equivalent and waiting for the operation to finish.
5. When the extraction process is finished, go to the location where you extracted the JDK and right-click on it and select Copy from the context menu to copy it to your clipboard.
6. Next, go to the below directory in File Explorer (My Computer) and paste the JDK 16 folder that you previously copied:
C:\Program Files\Java
8. Close the window and double-click on your Minecraft launcher once more time after the copying process is done (TLauncher or anything else).
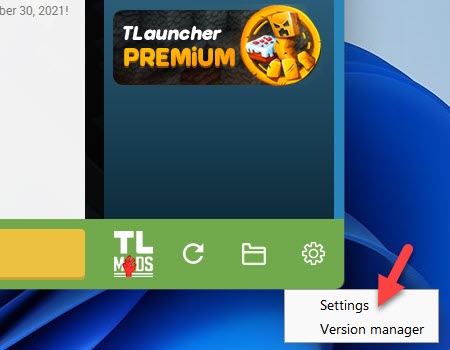
9. Click on the settings icon once within the launcher, then select Settings from the context menu.
10. Make sure the Minecraft Settings option is chosen at the top of the Settings menu, then click the Browse button next to the Java path.
11. Next, travel to the mentioned location using the browse window:
C:\Program Files\Java\jdk-16.0.2\bin
12. Before clicking the Open button, make sure that javaw.exe is chosen.
13. Finally, save the java path in your Minecraft launcher by clicking the Save option.
14. If you restart the game normally, the problem should be resolved.
If the problem persists, proceed to the next possible solution below.
PRO TIP: If the problem is with your computer or laptop/notebook, use Restoro Repair to scan the repositories and repair any damaged or absent files. This works in the vast majority of cases where the problem is caused by a system flaw. Download Restoro here.
Remove the broken System Path variable for Java
If the first method does not work for you, the next item you should look at is a possible broken Java system variable.
A broken variable may be the deciding element in convincing your Minecraft launcher that the Java JDK needed for the game is not installed when it is.
In this scenario, you can remedy the problem by going to the System Properties page and changing the Environment variables to remove the Java PATH environment.
This workaround has been confirmed to work for a large number of Minecraft players who are getting the message “A JNI error has occurred, please check your installation and try again” while launching the game from a specialized launcher.
For a step-by-step approach to removing the damaged Java JDK path variable, see the steps below:
Note: The steps below should work on any current version of Windows, including Windows 7, Windows 8.1, Windows 10, and Windows 11.
1. To launch the Run dialog box, hit Windows + R. To open the System Properties window, write ‘sysdm.cpl’ into the text box and hit Enter.
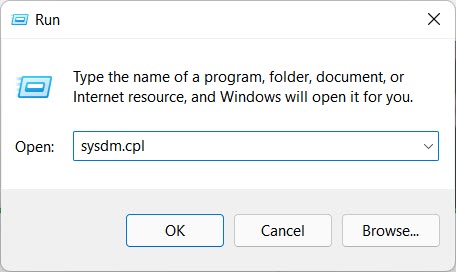
Note: If the User Account Control box appears, select Yes to grant admin access.
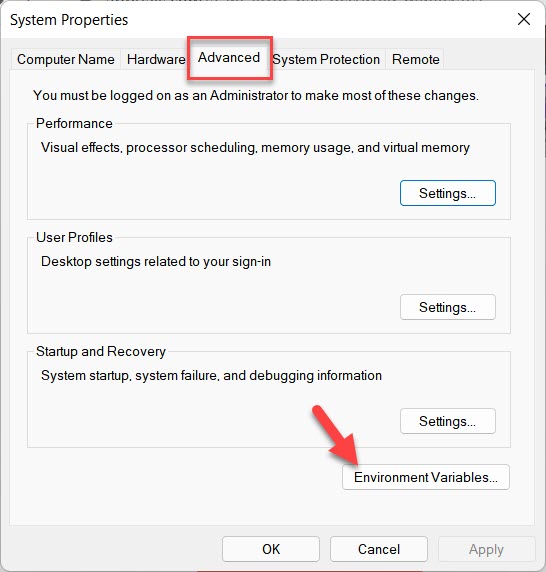
2. When you’ve arrived at the System Properties box, select the Advanced tab, then Environment variables (under Startup and Recovery).
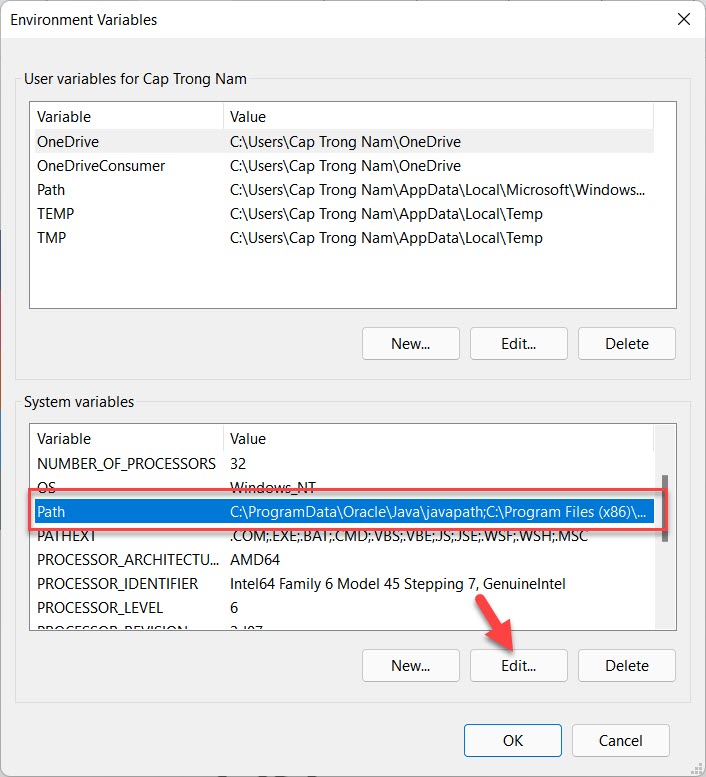
3. Go to System Variables, then Path, and then Edit once you’re within the System Variables box.
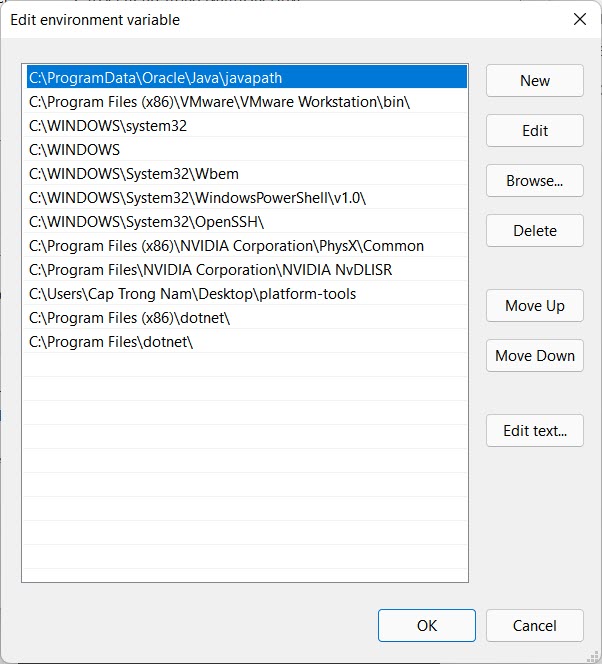
4. Next, while you’re in the Edit environment variable window, search for an environment variable that includes the word java.
5. Once you’ve found the perpetrator, select it with a single click, then Delete it.
6. Reboot your PC after deleting the faulty environment variable, then restart Minecraft to see whether the “A JNI error has occurred, please check your installation and try again” problem has been resolved.
Check this video for more help:
That’s about it.
![How to Configure Proxy Settings on Android Devices [FREE]](https://windows10freeapps.com/wp-content/uploads/2024/12/setting-up-a-proxy-for-a-wi-fi-network-1-150x150.jpeg "How to Configure Proxy Settings on Android Devices [FREE]")


 & Mac OS")
