In this tutorial, learn how to disable Quick access from File Explorer in Windows 10.
In Windows 10, Microsoft is adding a lot of changes to File Explorer. More there, the new icons, listing new drives outside of “This PC“, and a few new user interface tweaks, the company is replacing the “Favorites listing” in favor of the new “Quick access”.
Quick Access is a new feature in Windows 10 File Explorer navigation pane and it helps you by listing links of the most frequently accessed folders and files. This content is grouped by “Recent files” and “Frequent folders“, and by default, settings can show up to twenty files and ten folders.
This tutorial will go through the steps to remove Quick access from the navigation pane in File Explorer.
Read more: How To Disable The “Quick Access” Shortcuts in Google Drive
How To Disable Quick access In Windows 10
Step 1. Set File Explorer to access “This PC”
1. To begin, open File Explorer.
2. Click View > click Options to open “Folder Options“.
3. Go to the “General” tab, change “Open File Explorer” as “This PC“.
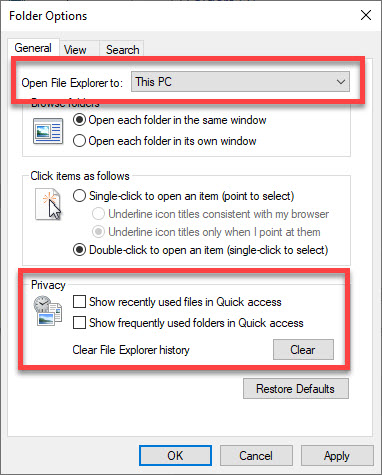
Disabling Quick access doesn’t clear the File Explorer history, as such this is a good time to disable Show frequently used folders in Quick access and Show recently used files in Quick access. Click on the “Clear” button to delete the File Explorer history.
4. Click Apply > OK to save changes.
Step 2. Give the local administrator accounts full control over ShellFolder
1. Press Windows Key + R then type regedit in Run dialog box to open Registry Editor. Click OK.

2. In the left pane of Registry Editor window, go to the following registry key:
HKEY_CLASSES_ROOT\CLSID{679f85cb-0220-4080-b29b-5540cc05aab6}
3. After that, you need to change the permissions of ShellFolder, find and right-click ShellFolder, click Permissions > click the Advanced button.
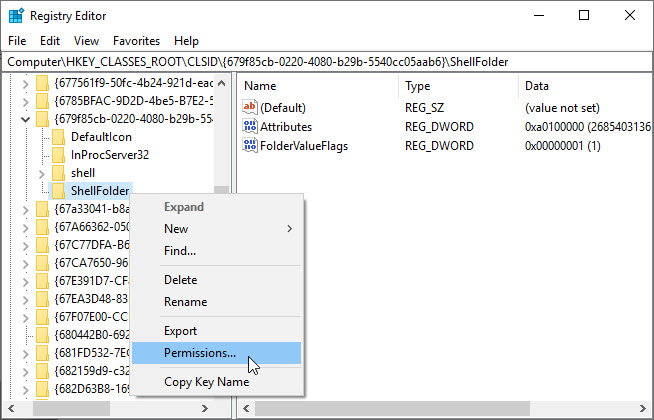
4. At the top of Advanced Security Settings for ShellFolder, change the ownership of the folder to “Administrators“. To do so, click Change > click Advanced > click the Find Now button, and select “Administrators” from “search results”.
5. Hit OK, OK again, then Apply, click OK, and click OK one last time to close the ShellFolder Permissions box.
If you have been trying to delete or modify some registry files through regedit but everytime you try to either delete the entire file, or adjust its value you get the following errors:
“Cannot edit <filenamehere>: Error writing value’s new contents.”This post will help you.
Step 3. Change the settings to disable quick access from File Explorer
1. Inside “ShellFolder“, double-click Attributes, and set data value from a0100000 as a0600000. Click OK to save changes.
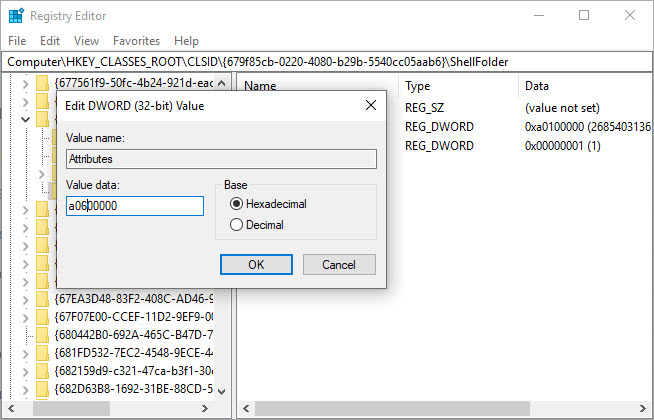
2. Restart your Windows 10.
After restarting your PC, try to open the File Explorer, then you shouldn’t see Quick access on the navigation pane anymore.
VIDEO TUTORIAL: How to disable Quick access on Windows 10
If you want to enable Quick access again, simply follow Step 3 again and set the data on Attributes from a0600000 as a0100000.
Hope something helps you.

 & Mac OS")

 & Mac OS For Free")
