In Windows 10, System Restore did not complete successfully? There are a variety of causes for this issue, but the result is always the same:
You won’t be able to restore your system to a previous state, regardless of whatever restore point you choose.
You don’t need to contact a technician just yet. Simply follow the steps outlined below.
Firstly, to deal with this, clean boot your computer, and if you’re not sure how to do that, we’re here to help.
To fix various PC problems, we recommend Restoro PC Repair Tool:
We recommend Restoro PC Repair Tool to address a variety of PC issues. This software will fix widespread computer faults, protect you from file loss, malware, and hardware failure, and optimize your PC to run at its best. In three simple actions, you can immediately fix PC problems and eradicate viruses:
- Download Restoro PC Repair Tool with Patented Technologies (patent available here).
- Click on Start Scan to figure out Windows issues that are responsible for PC problems.
- Press Repair All to repair problems impacting your computer’s security and efficiency level.
Windows is a fantastic operating system that has progressed significantly over the years, either by resolving known flaws or by introducing new features to keep up with technological advancements.
Even the best investments are not without flaws, and Windows is no exception.
Many customers have experienced problems with System Restore, which affects all versions of the operating system, including Windows 10.
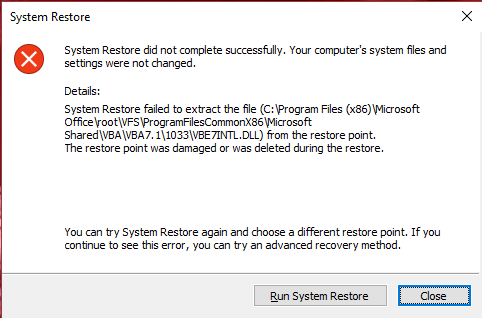
The full error message tells that the System Restore did not complete successfully. Your computer’s system files were not changed.
Even though the System Restore function has been much improved over the years, some unlucky customers have reported various issues with it.
According to the affected customers, the fundamental issue is that System Restore does not complete no matter which restores point is selected.
Now, we are trying to figure out the solution to the System Restore not working problem.
How To Fix “System Restore Did Not Complete Successfully. Your Computer’s System Files and Settings” Error
- Keep the computer in a clean boot status and check
- Run the System Restore in the Safe Mode and check the issue status
- Perform System Restore from Advanced Options screen
- Fix System Restore issues caused by specific errors
This is how this user’s issue sounds, and if it sounds like yours, keep reading for some possible solutions:
I have attempted to run the system restore on my Windows 8.1 PC, but it always fails, regardless of which restore point is picked. System Restore did not complete successfully, according to the warning displayed.
There were no alterations made to system files and settings on your device. Details:
The file(C:WindowsWinStoreAppxSignature.p7x) from the restoration point was not extracted by System Restore.
During the restoration, the restore point was either destroyed or removed. You can try System Restore once more, this time selecting a different restore point. If the issue persists, you can try a more complicated recovery approach. Is there any way to fix this problem so that I may continue with the system restore?
Method 1. Keep the computer in a clean boot status
This is how to do a clean boot manually:
1. Sign in with a profile that has administrator permissions.
2. To access the Run menu, use the Windows key + R on your keyboard.
3. After that, to open the System Configuration window, type msconfig and press Enter.
4. Check the box next to Hide all Microsoft services on the Services tab.
5. Disable everything by clicking Disable all.
6. After that, go to the Startup tab and choose Open Task Manager.
7. In the Task Manager window, go to the Startup tab and Disable each program.
8. Restart your computer after closing all open windows.
This is, without a doubt, just one method of carrying out the desired activity. You can also use the Windows Recovery Environment, the Microsoft sign-in page, or the Settings app to start your computer.
Method 2. Run the System Restore in the Safe Mode and check the issue status
1. Click on the Power button in the Start Menu.
2. Hold Shift and press the Restart button.
3. Choose to Troubleshoot > Advanced options > Startup Settings and Restart when your device restarts.
4. After that, hit the F5 key and select Safe Mode with Networking.
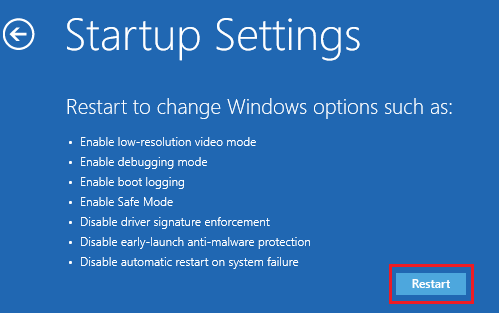
5. After entering Safe Mode, attempt to run System Restore.
If you want to learn more about this matter, go to Windows Startup Settings, which includes Safe Mode.
Method 3. Perform System Restore from Advanced Options screen
1. A black screen with gray writing stating: Press any key to boot from CD or DVD will show up when you have done booting your computer using Windows DVD or System Repair Disc.
2. Press any key you like.
3. The upcoming screen will look like this: Choose your keyboard layout screen.
4. Choose a suitable time zone and keyboard layout.
5. Select Repair your computer in the lower-left corner.
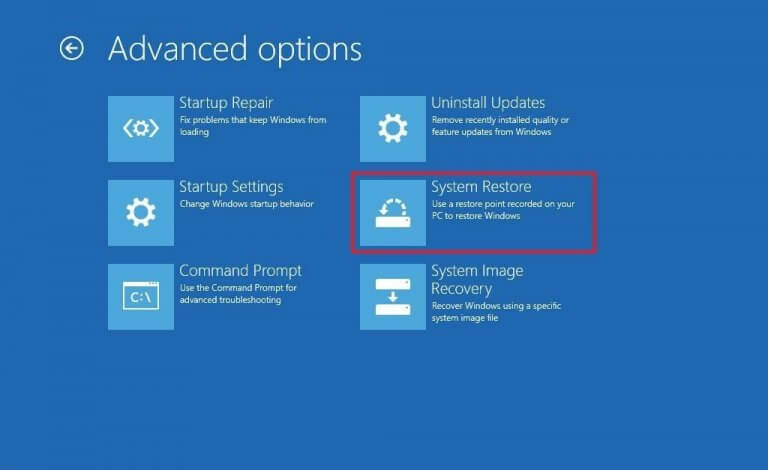
6. Go to Troubleshoot from the Choose an option screen.
7. After that, go to Advanced options in Troubleshoot screen.
8. Finally, click System Restore.
Check to see whether the fault persists after performing a System Restore. If that’s the case, you might want to look at some more detailed solutions for each possible problem code.
4. Fix System Restore issues caused by specific errors
You might encounter System Restore issues as well due to a variety of faults and we’ll teach you the way to fix some of the more common ones.
So, if this option doesn’t seem to work, check to see if System Restore is turned on on your computer.
Here’s how to verify the status of System Restore:
1. To open the Run menu, press Windows Key + R.
2. Once it’s open, type gpedit.msc into the command prompt.
3. Navigate to Computer Configuration -> Administrative Templates in the left pane.
4. Then go to System and click on Restore System.
5. Check the status of the following two options: Configuration and System Restore settings.
6. If they aren’t already set to Not Configured, double-click each one and change it.
7. To save your changes, click Apply and OK.
If you still get this issue after finishing this step, make sure you follow all of the recommendations in our extensive guide.
If the solutions listed above don’t work, we recommend looking into other system components that could be causing the error.
First and foremost, make sure your antivirus isn’t doing this. Running an SFC scan is one method that may help you isolate the source of the problem.
Follow these steps to run a system file checker scan:
1. Click on the Start menu, type in “cmd” in the search box. From the list of options, right click Command Prompt and select Run as Administrator.
2. Enter the following command in the new window that appears and press Enter:
sfc/scannow
3. Restart your device.
If it’s not the case, you might run into this issue due to errors 0x80070091 and 0x800700b7.
These are some of the most effective solutions for swiftly resolving the system restore failed to finish the successful problem.
In this video, we are gonna show you how to fix the “System Restore did not complete successfully. Your computer’s system files were not changed.” error in Windows 10:
Have you given at least one of the suggestions in our guide a go? Perhaps you’re aware of any alternative workarounds that could assist in resolving this issue?

![How to Configure Proxy Settings on Android Devices [FREE]](https://windows10freeapps.com/wp-content/uploads/2024/12/setting-up-a-proxy-for-a-wi-fi-network-1-150x150.jpeg "How to Configure Proxy Settings on Android Devices [FREE]")

 & Mac OS")

