If you’re unable to run the CHKDSK command on a partition using the command line, and you received Cannot open volume for direct access, here is how to fix it.
Check Disk or CHKDSK is a utility built inside the Windows operating systems that work to maintain the integrity of the disk connected to a computer. It can be launched both via Command line as well as via Graphical User Interface. With the help of this repair tool, you are able to repair corrupted USB drive, Micro SD card or external hard drive. However, when you use it to schedule a disk check, you may get the “cannot open the volume for direct access” error message. This problem may happen in Windows 10, Windows 8/8.1, Windows 7 or any other Windows version and prevent you from fixing the corrupted USB, SD card or external hard drive.
Cannot open volume for direct access.
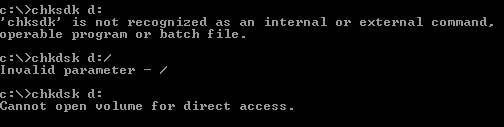
When one wants to run the Chkdsk command on a partition, you receive the following error messages:
C:\WINDOWS\system32>chkdsk /f f:
The type of the file system is NTFS. Volume label is 0529357401.C:\WINDOWS\system32>chkdsk /f g:
Cannot open volume for direct access.
Here’s what to do if CHKDSK cannot open volume for direct access
Solution 1. Disable application Service
The first method is to disable the Service. To do that, follow these steps below:
1. Press Windows Key + R then type services.msc in the Run dialog box and click OK to open Windows Services Manager.
2. In the Services(Local) list, scroll to find the respective service (i.e. the disk monitor tool or virus checker).
3. Right-click on that particular service and select Properties.
4. Change the Startup type to Disabled for any 3rd-party applications which might be causing the Chkdsk lock problem.
5. Click OK/Apply.
6. Restart your computer.
Make sure to enable the service back when the disk check is complete.
Solution 2. Run CHKDSK at Boot time
1. To begin, boot your computer to Safe Mode.
2. Run Command Prompt as an Administrator, execute the following command:
chkdsk /x /f /r
3. Have your computer rebooted normally and it will run CHKDSK on Startup.
Reboot your computer normally and it will run CHKDSK on Startup.
Solution 3. Perform a Hard Drive Self Test from the BIOS
1. First, turn off the computer and wait 10 seconds.
2. Press the Power button to start the computer, and then access the BIOS Setup menu.
Read more: How to enter BIOS in Windows 10
2. Use the Left Arrow and Right Arrow keys to navigate through the menu selection to locate the Primary Hard Drive Self Test option.
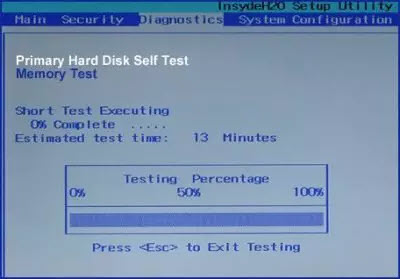
Run Primary Hard Disk Self Test
Notes: Depending on your BIOS, it might differ but would imply the same.
3. Select Primary Hard Drive Self Test and press the Enter key to start the test.
3. Let the test complete and boot your computer normally.
This should fix your issues.
Solution 4. Use free ChkDsk alternative software and Puran Utilities
You can use free ChkDsk alternative software or Puran Utilities to scan hard disks for errors and see if that helps you.
CHKDSK Alternatives and Similar Software:
- EaseUS Partition Master Free
- AbelsSoft CheckDrive
- HDDScan
- Windows Surface Scanner
- HD Tune
- Macrorit Disk Scanner
Solution 5. Check hard drive’s health
You can make use of the WMIC utility in Windows Command Prompt to check the status of hard drive’s health and check if your hard drive has any issues resulting in the Cannot open volume for direct access error.
Solution 6. Disable/Uninstall Drive Locking Feature
In the software that is causing the issue, look for any feature which tracks disk changes. We would recommend you disable that feature and then perform the check disk command.
Solution 7. Disable various restrictions on the hard drive
If your hard drive is restricted or encrypted to be performed operations on, you can attempt to disable the BitLocker encryption, and that should fix your problems.
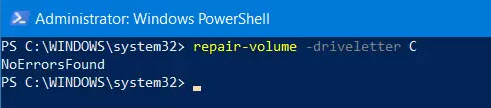
Solution 8. Use Repair-Volume for Windows Powershell
1. Click on the Start menu and type “Powershell“. Then right-click on Windows PowerShell in the result and select Run as administrator.
2. When the Powershell window opens, type in the following command to run Repair-Volume and then press Enter.
repair-volume -driveletter <DRIVE LETTER>
3. Wait for the process to finish and check if the scanning and repairing problem is fixed or not.
VIDEO TUTORIAL:
Hope something helps you.

")

 & Mac OS")
