Zoom is a well-known video conferencing service with web, desktop, and smartphone apps. Thousands of individuals use Zoom Meetings to join meetings remotely every day. Users may, however, encounter Zoom Meeting connection difficulties when attempting to access the services. Zoom may display numerous error codes or warn that your connection is unreliable on the screen. Zoom services will shut down in the first situation, with an Error message display that includes a specific code, such as 5003. You’ll have video or audio buffering issues, as well as frequent disconnects, in the second situation.
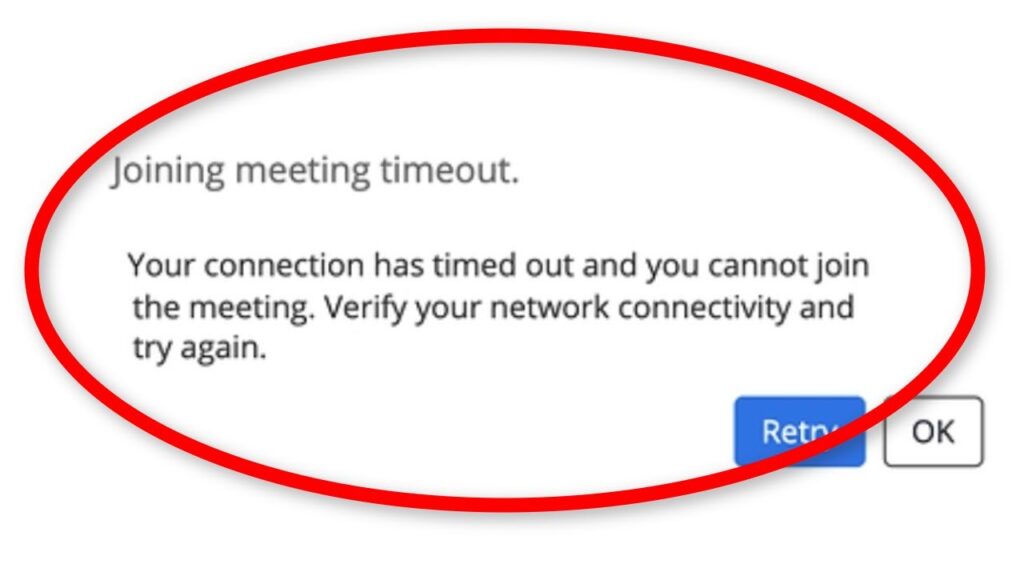
In addition to the initial instance of error codes, customers have recently reported on the Zoom support forums that they are unable to attend meetings owing to a peculiar network connection fault with no error code. “Your connection has run out and you are unable to join the meeting”, states the error message. As mentioned in the error notification above, “verify your internet access and try again”. Now, let’s dig right into the sources of this mistake so we can get to the bottom of it.
What Causes Zoom Meetings Network Connection Error?
Network difficulties or security software limiting the connection are the most common causes of Zoom meeting connection troubles. The following are the most common causes of this problem:
1. Wi-Fi Range: You’re too far away from the Wi-Fi router, causing signal drops while you’re trying to connect to the conference. Zoom tries to maintain the connection, but owing to repeated connections and Wi-Fi disconnection, the error under consideration may occur.
2. Outdated Public IP Address: If two devices on your network have the same IP address, or if your router doesn’t have an up-to-date public IP address, your connection may be broken. This will eventually result in the error in question.
3. ISPs Infrastructure Issues: There are certain short-term ISP (Intrusion Prevention System) infrastructure concerns that could lead to the issue at hand. These concerns frequently arise when protocol failures are discovered.
4. Peer Issues: Zoom servers have peering issues. Peering is a means of connecting and exchanging traffic between two networks without having to pay a third party to transport it across the Internet. This error is most likely to occur when your device is unable to connect to the Zoom server’s peers.
Pre-requisites:
Before attempting substantial fixes, the following workarounds have been suggested to help you quickly resolve the issue. Even if these solutions do not fix your problem, they are still useful for cleaning up certain cut corners. The following are some of the workarounds:
1. To begin, verify your internet speed to see if it is sufficient for Zoom video conferencing. To avoid network connectivity issues, you’ll need at least 2 Mbps upload and 2 Mbps download, as advised by the Official Zoom Support team.
2. If possible, go closer to the Wi-Fi router or utilize a wired Ethernet connection. If no alternative connections are available, move around until you find better cellular service.
3. Restart your modem, router, and the Zoom-enabled device (computer, smartphone, etc.). If your router’s firmware is available, you should update it because it will improve your router software integration.
4. Check to see if your ISP is experiencing any problems. You can do so by going to their official support or communications page, which includes Twitter, Facebook, and other social media platforms.
5. If you have two or more Internet connections, use them all at once. You probably have cellular data on your smartphone, so you may use a third-party application to integrate it with your home Internet.
6. A third-party app might sometimes cause the antivirus solution installed on your computer to prevent outbound connections. To fix the problem, briefly turn off your antivirus, open the Zoom client, and see if the connection works.
How to Fix ‘Your connection has timed out and you cannot join the meeting’ Zoom Meeting Timeout Error on Windows 11/10?
Solution 1: Clear DNS Server Cache and Winsock Catalog
Network connectivity problems are frequently caused by expired IP addresses or other issues with a computer’s current IP address lease. This eventually leads to the situation in question (as already stated in causes). This problem should now be resolved by renegotiating an IP address lease with the DHCP server and restarting Winsock to remove any possible socket faults. This will allow Windows to maintain a steady connection to the DNS Server, and the problem will be resolved. This solution proved to be beneficial to a large number of consumers on the internet. To fix this problem, follow the steps below:
1. Click Start, type Command Prompt into the search box, then select Run as administrator. This will start Command Prompt with administrative rights, which is used in Windows for automation and control.
2. Press Enter after copying and pasting the following command into the command prompt.
ipconfig/flushdns
This instructs your DHCP client to renegotiate an IP address lease with your router’s DHCP server.
3. Copy and paste the following command into the command prompt, then hit Enter.
Netsh winsock reset
This will rescue the computer from any possible socket issues that may occur when downloading unknown files or when the machine is infected with a malicious script.
4. Restart your computer. This is done because changing files while they are being used by the operating system or other applications is impossible. Furthermore, restarting the computer will allow Windows to take in the changes that have been done to the system.
5. Connect to your scheduled meetings by using Zoom. You will no longer receive the mistake that was being considered. If this does not resolve your issue, your DNS Server Settings are either old or corrupted, and they must be properly updated. Proceed to our ultimate solution, which is listed below.
Solution 2: Configure DNS Server Settings
DNS servers convert domain names into IP addresses that are understandable to machines. You’re most likely utilizing a DNS server provided by your ISP (Internet Service Provider), which is of uncertain quality. Switching to a third-party DNS service can improve your internet experience while also protecting you from DNS-based assaults. Because you’re having trouble with Zoom Meetings Timeout, switching your DNS settings to the OpenDNS servers will be a safe, reversible, and helpful configuration change that will cure your problem without affecting your machine or network. To fix the connection error, follow the instructions below:
PRO TIP: If the issue is with your computer or a laptop/notebook you should try using Restoro Repair which can scan the repositories and replace corrupt and missing files. This works in most cases, where the issue is originated due to a system corruption. You can download Restoro by Clicking Here
1. Click Start, type Control Panel into the search box, then select it. This will launch Control Panel, which is a central location for all user-based settings on your Windows operating system, such as System and Security, Programs, Network, and Internet, and so on.
2. Select Network and Internet from the drop-down menu. This will open a new window with all network and internet settings, such as Network and Sharing Center, Internet Options, and so on.
3. Select Network and Sharing Center from the drop-down menu. This will open a window with many options linked to the category, such as basic network information, adaptor settings, media streaming options, and so on. Select Change Adapter Settings from the left tab. This will open a window with all available adapters, such as LAN, WAN, and so on.
You have two options now: an Ethernet connection or a Wi-Fi connection. Depending on whether you’re connecting to the internet by Ethernet or Wi-Fi, the solution stages will vary. The following contains a list of the steps:
Wi-Fi Adapter:
1. Right-click Wi-Fi and choose Properties from the drop-down menu. A popup window with several Network & Sharing tabs and related options will emerge.
2. Select Internet Protocol Version 4 (TCP/IPv4) and open its Properties under the Networking tab. This will open a new window with several IPv4 configuration options. Version 4 of the Internet Protocol (IPv4) is the fourth version of the protocol (IP). On the Internet and other packet-switched networks, it is one of the essential protocols of standards-based inter-networking systems.
3. Select the Use the following DNS server addresses under the General tab. Type 8.8.8.8 in a Preferred DNS server and 4.4.4.4 in an Alternate DNS server in the following DNS server addresses. This is Google’s public DNS server, which will assist you in resolving the Zoom Meeting Timeout problem.
Note: DNS effectively converts what you write in the address bar into a computer-readable format (and vice versa). For example, if you write example.com into the address bar, your DNS will convert it to 93.184.
4. To close the Wi-Fi adapter properties window, click OK and then Close. The adjustments you’ve made will be saved as well.
Ethernet Adapter:
1. Right-click Ethernet and choose Properties from the drop-down menu. A popup window with several Network & Sharing tabs and related options will emerge.
Note: If multiple Ethernet adapters are available, use the one you’re presently using for an internet connection.
2. Select Internet Protocol Version 4 (TCP/IPv4) and open its Properties under the Networking tab. This will open a new window with several IPv4 configuration options. Version 4 of the Internet Protocol (IPv4) is the fourth version of the protocol (IP). On the Internet and other packet-switched networks, it is one of the essential protocols of standards-based internetworking technologies.
3. Select the Use the following DNS server addresses under the General tab. Type 8.8.8.8 in a Preferred DNS server and 8.8.4.4 in an Alternate DNS server in the following DNS server addresses. These are Cloudfare’s public DNS resolver servers, which provide a quick and secure way to browse the internet. Unlike the majority of DNS resolvers, 1.1.1.1 does not sell user data to advertising, unlike most DNS resolvers. As a result, it is extremely secure and safe to use.
4. To close the Ethernet adapter properties window, click OK and then Close. The adjustments you’ve made will be saved as well.
After you’ve finished, restart your computer to save the changes you’ve made. After that, launch Zoom and join your scheduled meetings. You will no longer receive the connection error you were previously experiencing.
In this video, we are gonna show you how to fix ZOOM “Join Meeting Timeout Error. Your Connection Has Timed Out Error” in Windows 11:
That’s about it.

")
![How to Configure Proxy Settings on Android Devices [FREE]](https://windows10freeapps.com/wp-content/uploads/2024/12/setting-up-a-proxy-for-a-wi-fi-network-1-150x150.jpeg "How to Configure Proxy Settings on Android Devices [FREE]")
 & Mac OS")

