This post explains what WSAPPX is in-depth and offers multiple solutions to fix high CPU and memory usage issues caused by WSAPPX in Windows 10.
What is WSAPPX?
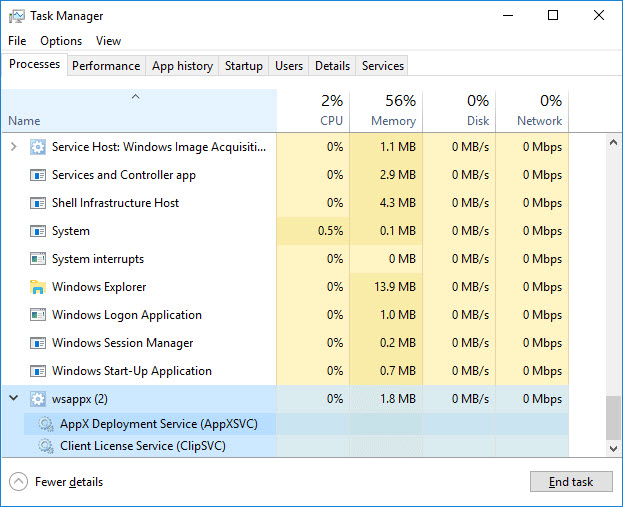
WSAPPX is a process that runs in the background on your Windows 10 computer as the Universal app platform of Microsoft and a part of the Windows Store. It is used for updates, installations, and uninstallation of Store apps, hence once you have finished installing all updates, you don’t need it. If you expand Wsappx in Task Manager, you will probably see a few services running: Windows Store Service (WSService), Client License Service (ClipSVC) or Appx Deployment Service (AppXSVC), as follows.
What is WSAPPX and why is it causing high cpu load?
This process is using high disk, CPU or memory, thus we would recommend you get it disabled to save yourself some CPU or Disk usage.
WSAPPX High Disk Usage – How To Fix WSAPPX High Disk Usage For Windows 10
Wsappx is causing high CPU usage. If you face this problem, this tutorial will show you how to disable WSAPPX and fix the high PCU usage issue on Windows 10?
Solution 1. Increasing Virtual Memory in Windows 10
The virtual memory size may need to be expanded. Here’s how to increase virtual memory on Windows 10:
1. Go to the Start Menu and open Settings.
2. Click on “System” > click on “About“.
3. Navigate to the “Related settings” section, click the “System info” option.
4. Click on the “Advanced system settings” option from the left pane.
5. Go to the Advanced tab, click on the “Settings” button under the “Performance” section.
6. Go to the Advanced tab, click on the “Change…” button under the “Virtual memory” section.
7. Uncheck the “Automatically manage paging files size for all drives” option.
8. Choose the drive where the OS is installed and select the “Custom size” option.
9. Set the “Initial size” equivalent to the size of your RAM but in MB and the “Maximum size” to double of the Initial size.
10. Click “Set” and then “OK” and then restart your Windows device.
If the issue remains, move on solutions below
Solution 2. Disable Windows Store
You can do this by two ways. First, using the Group Policy Editor. Second, using the Registry Editor. Here are the steps for both ways.
With Group Policy Editor
1. Press Windows Key + R and put gpedit.msc. Click OK or Press Enter. It opens the Local Group Policy Editor. You can refer how to fix “Windows cannot find gpedit.msc” in Windows 10 from this tutorial.
2. Navigate to: Computer Configuration >Administrative Templates >Windows Components >Store
3. Locate the “Turn Off Store application” setting in the right pane.
4. Select “Enable” > “Apply” and then restart your computer.
With Registry Editor
1. On your keyboard, press the Windows logo key + R at the same time, and then type in regedit and click OK.
2. Go to HKEY_LOCAL_MACHINE\SOFTWARE\Policies\Microsoft\WindowsStore key.
3. In the Windows Store key, you will have to create a new DWORD value. Name it RemoveWindowsStore and set the value as “1“. If the WindowsStore key does not exist itself, you need to create it.
4. Restart your Windows 10 PC
When you disable Windows Store, third-party Windows Store apps cannot be updated and installed. If you attempt to launch the Windows Store app now, the screen will pop up the message:
Windows Store isn’t available on this PC. Contact your system administrator for more information.
Apps like Movies & TV, Photos, Mail, OneNote, and Calculator need this app for automatic updates thus if you need those frequent updates, we wouldn’t recommend you disable this feature.
You may also like: How to disable Windows Store in Windows 10
Solution 3. Change the value of AppXSvc in Registry
1. Open Registry Editor and go to:
HKEY_LOCAL_MACHINE\SYSTEM\ControlSet001\Services\AppXSvc
2. In the right panel, change the value of Start to 4.
3. Restart your computer.
VIDEO TUTORIAL: How to fix high Disk and CPU usage caused by WSAPPX?
Hope something helps you.


 & Mac OS")
")

