SoundVolumeView is a simple tool for Windows 10/11 that displays general information and current volume level for all active sound components on your system, and allows you to mute and unmute them instantly.
SoundVolumeView also allows you to save a sound profile into a file, containing the current volume level and the mute/unmute state of all sound components, as well as the default sound devices, and then later, load the same file to restore exactly the same volume levels and settings.
There is also extensive command-line support, which allows you to save/load profiles, change current volume of every sound component, and mute/unmute every sound component, without displaying any user interface.
Start Using SoundVolumeView
SoundVolumeView does not require any installation or additional dll files. To use it, simply run the executable file, SoundVolumeView.exe.
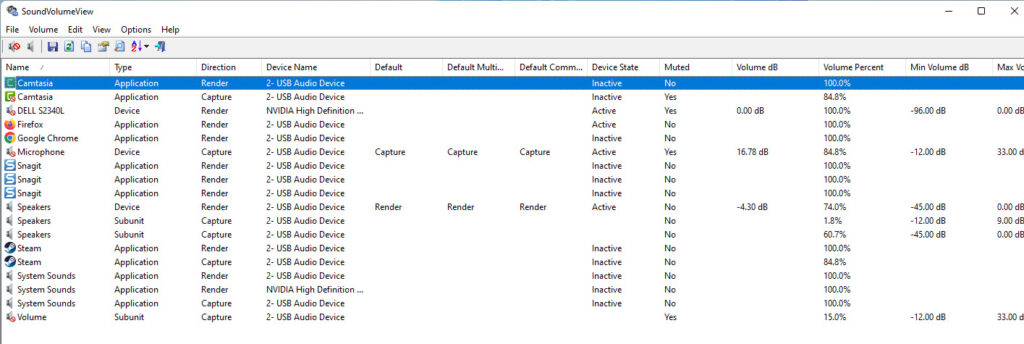
After launching SoundVolumeView, the main window displays all sound items found on your system. There are three types of items: devices, subunits, and application volumes.
The current volume level for each item is shown in percentage units. The volume level of devices and subunits is also displayed in decibels. For subunits, the volume level is displayed for each channel separately.
Increase/Decrease/Mute Volume
In the main window of SoundVolumeView, you can select one or more items and then use accelerator keys to mute, unmute, increase, or decrease the volume of selected items.
- Mute – F7
- Unmute – F8
- Mute/Unmute switch – F9
- Decrease volume 1% – Ctrl+1
- Increase volume 1% – Ctrl+2
- Decrease volume 5% – Ctrl+3
- Increase volume 5% – Ctrl+4
- Decrease volume 10% – Ctrl+5
- Increase volume 10% – Ctrl+6
The Increase/Decrease options can also be applied to specific channels. Select the desired channel from Options -> Selected Channel.
Sound Profiles
SoundVolumeView allows you to save all of your current sound settings as a sound profile filename, which you can then load later to restore these settings.
The sound profile file includes the following information:
- Volume level for all active sound components in your system. (Devices, Subunits, and App Volume) Subunits store the volume level of each channel separately.
- Mute or unmute all of your system’s active sound components. (Devices, Subunits, and App Volume).
- Default render/capture device.
Sound profiles can be saved and loaded via the File menu’s ‘Save Sound Profile’ and ‘Load Sound Profile’ options, as well as the command-line options /SaveProfile and /LoadProfile. There is also a recent menu located under the File menu, which allows you to easily load the last 10 sound profiles you used, as well as the last 5 sound profiles from the tray menu (if the tray icon is turned on).
Be aware that sound profiles are specific to each computer and its devices. A sound profile cannot be saved in one computer and then loaded into another.
Creating Desktop Shortcuts
Starting with version 2.00, you can easily create shortcuts on desktop that will execute one of the following actions: Mute, Unmute, Mute/Unmute Switch, Disable, Enable, Disable/Enable Switch. Set the default device (Console, Multimedia, Communications), increase or decrease volume.
To create the desktop shortcut, simply select the desired item, then navigate to File -> Create Desktop Shortcut and select the action to be performed when the shortcut is activated. The right-click context menu also includes a ‘Create Desktop Shortcut’ submenu.
The following actions are also available for application items: Mute, Unmute, Mute/Unmute Switch, Increase Volume, and Decrease Volume. For example, you can create a ‘Mute/Unmute Switch’ shortcut for the Chrome Web browser that mutes the sound when it is turned on and unmutes it when it is turned off.
After you’ve created the shortcut, right-click on it, select ‘Properties’, and then the desired key combination to activate it.
Translating SoundVolumeView to other languages
To translate SoundVolumeView to another language, follow the instructions below:
To run SoundVolumeView with the /savelangfile parameter, use the following command: SoundVolumeView.exe /savelangfile.
A file named SoundVolumeView_lng.ini will be created in the SoundVolumeView utility folder.
Open the newly created language file in Notepad or any other text editor.
Translate all string entries into the desired language. You can optionally include your name and a link to your website. (TranslatorName and TranslatorURL values). If you enter this information, it will be displayed in the ‘About’ window.
When you finish translating, run SoundVolumeView to load all translated strings from the language file.
If you want to use SoundVolumeView without the translation, simply rename or move the language file to another folder.
Download SoundVolumeView (64-bit)
Download SoundVolumeView (32-bit)

 & Mac OS")

![How to Configure Proxy Settings on Android Devices [FREE]](https://windows10freeapps.com/wp-content/uploads/2024/12/setting-up-a-proxy-for-a-wi-fi-network-1-150x150.jpeg "How to Configure Proxy Settings on Android Devices [FREE]")

")
