The Windows user may get with the error messages “Site’s Server DNS address could not be found” in Google Chrome while trying to open some websites (as www.reddit.com, www.facebook.com, www.youtube.com), fix it here.
This error is caused when the Domain Name Server is not able to translate the website IP address. The Domain Name System (or also known as DNS) is used to convert Internet domain and host names to IP addresses and vice versa. DNS makes sure you will go to the right place when typing a domain name in the web browser address bar. Hence, when you access any websites then the first thing the browser does is contact the DNS Server but sometimes this DNS lookup fails and you get the following error message:
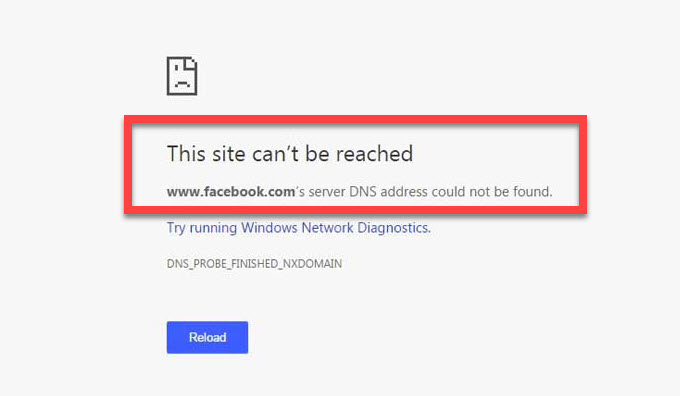
DNS address could not be found – This site can’t be reached – DNS_PROBE_FINISHED_NXDOMAIN
In this tutorial, I am going to look at user-supported methods to this issue happening on Google Chrome.
You may also like: Top 10 Best Free VPN Extensions For Google Chrome
How To Fix ‘This site cannot be reached. Server DNS address could not be found’ error in Chrome
Method 1: Delete files in folder System32/driver/etc
This fix has gained a lot of popularity which suggests that the Windows 10 user should remove all the files in “etc” folder. To do so, you navigate to C:\Windows\System32\drivers\etc. And then delete all the files in your etc folder.
You can now try accessing Youtube, Facebook or Reddit again with Google Chrome and the error is gone.
Method 2: Change Your DNS Server With A Third-Party Provider
Why you get the “Server DNS address could not be found” error. Sometimes, there is an issue with your default DNS server from ISP and then your computer doesn’t respond or can’t be connected thus it can’t match your requested domain name to the right IP address. So, if you are facing this DNS address error, I would recommend you change your DNS Server with a third-party service like OpenDNS or Google’s DNS. This will help to load a website faster, more stable and especially more securely and you will not get any DNS errors anymore.
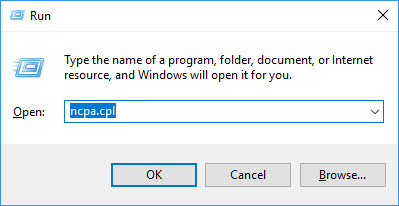
Step 1. Press Windows Key + R then put ncpa.cpl in Run dialog box. Click OK to open Network Connections.
Step 2. In the Network Connections window, you right-click on the connection icon (either Wireless Network Connection or Local Area Connection), then click Properties.

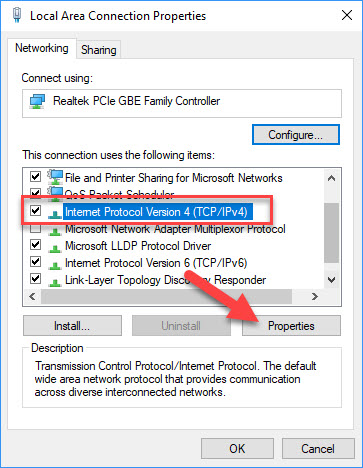
Step 3. Moving on, in the network adapter’s property sheet, you select Internet Protocol Version 4 (TCP/IPv4) then click Properties.
Step 4. Go to the General tab, do one of the following, make sure that Obtain an IP address automatically is selected. And you check the radio button for Use the following DNS server address then type the following server address and click OK:
- The IP addresses of Google’s DNS are as follows: 8.8.8.8/8.8.4.4
- The IP addresses of OpenDNS are as follows: 208.67.222.222/208.67.220.220

Step 5. Reboot the machine and check to see if the error is resolved.
Method 3: Clear the Google Chrome DNS cache
If the Chrome DNS cache becomes outdated or corrupt, you may not be able to access any websites. That’s the reason why you get this DNS error, and quite a simple one to fix. This method will show you how to flush and clear DNS cache of Google Chrome in Windows.
Step 1. Open your Chrome browser.
Step 2. In the address bar, enter chrome://net-internals/#dns and tap Enter.
Step 3. Next, click on the Clear host cache button and restart your Chrome browser.
If you have any problems related to DNS servers, this method could help you.
Method 4: Reset IP Configuration and Flush DNS Cache
All DNS entries and the IP addresses of the websites you access are stored in the computer’s cache memory so they open faster the next time you access them. However, if a website has changed its IP address or DNS entry recently, then you have to clean up all outdated entries. Otherwise, it can prevent you from accessing the internet and cause DNS errors. To check if this is what’s causing the “Server DNS address could not be found” error, just reset IP Configuration and flush DNS Cache.
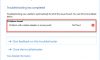
Step 1. Open the Command Prompt program with administrator privilege.
Step 2. In the Command Prompt window, execute all the following commands below, one by one:
ipconfig /flushdns
ipconfig /registerdns
ipconfig /release
ipconfig /renew
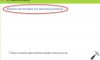
Step 3. Next, execute these next commands:
netsh winsock reset catalog
netsh int ipv4 reset reset.log
netsh int ipv6 reset reset.log
Step 4. Reboot the machine and then check if the issue is resolved.
Check the following video to learn how to fix server DNS address could not be found and dns_probe_finished_bad_config, Site cant be reached:
Method 5. Restart DNS Client Service
If you are still getting the “Server DNS address could not be found” error, you should restart DNS Client Service in Windows Services.
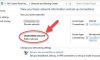
Step 1. Press Windows Key + R then put services.msc in Run dialog box and click OK. This will open the Services Manager.
Step 2. Then, locate the DNS Client service and right-click it and select Restart.
Step 3. After the process is completed, restart your Windows PC.
Hope something helps you. If you have any other DNS address error you can see for the solution on my webiste.


![How to Configure Proxy Settings on Android Devices [FREE]](https://windows10freeapps.com/wp-content/uploads/2024/12/setting-up-a-proxy-for-a-wi-fi-network-1-150x150.jpeg "How to Configure Proxy Settings on Android Devices [FREE]")
")

 & Mac OS")