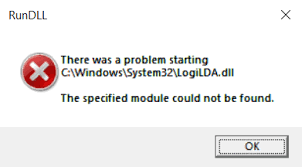
If you use a Logitech device on a Windows PC, such as a mouse, keyboard, or even a headset, you’ve probably encountered the LogiLDA.dll error message at least once. The error will say something along the lines of “There was a problem starting C:\Windows\System32\LogiLDA.dll The specified module could not be found.“
Although there is no specific explanation for why you are receiving this error message, there are a few solutions that you can employ to resolve it. And it’s the subject of this article. We’ll look at how to fix the LogiLDA.dll missing problem in this article. We shall jump straight to the topic without wasting more time.
Reason Behind LogiLDA.dll Missing Error
You may be experiencing LogiLDA.dll issue on your Windows machine for a variety of reasons. However, Logitech Download Assistant may be the major source of the problem. When you connect a Logitech device to your Windows PC, the Logitech Download Assistant is automatically installed. Anything from a Logitech gaming mouse to a Logitech keyboard could start the Logitech Download Assistant installation procedure on your Windows computer.
Logitech Download Assistant searches your computer for any new driver or software update for any Logitech device you have installed. The worst part is that it happens every time you turn on your computer. If you receive a LogiLDA.dll error notice, there are two possible causes.
1. The update was not fully deployed.
2. Because you recently received an update, Logitech Download Assistant starts looking for a file in the wrong directory.
How To Fix LogiLDA.dll Missing Error in Windows 11/10
Error with LogiLDA.dll. It seems highly technical and complicated, right? But don’t panic; resolving this issue on your Windows PC is simple. Simply follow the remedies listed below, and by the end of the article, you will see that the problem has been permanently resolved.
Before we go into the technical remedies, let’s look at some basic fixes for the LogiDLA.dll missing error message.
1. All Logitech devices in this system should be unplugged and reconnected.
2. Check if the problem persists after restarting your Windows machine.
I hope you were able to solve your problem by using these simple workarounds. However, if the problem persists, it’s time to look into technical solutions. So, let’s take a look at each one individually.
Fix 1: Install the Latest Windows Update
Downloading the latest Windows 11 update can fix many flaws and errors that originate in various files, in addition to delivering a fully updated design and increasing overall system efficiency. The LogiLDA.dll problem is in the same boat. The likelihood of the problem being resolved by downloading the most recent Windows update is very high. So, here are the actions you need to take to get the most recent update.
1. By hitting the Windows + I shortcut key, you may access Windows Settings.
2. On the left panel of the screen, select the “Windows Update” option.
3. Click on “Check for updates“.
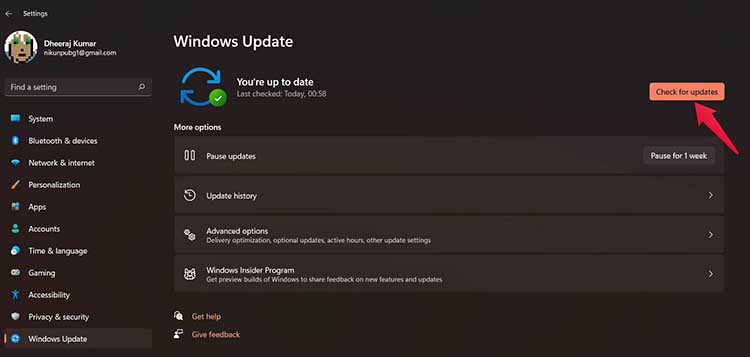
Windows will check to see if any updates are available. If the update is available, download it to fix the missing LogiLDA.dll issue. Now restart your machine and see if the problem persists.
Fix 2: Reinstall Logitech Device Drivers
The LogiLDA.dll error is triggered by any Logitech device installed on your Windows computer, as previously stated. You will need to reinstall any installed Logitech Device Driver as a solution. Let’s imagine you have a Logitech keyboard connected to your Windows computer. So, this will show you how to remove the Logitech keyboard driver from your computer.
1. Click on Start Menu, type “device manager” into the search field and press Enter.
3. The Device Manager window will appear on the screen.
4. By double-clicking on the Keyboard option, you can expand it.
5. Right-click the Logitech keyboard and select Uninstall Device from the menu that appears.
That is all there is to it. You’ve successfully removed the Logitech keyboard from your Windows PC. Restart your computer and reconnect the Logitech keyboard. It will be immediately installed on the machine as you re-plug it.
Fix 3: Disable Automatic Start-up of LogiDA
Disabling LogiDA’s automatic start-up is another efficient technique to remedy the problem you’re experiencing. But keep in mind that removing LogiDA will not address any issues with the Logitech application. In reality, it prevents Logitech Download Assistant from starting on its own, resulting in LogiLDA. Every time the system boots up, there is a dll missing error. Nonetheless, here are the methods to disable LogiDA’s automatic startup on a Windows PC.
1. Press Ctrl + Shift + Esc to open Task Manager on your computer.
2. Select the “Startup” area in the window.
3. It will feature a list of all the programs that have been permitted to start automatically whenever the system is turned on. Select Logitech Download Assistant from the list, then click “Disable” at the bottom of the screen.
You’ve turned off LogiDA’s automatic startup on your Windows PC. Check to see whether you’re still getting the problem message after restarting your computer. Otherwise, you’re good to go. If the problem persists, move on to the next possible solution.
Fix 4: Remove Logitech Application
If the problem remains and you continue to receive a LogiLDA.dll missing error every time you start your computer, you can try removing the Logitech software. To be more specific, you must install Logitech Download Assistant or anything similar to the company’s name. So, these are the actions you must do to uninstall the Logitech software.
1. On your Windows PC, go to the start menu.
2. Type Control Panel into the search field and hit enter.
3. Select “Uninstall a Program” from the drop-down menu.
4. A list of all the programs installed on your Windows PC may be found here.
5. Simply right-click on all of the Logitech programs and select Uninstall.
After that, restart your device to see whether the problem still exists.
Fix 5: Remove Logitech Application from Registry
Removing an application from the registry is a good technique to get rid of any minor faults or problems it may have. So, here are the procedures for uninstalling the Logitech application from the registry.
1. Press Windows + R to the Run dialogue box, then type “regedit” and click OK.
2. Go to the following path:
Computer\HKEY_LOCAL_MACHINE\SOFTWARE\Microsoft\Windows\CurrentVersion\Run
3. On the right panel of the screen, find the ‘Logitech Download Assistant Key.’ Right-click on it and click Delete.
That is all there is to it. Finally, the Logitech application has been removed from the registry. Remember to properly follow the above-mentioned instructions, as administering a register is a difficult undertaking.
In this video, we are gonna show you how to fix LogiLDA.dll missing error on Windows 11/10:
Final Words
We have shown you how to fix the missing LogiLDA.dll problem. Because Logitech and Windows haven’t issued a particular workaround to repair the issue, you may have to go through all of the above-mentioned fixes to get past it. In addition, in the comment section, feel free to offer any other useful fixes to this issue that you know.


")

 & Mac OS")
