Many users have been complaining about a problem regarding BitLocker encryption on Windows 10 computer, mostly, an incompatibility between a drive encrypted on Windows 7 and then used in a Windows 10 machine. If you are facing this problem, then maybe this article will give you the method.
Let me explain first what is BitLocker?
BitLocker is an encryption feature built into computers running Windows 10 Pro, if you’re running Windows 10 Home you will not be able to use BitLocker. BitLocker is designed to protect data by providing encryption for entire volumes. By default, it uses the AES encryption algorithm in cipher block chaining or XTS mode with a 128-bit or 256-bit key.
However, Microsoft’s encryption feature has some problems when installing drives from Windows 7 computers to Windows 10.
For example, you have been using BitLocker on a Windows 7 computer and you want to move your old hard drive into a new Windows 10 computer. When you attempt to access the encrypted partitions, Windows 10 suggests you to disbale BitLocker or does not recognize your password.
BitLocker is an easy method to protect your files, and in this tutorial, we are gonna to cover the following problems:
- Disable BitLocker Windows 10: Turning off BitLocker is quite simple, and the turning off process is almost identical on Windows 10.
- Disable BitLocker using PowerShell or command promt: You can turn off BitLocker with both Command Prompt and PowerShell, and in this tutorial will show you how to do it.
- Disable BitLocker Windows 10 using the Local Group Policy Editor: If you want disable BitLocker with Group policy, this way works for Windows 10.
- Permanently disable BitLocker Windows 10: BitLocker is a built-in feature of Windows, so you can’t remove it. However, you can turn off it and all its related services. By doing so you’ll completely disable BitLocker on your Windows computer.
- Disable BitLocker external hard drive, removable drive, USB encryption, USB drive: BitLocker also works with removable storage and external drive. If you want to remove BitLocker for your USB drive you can do so using any of our methods.
- Disable BitLocker to update BIOS: Some Windows users complained that they are unable to update their BIOS before turning off BitLocker. However, you should be able to disable BitLocker after reading this guide.
Here are the solutions to turn off BitLocker on Windows 10.
How to disable BitLocker in Windows 10
Method 1. Disable BitLocker from Windows 10 Control Panel
1. Click on the Search bar and type Manage BitLocker. Choose the Manage BitLocker from the result.
2. When the BitLocker window opens, you will see all your partitions and you can either choose to suspend BitLocker or permanently disable it.
3. Choose the option you want and then follow the on-screen guide.
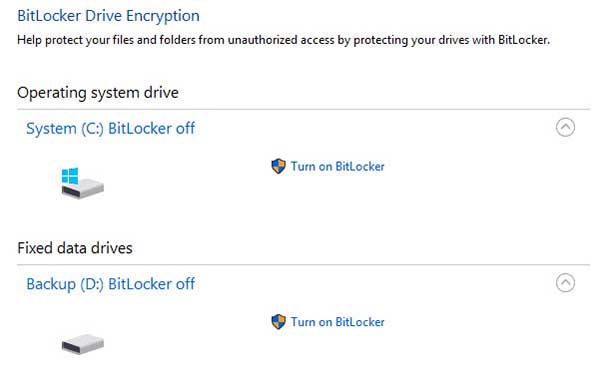
Now BitLocker should be completely disabled for the selected drive.
Method 2. Use Command Prompt
If you’re an advanced user, you can disable BitLocker by using Command Prompt.
1. Start a Command Prompt as administrator. To do that, you can search for “cmd“, right-click on the result, and select “Run as administrator“.
2. In the Command Prompt window, type the follwoing command, and press Enter:
manage-bde -off X:
Notes: Replace X with the actual hard drive letter.
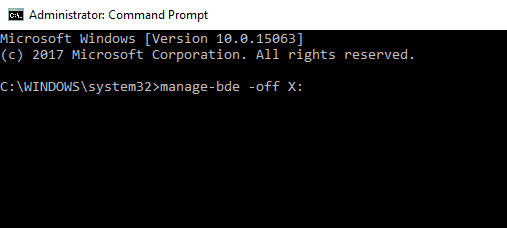
3. Now the decryption process will start. This process can take a while, hence don’t interrupt it.
Once the drive is decrypted, BitLocker will be turned off for your drive and that drive will be unlocked
Method 3. Use PowerShell
You can disable off BitLocker for specific drive simply by using PowerShell.
1. Click Start menu and type “Powershell“. Then right-click on Windows PowerShell in the result and select Run as administrator.
2. In the PowerShell window, type the following command and run it:
Disable-BitLocker -MountPoint “X:”
Notes: Replace X with the letter that represents your hard drive partition.
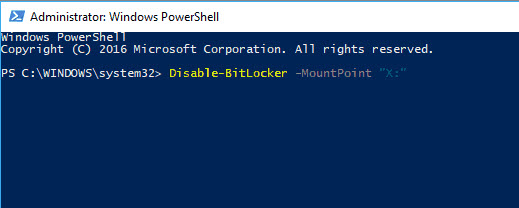
3. The decryption process can take a while, so don’t interrupt it
After the process is complete, BitLocker should be turned off on your device.
You can also disable BitLocker for all drives on your PC via PowerShell. Here are the steps:
– Start PowerShell as administrator.
– Now excute the following commands:
$BLV = Get-BitLockerVolume
Disable-BitLocker -MountPoint $BLV
– By running these two commands, the list of encrypted volumes will show and then decrypt them with a single command.
Method 4. Disable BitLocker Windows 10 Group Policy
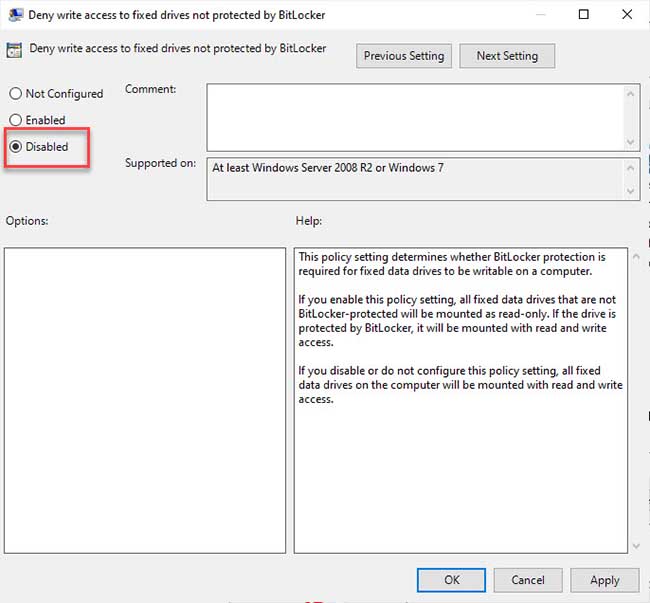
1. Press Windows + R and type “gpedit.msc” in the dialogue box. Click OK.
2. Go to the following path:
Computer Configuration > Administrative Templates > Windows Components > BitLocker Drive Encryption > Fixed Data Drives
3. Find the “Deny write access to fixed drives not protected by BitLocker” setting in the right pane. Double-click to open it.
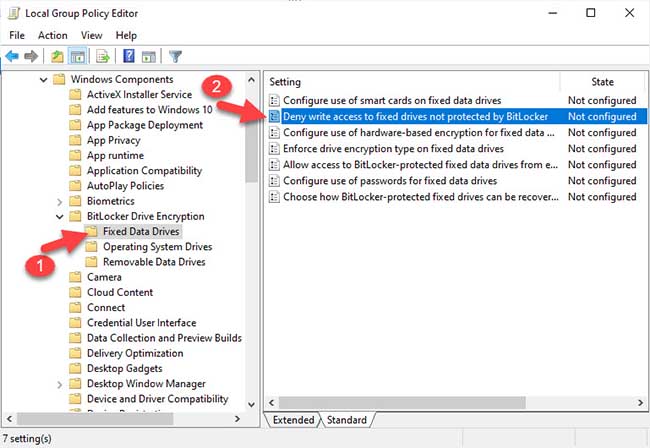
4. Select Disabled or Not Configured. Click on Apply > OK to save changes.
After doing that, restart your computer and the problem should be resolved completely.
Method 5. Disable BitLocker service
If you want to disable BitLocker, you can do that by disabling its service. Here are the steps:
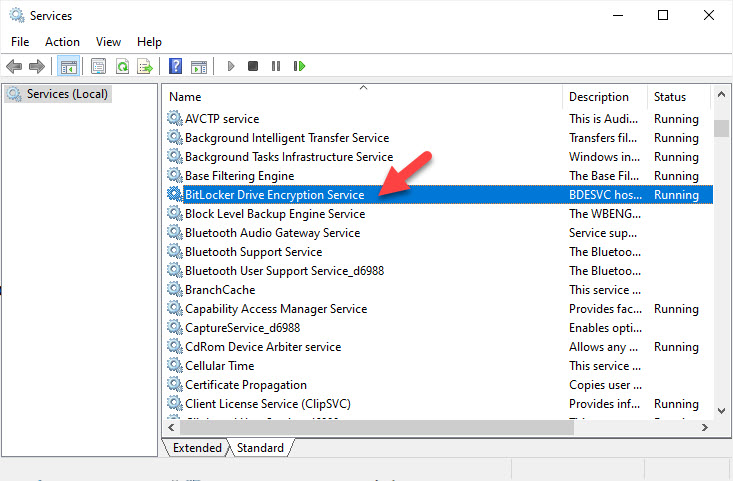
1. Press Windows Key + R then type services.msc in the Run dialog box. Click OK.
2. When Services window opens, find the BitLocker Drive Encryption Service. Double click on it.
3. Set the Startup type to Disabled. Click on Apply > OK to save changes.
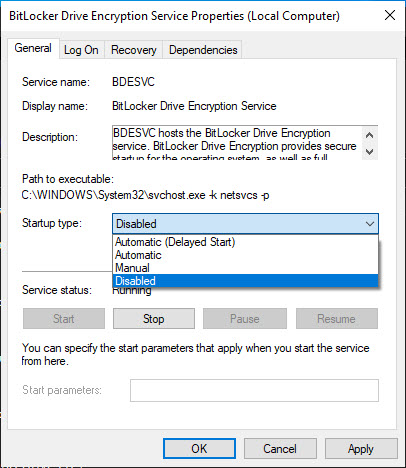
After disabling the BitLocker service, BitLocker will be diabled for that drive.
Method 6. Turn off device encryption via the Settings app
If you want to disable BitLocker, you’ll be pleased to hear that you can do that right from the Settings app.
1. Open the Settings app.
2. When the Settings app opens, go to the System section.
3. In the left pane, click About.
4. After that, go to Device encryption section in the right pane, click on Turn off button.
5. When the confirmation dialog opens, click on Turn off again.
After doing that, BitLocker should be turned off on your Windows 10 computer.
Hope something helps you.


")

