If you want to play Android games and apps on your Windows PC, BlueStacks is the optimal platform. It is often regarded as the greatest Android emulator for Windows. The majority of BlueStacks’ fundamental features are available for free.
However, if you want more control over your Android apps, you may upgrade to the premium account. What sets BlueStacks apart from the competition is that, like Android smartphones, it has the Google Play Store, where you can download your favorite apps.
However, BlueStacks, like anything else on the internet, has its own set of issues. The current crashing of BlueStacks on Windows 11 PC has been a subject of concern for users. In reality, BlueStacks users are reporting two different types of crashes. First, BlueStacks crashes with the notice “unexpected error occurred.” A blue screen of death appears in one example, followed by a total crash in another.
Although there are a variety of causes for the problem, most crashes are caused by faulty software or an old version of the platform. So, if you’re having issues with BlueStacks crashing on Windows 11, this is the place to go. Here, we’ll show you how to fix BlueStacks crashing on your Windows 11 PC using several workarounds. So without wasting your time, we shall begin now.
Reasons Behind BlueStacks’ Crashing on Windows 11
As previously said, there could be a variety of reasons why BlueStacks is crashing on Windows 11. Some of the most popular ones, however, are given below.
- A crashing problem can be exacerbated by a corrupted or outdated version of BlueStacks.
- If you keep the Hyper-V option active on a Windows 11 PC, BlueStacks will crash.
- Antivirus software from third parties, such as Norton and AVG, might function as a barrier between BlueStacks and Windows 11. As a result, you may have to deal with the issue of crashing.
- If you haven’t updated your graphics drivers in a long time, not only BlueStacks, but any graphics-oriented application will fail on Windows 11.
- BlueStacks requires a lot of space to run smoothly. If this information is not provided, you may have a variety of issues with the application, including the possibility of it crashing.
Now that you know what the main causes of BlueStacks crashing are, it’s time to figure out how to solve them.
How to fix BlueStacks Crashing on your Windows 11 PC?
As previously stated, BlueStacks can crash on Windows 11 for a variety of reasons. If you want to get rid of the glue stick scratching problem, you’ll have to fix those issues. So, here are a few remedies to try if BlueStacks keeps crashing on your Windows 11 PC.
Fix 1: Reinstall BlueStacks With Latest Version
An outdated driver, as described under the causes, can function as a trigger for BlueStacks issues, including the crashing issue. If you haven’t updated the BlueStacks application in a long time, you will most likely have the crashing issue. Reinstall BlueStacks with the most recent version as a solution.
Even if you already have the most recent version of BlueStacks, we recommend reinstalling it at least once. Any corrupted files that were causing the problem are removed when you reinstall an application. Regardless, these are the procedures you must take to reinstall BlueStacks on Windows 11’s latest edition.
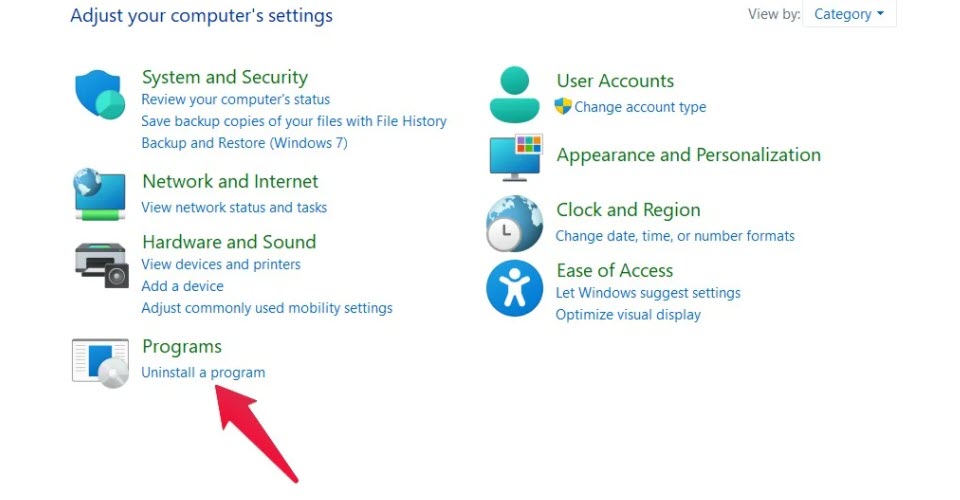
1. To access the start menu, use the Windows key.
2. Type Control Panel into the search field and hit enter.
3. Select “Uninstall a Program” from the drop-down menu.
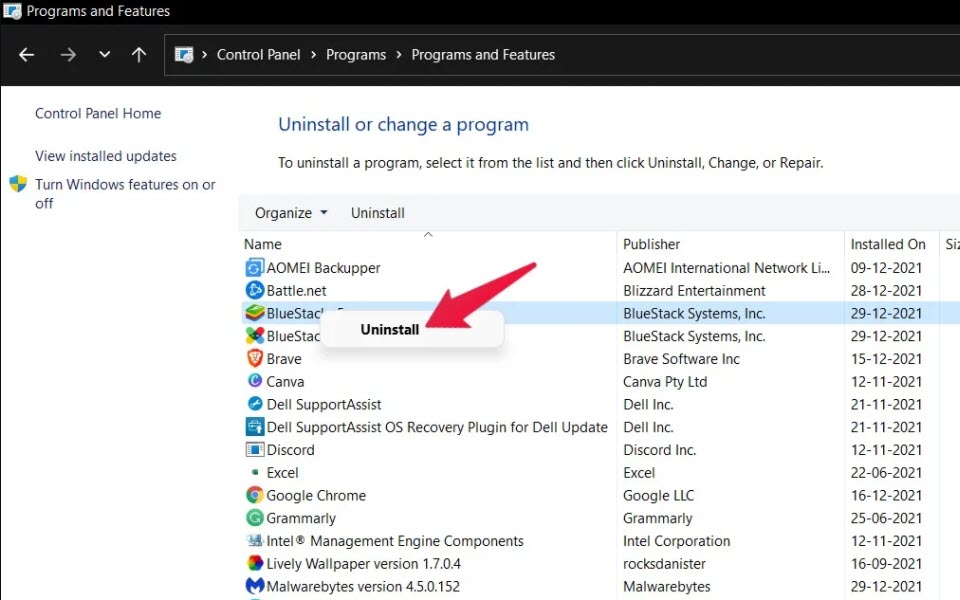
4. A list of all the applications installed on your Windows 11 PC may be found here. Right-click on BlueStacks and click uninstall.
You’ve successfully removed BlueStacks from your Windows 11 computer. It’s now time to get the most recent version, BlueStacks 5. (at the time of writing the article). So, here’s what you’re going to have to do.
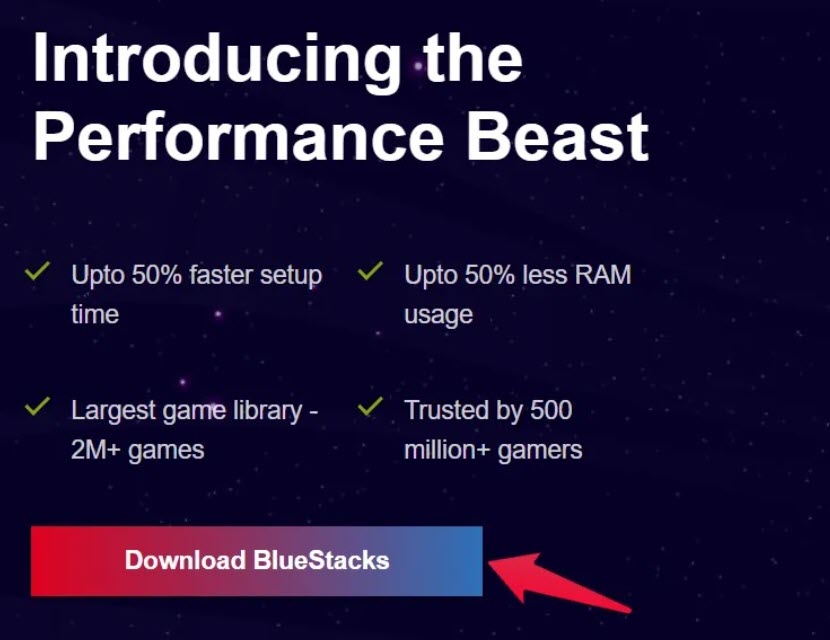
1. To install BlueStacks 5, open Google Chrome and type “BlueStacks 5” into the address bar.
2. Go to the first link, which is the BlueStacks official website.
3. Click on “Download” button.
Install it on your PC after you’ve downloaded it, and see if the BlueStacks crashing problem persists. Otherwise, you’re good to go. If the issue persists, it’s time to delve deeper into the technical components of the workarounds.
Fix 2: Change BlueStacks Settings
Because BlueStacks is a graphics-intensive program, it is only suggested for use on a high-end computer. But what if it crashes on a high-end Windows 11 machine as well?
If this is the case, it means you haven’t set aside enough RAM or CPU cores for the application. BlueStacks’ optimal performance is ensured by the RAM and CPU cores, which immediately eliminates the crashing issue. So, here’s how to make BlueStacks settings work for you.
1. On Windows 11, launch the BlueStacks application.
2. To access the BlueStacks settings menu, press the Ctrl + Shift + I shortcut key.
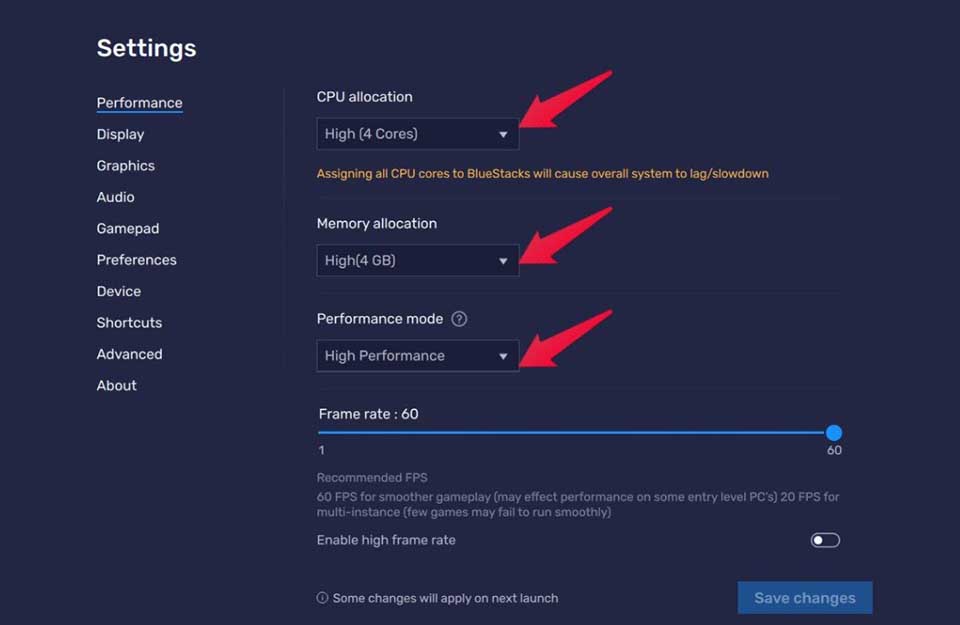
3. Under the “Performance” area, you will now have to adjust several various options.
4. Replace “CPU allocation” with “4 cores.”
5. Activate the “High” RAM allocation option (4GB).
6. Select “High Performance” in the Performance mode.
Now navigate to the “Graphics” section of the preferences.
1. Make that “Performance” and “OpenGL” are selected for the graphics engine mode and renderer, respectively.
2. Change the ASTC textures (Beta) to “Software decoding” and the Interface renderer to “OpenGL.”
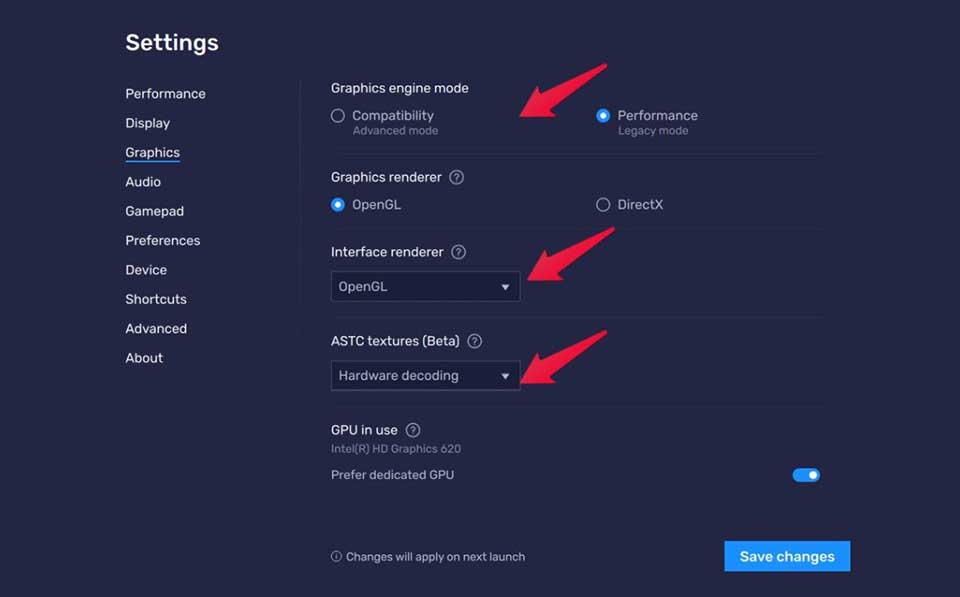
When you’re finished, click “Save Changes.” Restart BlueStacks to determine if the crashing issue persists.
Fix 3: Download the Latest Graphics Engine
BlueStacks on Windows 11 may crash due to an outdated graphics driver. Many users have reported that simply updating the graphics driver cured their BlueStacks crashing issues. If your system has an Nvidia GPU, you can visit Nvidia’s official website and get the update for your GPU model by clicking this link. The same may be said about AMD Ryzen. Simply go to this link to access the official website and download the appropriate update for your model.
But what if you only have a dedicated graphics card with Windows 11? In this instance, you should let Windows choose which update is most beneficial to your PC. So, to find out what you’re required to do, follow the steps outlined below.
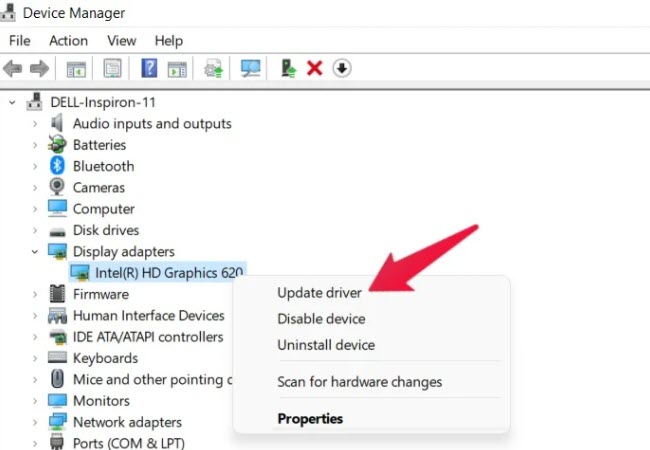
1. To access the Start Menu, use the Windows key.
2. Type “Device Manager” into the search field and hit enter.
3. A window for device management will appear.
4. Double-tapping the “Display Adaptor” option expands it.
5. Select Update Driver from the context menu of the Intel HD Graphics.
6. Finally, select “Search automatically for driver” to begin the update procedure.
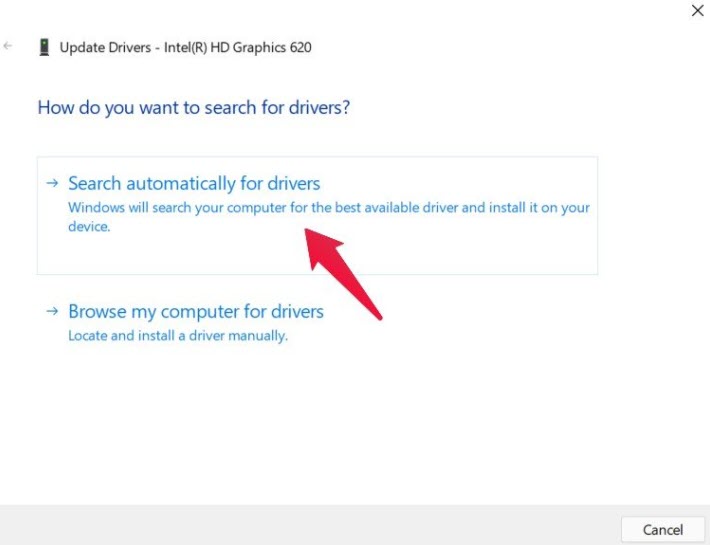
Restart BlueStacks after the update is complete to see if the issue has been resolved. If it doesn’t work, try the next method.
Fix 4: Remove a 3rd-Party Antivirus
BlueStacks and third-party antivirus have a long history of feuding. A third-party antivirus is to blame for the majority of BlueStacks difficulties. Any antivirus product you have installed on your Windows 11 PC, such as Avast, Norton, Malwarebytes, or anything else, can create the problem. If you wish to fix BlueStack’s crashing issue, you’ll need to delete these anti-virus apps.
Please keep in mind that you should only use this method if you believe BlueStacks is more important to you than having an antivirus product installed. As a result, here are the measures you should take.
1. Uninstall a program by going to Control Panel > Uninstall a Program.
2. Right-click any third-party antivirus product that you have installed on your PC in the Progress and Features window. After that, choose to uninstall.
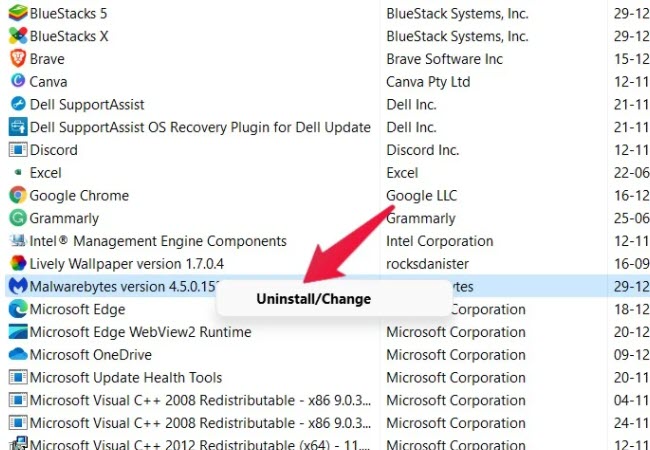
Restart your computer after the uninstallation is complete. Now launch BlueStacks and see if the issue has been resolved.
Fix 5: Turn Off Hyper V Service
If you’ve been using an Android emulator for a while, you’re probably familiar with the Hyper-V service and how it’s responsible for a variety of troubles. One of the best solutions to fix BlueStacks crashing on your Windows 11 PC is to disable Hyper V services. It’s worth mentioning that stopping this service will result in a decrease in system performance. However, the deal appears to be fair, since you’ll have nonstop BlueStacks amusement in exchange for a tiny drop in system speed.
On a Windows 11 PC, there are a few options for turning off the Hyper V service. We’ll show you two techniques so you can choose the one that’s most convenient for you.
1. By tapping the Windows key, you can access the Start menu.
2. Type CMD into the search bar and select open as administrator.
3. Now, type the code below into the space provided and hit enter.
bcdedit /set hypervisorlaunchtype off

The Hyper-V service will be disabled in a few seconds. Let’s have a look at the second option for turning off this service.
1. Uninstall a program by going to Control Panel > Uninstall a Program.
2. Select “Turn Windows features on or off” from the drop-down menu.
3. Now, uncheck “Windows Hyperversion Platform“.
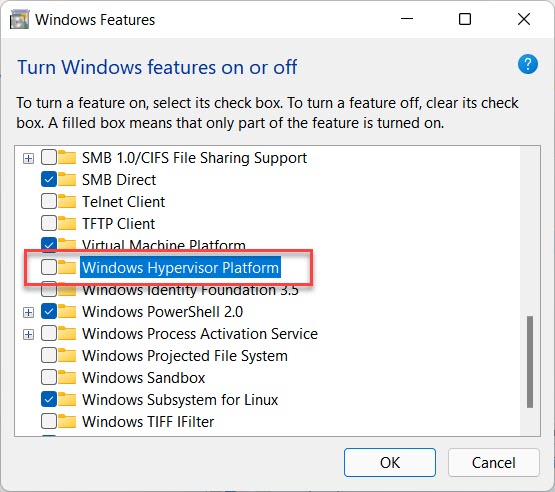
4. Click OK to save changes.
That is all there is to it. On your Windows 11 PC, you’ve finally disabled the Hyper-V service. Restart your computer and restart BlueStacks. You’ll be relieved to learn that BlueStacks is no longer crashing on your Windows 11 computer.
In this video, we are gonna show you how to fix BlueStacks 5 crashing on Windows 11 PC/Laptop
Final Words
These were some of the methods for resolving the BlueStacks crashing on Windows 11 PC issue. Because no particular fix for the crashing issue has been given by Windows or BlueStacks developers, you may have to try all of the workarounds to get rid of it. Regardless, leave a comment to tell us whether or not the methods listed helped you. You can also share any alternative solutions that you believe would be beneficial in this circumstance.
Related Posts:
 The Best VPN Services of 2025
3 Methods to Extend C Drive in Windows 11/10 (Easily)
![How to Configure Proxy Settings on Android Devices [FREE]](https://windows10freeapps.com/wp-content/uploads/2024/12/setting-up-a-proxy-for-a-wi-fi-network-1-150x150.jpeg "How to Configure Proxy Settings on Android Devices [FREE]") How to Configure Proxy Settings on Android Devices [FREE]
How to Configure Proxy Settings on Android Devices [FREE]") How to Mirror iPhone to Windows 11 for Free (3 Best Methods)
How to Mirror iPhone to Windows 11 for Free (3 Best Methods) How to Download and Install iTunes on Windows 11
 & Mac OS For Free") Download AVSS For PC (Windows 11/10) & Mac OS For Free
Download AVSS For PC (Windows 11/10) & Mac OS For Free
