For a variety of reasons, Android apps may malfunction on your Windows 11 PC. Here’s a step-by-step method to resolving the majority of these concerns.
Starting with Windows 11, Windows included native support for running Android apps. Android app compatibility in Windows 11 has vastly enlarged the app portfolio, allowing users to experience their favorite mobile apps on their desktop or laptop computers.
Windows Subsystem for Android, or WSA, is how Windows ensures faultless execution of Android programs. The WSA app is made up of Linux kernels and the Android operating system, which serves as a component layer for Android apps.
Because the technology required to achieve this is rather complicated, there may be instances where Android apps do not work effectively or crash when accessed. Since there are so many co-dependencies, there may be several causes for the problem statement.
Luckily, software-related difficulties are simple to address and cure, and the solutions listed below can be used the next time one of your Android apps becomes unusable due to a problem.
How To Fix Android Apps Not Launching on Windows 11
Android apps not starting is one of the most basic issues you’ll encounter more frequently than you’d like. If this is the case for you, there are a few simple solutions below.
Method 1. Update Windows Subsystem for Android
As previously stated, WSA (Windows Subsystem for Android) is one of the most essential aspects for running Android apps on your PC; it is critical that it is kept up to date in order to do so.
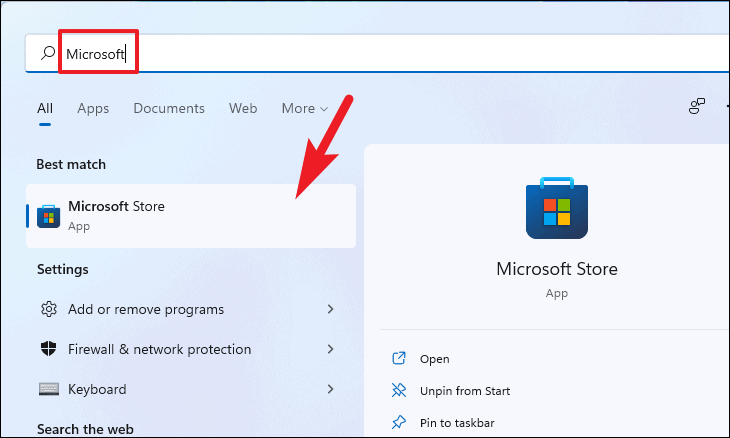
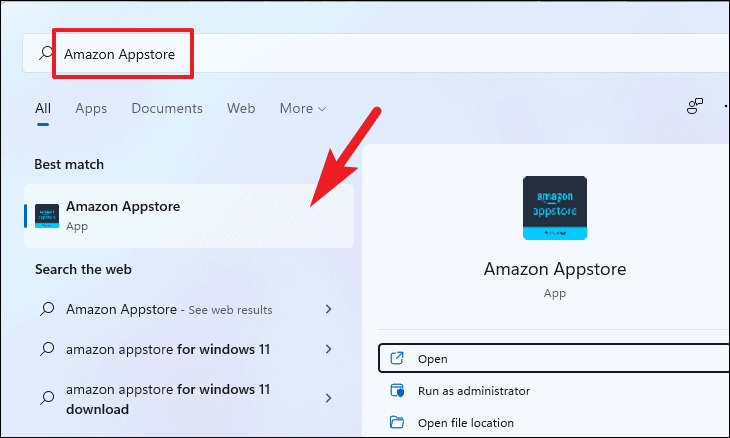
To directly upgrade WSA, go to the Microsoft Store from the Start Menu’s pinned apps grid or by just tying it in the menu.
Then, in the Microsoft Store window, select the ‘Library‘ option in the bottom-left corner.
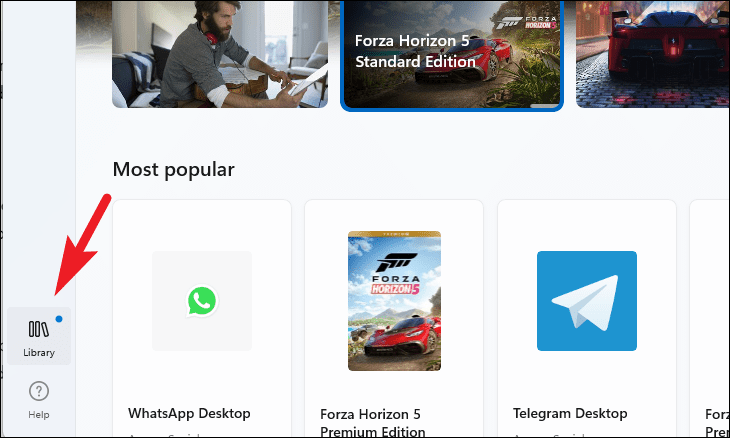
Next, on the ‘Library’ page, you’ll find a list of all the apps that haven’t been updated yet.
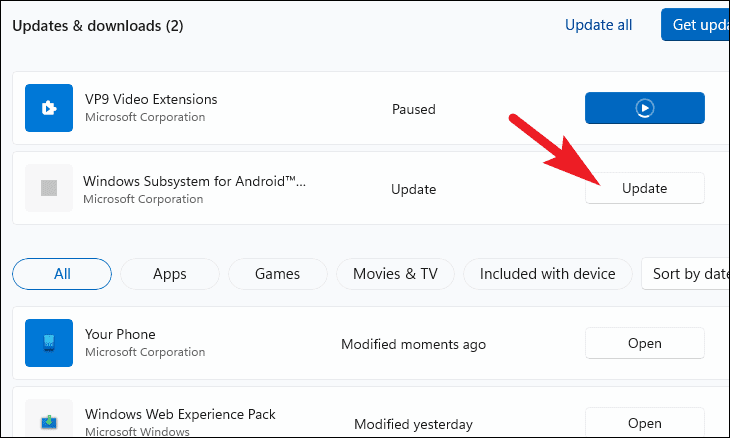
Furthermore, from the list, select ‘Windows Subsystem for Android‘ and click the ‘Update‘ button on the tile’s far-right side.
Once your PC has been updated, restart it from the Start Menu to see if the problem has been repaired.
If the issue you were having was caused by a known bug that developers fixed in the later version, updating WSA could help. If this isn’t the case for you, there are plenty of other possibilities.
Method 2. Restart Windows Subsystem for Android
Restarting Windows Subsystem for Android is one of the most basic things you can perform. Some fundamental issues can be resolved by restarting the app.
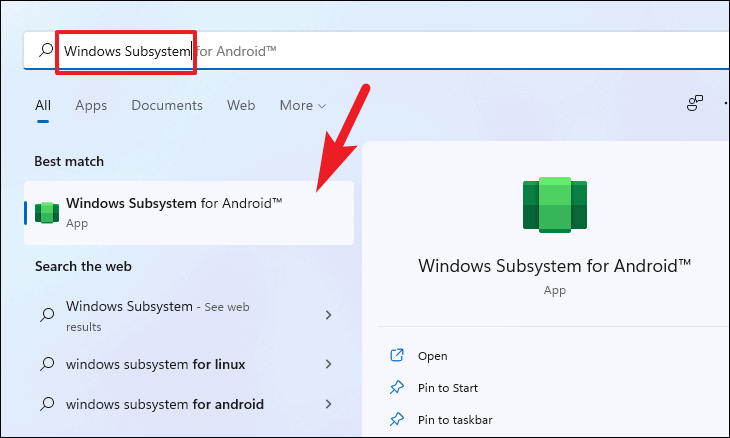
Go to the Start Menu and type “Windows Subsystem” to restart WSA. Then, from the search results, select the ‘Windows Subsystem for Android‘ title.
Next, in the WSA window, find the ‘Turn off Windows Subsystem for Android’ tile and select the ‘Turn off‘ button on the far right side. When you run an Android app again, this will close any current open Android apps on your device, as well as WSA, and restart it.
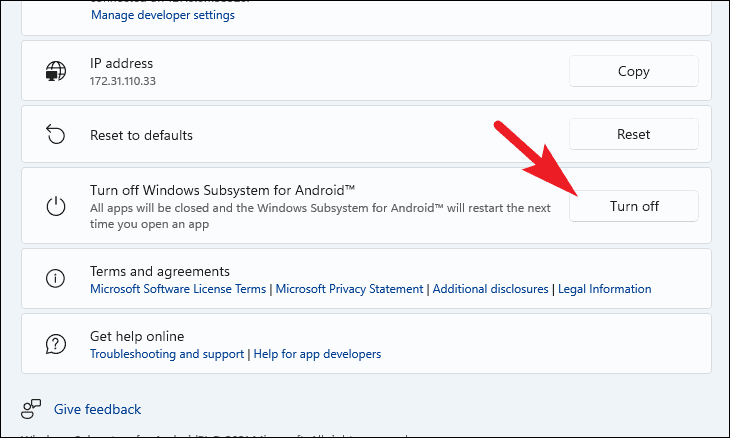
It should also fix any problems caused by app cache data or preemptive scheduling. If this strategy didn’t work for you, move on to the next one.
Method 3. Restart your Windows 11 PC
If you’re one of those folks who never turn the computer off, rebooting it might be the solution. Many logical systems of the computer are under tremendous stress as a result of constant operation, and restarting them may help you resolve problems.
Restarting your computer is simple: go to the Start Menu and select the ‘Power’ option. To restart the computer, select the ‘Restart’ option from the expanded menu. To avoid data loss, remember to save any unsaved files or tasks before restarting your PC.
Method 4. Reinstall Windows Subsystem for Android on your PC
If none of the other options work, you can delete and then reinstall the WSA software on your computer as a final resort. Using Windows Terminal is the fastest method to uninstall and reinstall WSA on your PC.
To reinstall WSA, open the Windows Terminal by choosing it from the Start Menu’s pinned programs or writing it directly into the menu.
By default, Windows Terminal opens a PowerShell window; in that window, enter the following command and press Enter on your keyboard.
winget uninstall “Windows Subsystem for AndroidTM”
When the progress has been completed and the app has been removed, enter the command below and press Enter on your keyboard once more. The current version and name of the program will be displayed in a list format.
winget search “Windows Subsystem for AndroidTM”
Then, on your keyboard, type the command listed below and press Enter. This will start the WSA installation procedure on your computer.
winget install “Windows Subsystem for AndroidTM”
In this video, we are gonna show you how to fix Android apps not working on Windows 11:
Android Apps Open But Don’t Work
The second most typical problem is that the app starts up normally but doesn’t display anything, doesn’t record any input or one of the functions is broken. In any event, the situation necessitates your urgent help, and the following are some short treatments for it.
Installed App could be Incompatible
With the extra benefit of sideloading Android apps, you’ll be able to try out some of your favorite apps on your Windows computer even if they’re not currently available in any approved store.
Though it will be as simple to install as any other Android app, its behavior and usefulness will remain a surprise until you run it. There may be a situation when you have tried all of the suggested remedies, but the app is still not answering.
If you ever find yourself in this situation, remember that the WSA program or even your computer can always be correct, but the individual app is to blame.
Regrettably, there is no way to patch a mismatched app on your PC, but with Windows increasing its Android app portfolio, users can download incompatible apps soon.
Update the Android App
Because you are on an older version that is not yet optimized, updating the app can rule out the potential of a new Windows update conflicting with it. If you got the app through the Amazon Appstore, all you have to do now is go to the store and update it.
But, if you’ve sideloaded an app, the procedure will take a little longer than usual.
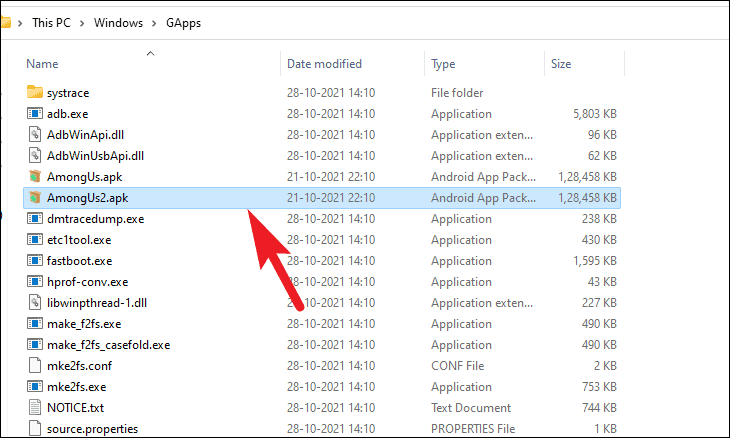
To update a sideloaded app, go to your computer’s ‘Android SDK Tools‘ directory.
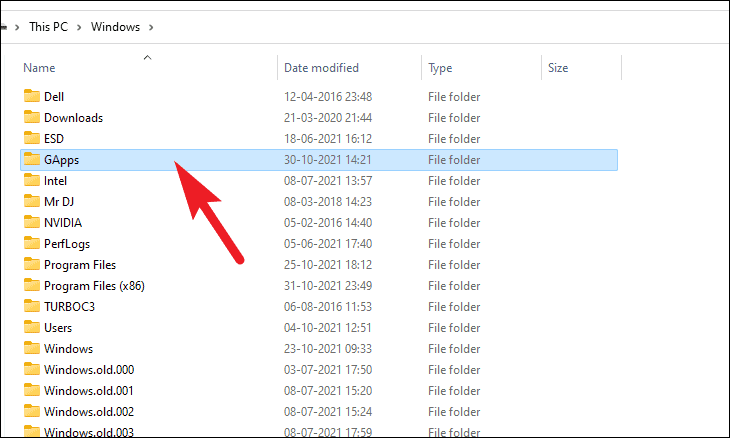
Then, using the Ctrl+C keyboard shortcut, paste the newest version of the software into the folder.
Then, in the address bar, type cmd and press Enter to launch a Command Prompt window in the working directory.
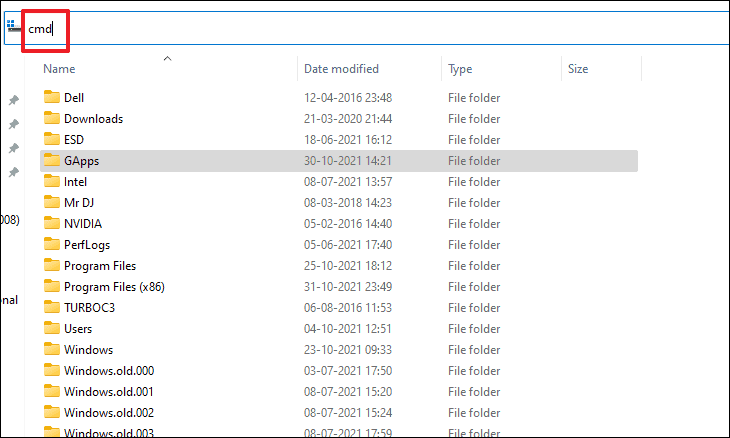
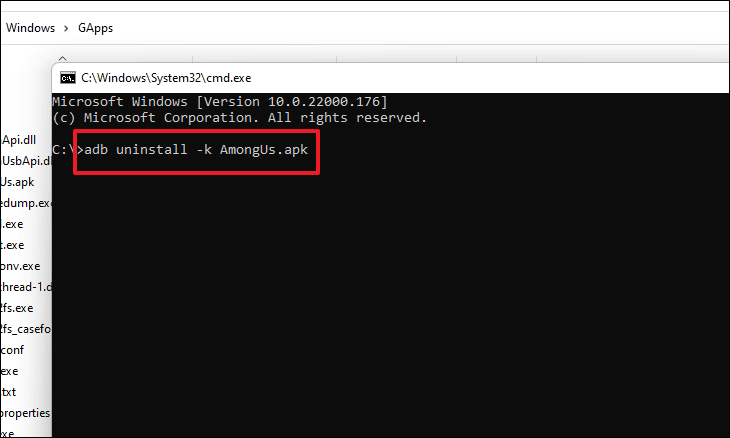
Now, type the following command into the command prompt and press Enter to run it. This command removes the app’s cache and data without uninstalling it.
Note: Replace the placeholder <packagename.apk> with the name of the program you want to install.
adb uninstall -k <packagename.apk>
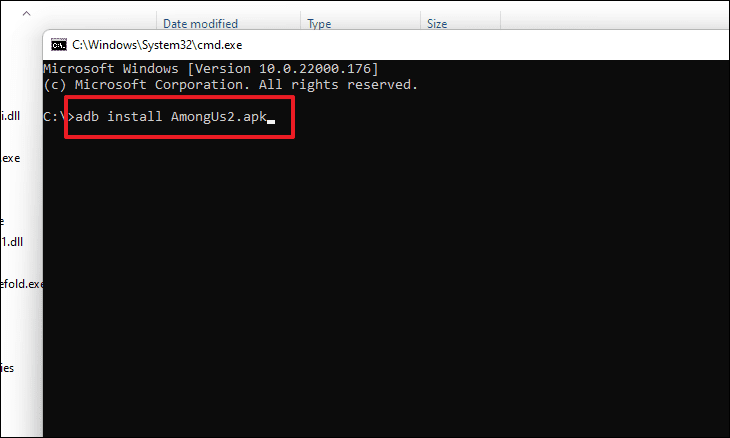
After you’ve uninstalled it, type the following command to reinstall it. Then press Enter to put it into action.
Note: For this method to work, make sure the version you’re installing is more updated than the removed version of the software.
adb install <packagename.apk>
Clear App Cache and Data
Cleansing the app cache and data restores the app to its original state, wiping all of your stored data and logged-in accounts. It’s almost like a soft reinstall of the software, and it will undoubtedly fix several issues.
To clear the app cache and data, first search for it in the Start Menu by typing its name. We’ll use ‘Among Us’ as an example. Then, from the context menu, right-click on the app and select ‘App settings.’ A separate WSA window will appear on your screen as a result of this action.
![]()
Now, from the WSA window, scroll down to the ‘Storage & cache’ option and click it.
![]()
To restore the app to its original form, click on the ‘CLEAR STORAGE’ and then the ‘CLEAR CACHE’ buttons. Close the WSA window when you’re finished.
![]()
You can now relaunch the app to see if the problem has been fixed.
Reinstall the App on your System
If none of the previous options work, the last recourse is to remove and then reinstall the software on your machine to fix the problem.
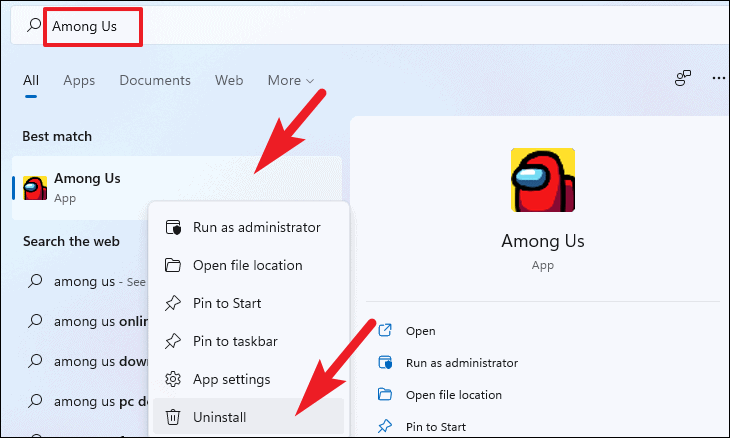
To uninstall any Android app, go to the Start Menu and type the program’s name. Next, from the context menu, right-click on the app’s title and select ‘Uninstall’.
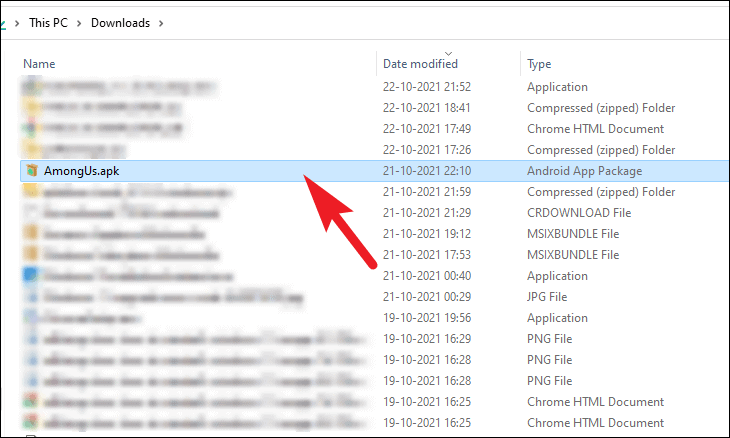
If you had installed the program via an APK file, locate it on your storage and double-click it to start the installer once it has been uninstalled.
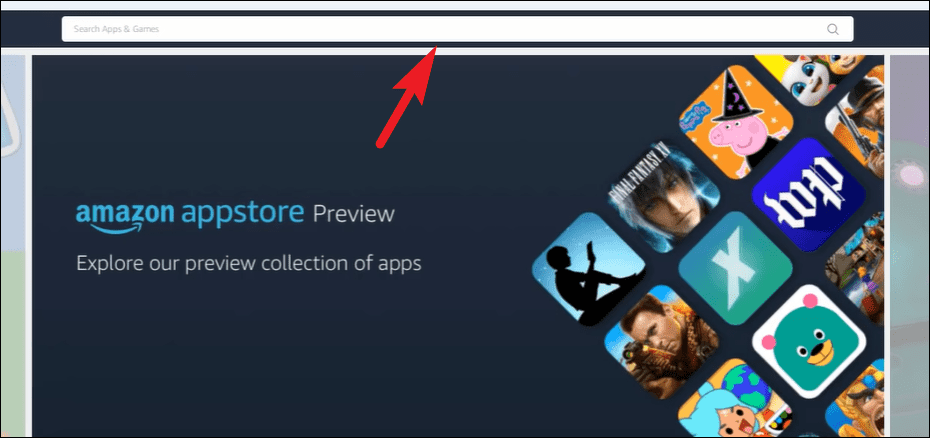
Instead, if you installed the program through the Amazon Appstore or Google Play Store, go to the appropriate store by opening it from the Start Menu’s pinned apps or just searching for it.
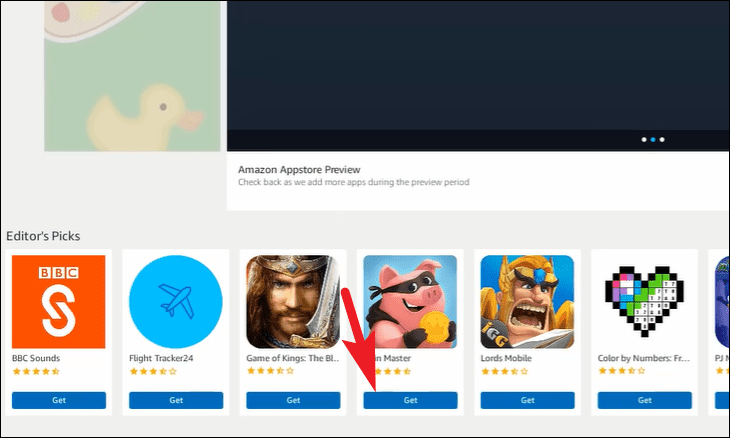
Now, search for your app on the Amazon Appstore or Google Play Store by putting its name into the search field on the home screen, then press Enter.
Then, on the app tile, you want to download, click the ‘Get/Install’ option to download and install it again.
So, there you have it: all the ways to fix Android apps on your PC if they aren’t operating properly.

")
![How to Configure Proxy Settings on Android Devices [FREE]](https://windows10freeapps.com/wp-content/uploads/2024/12/setting-up-a-proxy-for-a-wi-fi-network-1-150x150.jpeg "How to Configure Proxy Settings on Android Devices [FREE]")
 & Mac OS")


