The simplest approach to enable and disable Nagle’s Algorithm for Windows 10 and 11 may be found here. When you buy a computer with Windows 11 or 10 as the operating system, you want each tool to be unique and valuable. However, the harsh reality is that all of the features are inconvenient. Nagle’s Algorithm is one such useless feature that slows down your internet connection and hinders you from replying promptly.
Before we go any further, let’s define Nagle’s Algorithm in very simple terms. Its purpose is to increase the productivity of TCP/IP networks by reducing the number of packets that must be delivered over the network. This approach is justified by the fact that it makes proper use of TCP/IP packets while also preventing little TCP/IP packets from flooding your network. Sending these little packets (tiny grams) is only useful in a few situations, such as on slower networks, but for the most part, it is pointless.
How To Enable and Disable Nagle’s Algorithm in Windows 11 and Windows 10
On Windows 11 or Windows 10, here’s how to enable and disable Nagle’s Algorithm:
Let’s start with some background on Nagle’s Algorithm and why many people find it useless.
The Common Reason for Disabling Nagle’s Algorithm
Despite its convenience, Nagle’s Algorithm has failed to impress the majority of consumers. People who play networked video games are the ones that suffer the most from this algorithm because the games are only fun if the data transmit quickly. There will be no stuttering time delay when playing multiplayer games on a network if you disable this.
Read also: How to Increase Performance & FPS on PC Games
Why you should disable Nagle’s Algorithm on Windows 11 and Windows 10?
Nagle’s Algorithm must be disabled if you want data to flow freely through your network. This will help to speed up the network and reduce game ping/latency. It’s crucial to understand the NIC Interface before knowing how to enable and disable Nagle’s algorithm.
Network Interface Card (NIC) – When a PC has several internet connections, the Windows Registry assigns each one a unique NIC-ID or NIC Interface. This is displayed on your computer as a mysterious mixture of numbers and letters surrounded by braces. You must obtain your active internet connection IP address to recognize the required NIC-ID. Here’s how to do it:
1. Type CMD in the Taskbar’s Search Box, and when the result appears, press Enter on your keyboard. Command Prompt opens as a result of this.
2. After the blinking cursor, type IPCONFIG and hit Enter to get details about your active internet connection in the next window.
3. Look for the IPv4 Address next to the Wireless LAN adapter Wi-Fi. It’s the IP address you’re after; write it down.
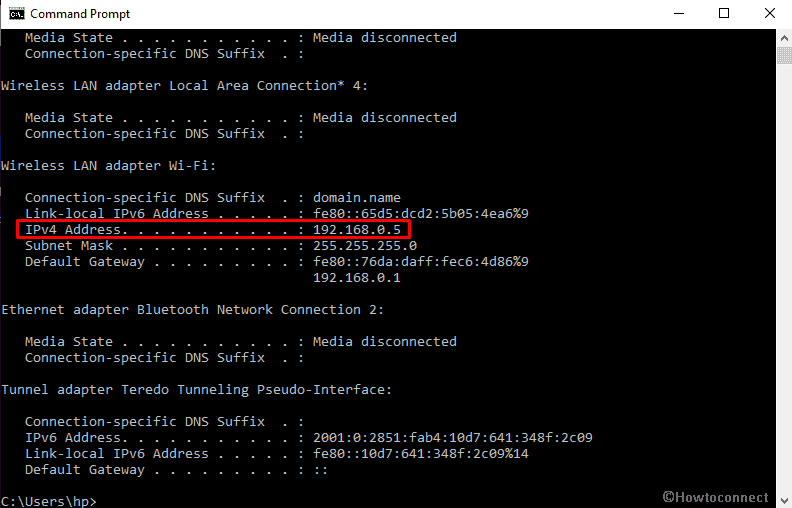
4. Close Command Prompt.
Enable Nagle’s Algorithm on Windows 11 or 10
On Windows 10, you don’t need to do anything to enable Nagle’s Algorithm because it’s already active by default. However, you can disable it by following the instructions outlined in the next section of this article.
Disable Nagle’s Algorithm on Windows 11 and Windows 10
It’s simple to disable Nagle’s Algorithm on Windows 11 or 10; all you have to do is edit a registry entry. But keep in mind that you’ll need the IP address you determined in the previous section of this article to edit the registry. After that, follow the steps below.
Step-1: Type regedit.exe into the Start Search Box and press Enter.
Step-2: If a UAC prompt appears, select Yes to access Registry Editor.
Step-3: Go to the following path:
HKEY LOCAL MACHINE\SYSTEM\CurrentControlSet\services\Tcpip\Parameters\Interfaces
If you see many NICs in the right pane, don’t be surprised; this is typical. You’ll need access to the correct NIC-ID to disable Nagle’s Algorithm for an accurate internet profile. This is accomplished by clicking on each of the interface keys. Then, find the IP address and compare it to the one you specified in the previous section. DhcpIPAddress or IPAddress could be the name of the string value in which it is found.
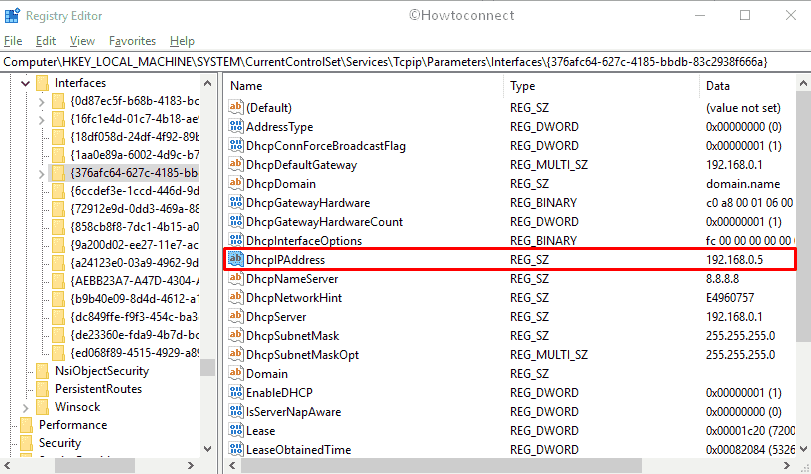
Continue in that key only after you’ve found it –
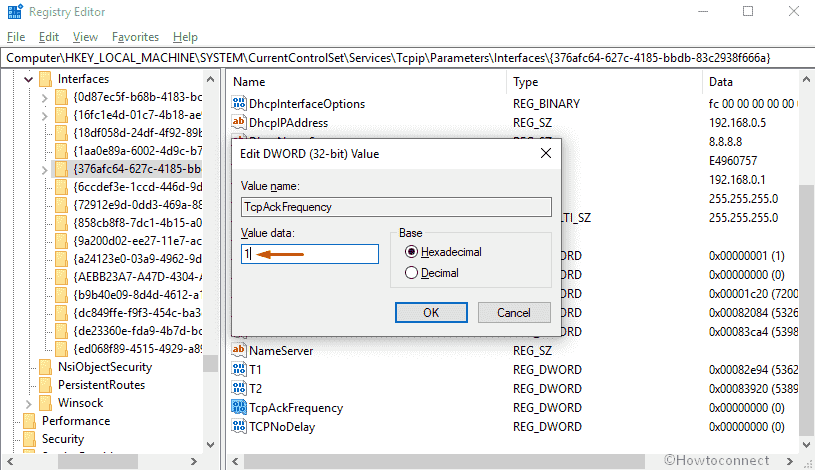
Right-click the empty space with your mouse pointer and select New. This is used to create two DWORD (32-bit) Values. TcpAckFrequency (to send packets immediately) and TCPNoDelay (to disable Nagle’s Algorithm) are two options.
After that, double-click both of these entries to make changes.
Set their Value data to 1 to activate them.
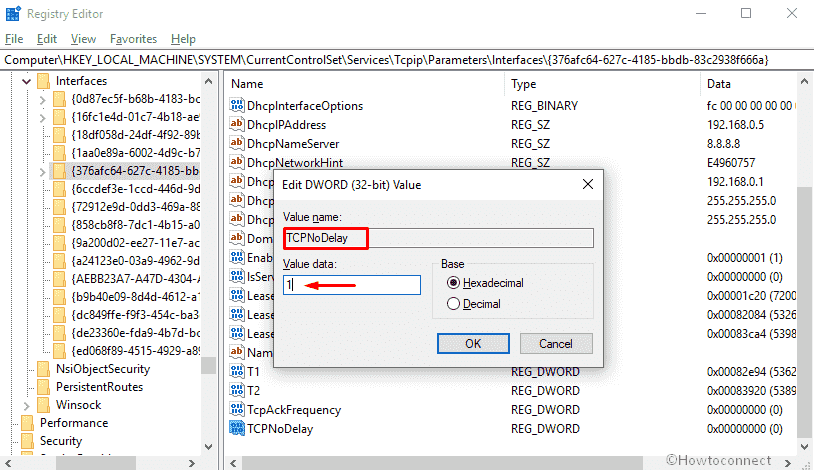
Finally, click OK to save the changes, then close and restart the Registry Editor.
So, in Windows 11 or 10, this is the simplest way to stop Nagle’s Algorithm. However, keep in mind that this is an important feature of Windows 11 or 10 that should be reactivated whenever you conduct some serious work on your computer. It is preferable to temporarily disable this technique because if it is switched off permanently, it will affect your network’s normal bandwidth. As a result, once you’ve finished your job, reverse Nagle’s Algorithm settings by setting the details of the two newly produced values to 0.
Check this video for more help:
That is everything!

")
 & Mac OS")
![How to Configure Proxy Settings on Android Devices [FREE]](https://windows10freeapps.com/wp-content/uploads/2024/12/setting-up-a-proxy-for-a-wi-fi-network-1-150x150.jpeg "How to Configure Proxy Settings on Android Devices [FREE]")

