In this article, learn how to disable Desktop right click context menu in Windows 10.
If you want to disable Desktop right click context menu, this post is useful for you. I have got two ways which you can apply to accomplish this. You can disable the Desktop right click context menu via Group Policy or using registry.
See more: How to Re Right Click Context Menu in Windows 10
How to disable Desktop right click context menu
Method 1. Using Group Policy
1. Press Windows + R and type gpedit.msc in the dialogue box. Click OK.
2. In the GPO Editor window, go to here:
User Configuration Configuration > Administrative Templates > Windows Components > File Explorer
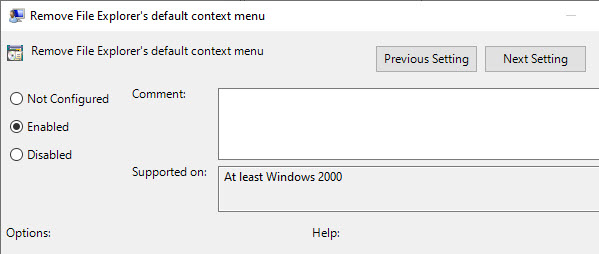
3. In the right pane of File Explorer, find Remove File Explorer’s default context menu. Double click on it and change the policy status to Enabled. Click Apply > OK to save changes.
4. Close GPO editor and then update GP engine by running gpupdate /force command to save changes.
Method 2. Using Registry
We would recommend you to create System Restore point before editing registry.
1. Click Start, type “Run” and select Run. In the Run box, type “regedit” and click OK.
2. In the left pane of Registry Editor window, go to this location:
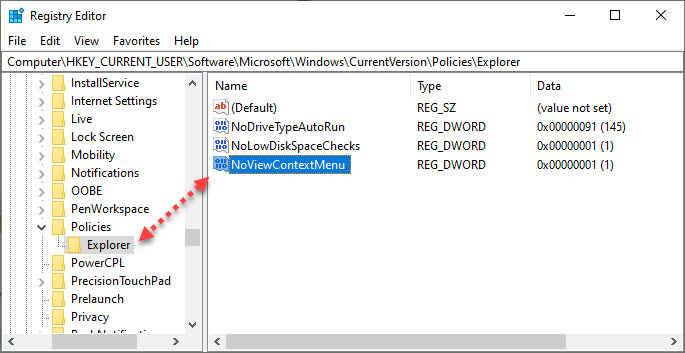
HKEY_CURRENT_USER\Software\Microsoft\Windows\CurrentVersion\Policies\Explorer
3. Now, once you expand Explorer, create a new registry DWORD (REG_DWORD) and name it as NoViewContextMenu and set its Value data to 1.
4. Similarly, if you want to disable Desktop right click context menu for all users, create the same registry DWORD at following registry location:
HKEY_LOCAL_MACHINE\SOFTWARE\Microsoft\Windows\CurrentVersion\Policies\Explorer
5. Close Registry Editor and restart your system.
Checkout this video to illustrate this guide:
Hope something helps you.


")

