Many improvements came with the release of Windows 11, including the new Start menu, all-new Settings app, Android support, and more. At the same time, Windows 11 comes with a default date and time format based on your area, which you can change throughout the setup process. However, with all of the new changes in the new OS, customers are perplexed and are having difficulty changing the clock format to 12 or 24 hours.
You can change the regional format in Windows 11 to any other area, which will automatically align the date and time with the OS and select programs. Alternatively, you can manually change the regional formats to suit your needs. In this post, we’ll show you how to change the time format in your Windows 11 PC from 12 to 24 hours. Let’s have a look at how:
How to Change Time Format to 12/24 Hour Format In Windows 11
Method 1: By Changing the Format Manually
This method allows you to change the time, dare, calendar, and even the beginning day of the week one at a time, with no effect on the other factors. You can also modify the date and time formats on an individual basis while ignoring the geographical standard. To change the time format to 12 or 24 hours, follow the steps below:
Step 1: First, press the Win + I keys on your keyboard together to launch the Settings app.
Step 2: In the Settings box, on the left side of the pane, select Time & language.
Step 3: Next, go to the right side of the screen and select Language & Region.
Step 4: Scroll down to the Regional format section on the right side of the following screen.
Now, below it, click the Change formats button.
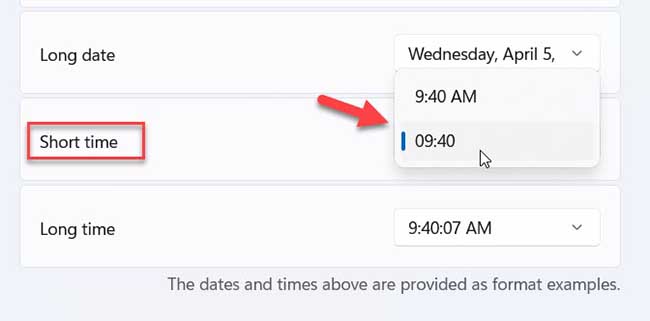
Step 5: Next, go to the Short time field and select a value from the drop-down menu.

To set it to a 12-hour format, choose AM or PM as the time format.
Step 6: Select the time format with no AM or PM next to it for the 24 hour format.
You’ve now successfully changed the time format in Windows 11 to 12 hour or 24 hour.
Method 2: By Changing the Regional Format in the Settings App
When you change the regional format, the changes will be applied automatically to Windows and programs that use the same regional format, and they will utilize the date and time based on the new format. To alter the regional format (date and time) to match your current country or region, follow the procedures below:
Step 1: Select Settings from the Start menu by right-clicking on it.
Step 2: In the Settings box, on the left side of the pane, select Time & language.
Step 3: Select Language & Region from the right-hand menu.
Step 4: Next, on the right side, scroll down to the Region area and select Regional format from the drop-down menu beneath it.
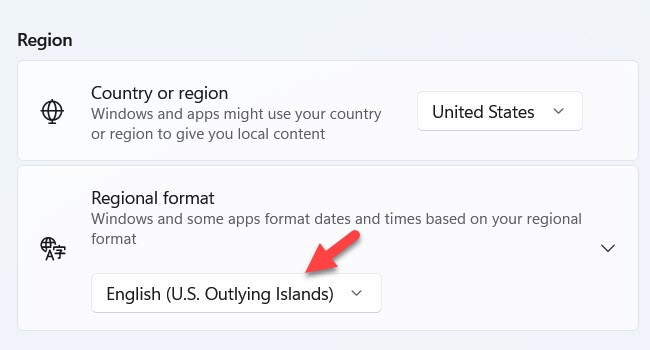
Choose your favorite region from the drop-down menu.
If you want the formatting changes to take effect, you need to reopen any open apps after changing the regional format. The date and time, on the other hand, are immediately effective and should be seen on your Windows 11 PC’s taskbar.
Method 3: Through Control Panel
This is a tried-and-true strategy that has been in use since the prior Windows version. Here’s how to use the Control Panel to change the time format:
Step 1: On your keyboard, press the Win + R keys together to launch the Run command window.
Step 2: To open the Control Panel, type control.exe in the search bar of the Run command window and press Enter.
Step 3: Go to the upper right side of the Control Panel window and select Category from the drop-down menu next to it.
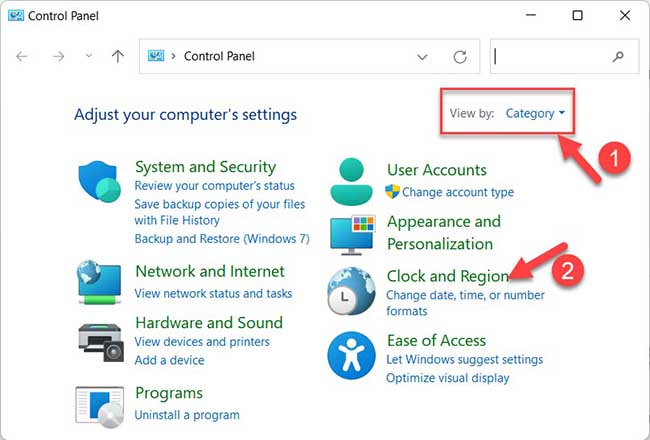
Now, in the list, select Clock and Region.
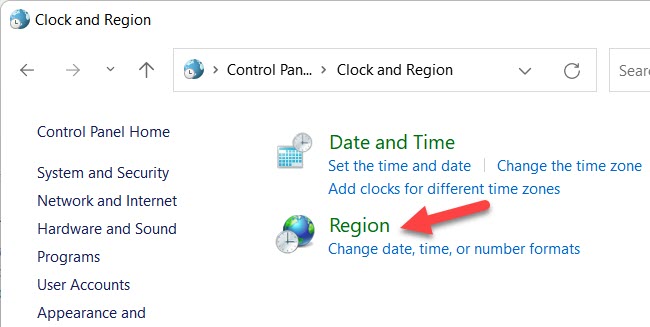
Step 4: Next, on the right side of the Clock and Region panel, click Region.
Step 5: Now, in the Region dialogue box, under the Formats tab, go to the Date and time formats section.
Select the 12 or 24 hour format from the drop-down menu in the Short time area, depending on your needs.
For example, if you wish to choose a 24 hour format, you can choose HH:mm or h:mm tt for a 12 hour format.
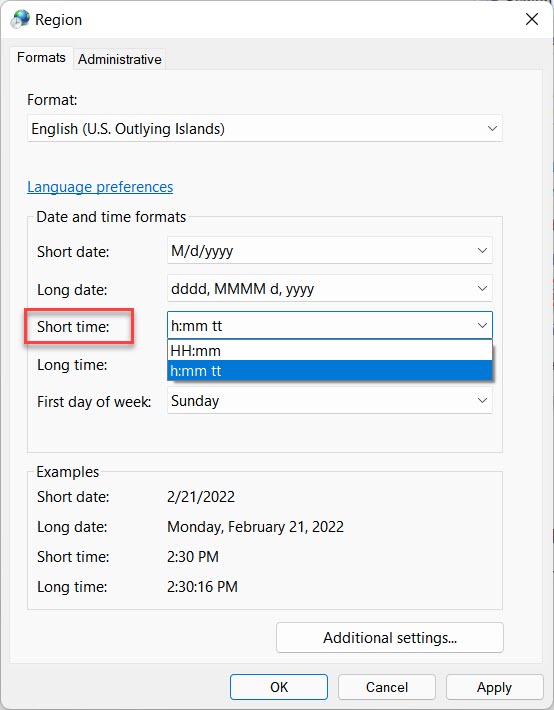
To save your changes and exit, press Apply and then OK.
*Note – You can also adjust the Long time parameter to suit your needs. Select HH:mm:ss for a 24 hour format and h:mm:ss tt for a 12 hour format.
So that’s how you change the time format on your Windows 11 PC to 12 or 24 hours.
Check this video for more help:
That’s about it.

 & Mac OS")

")

