OBS (Open Broadcaster Software) is an open-source platform that allows you to stream your favorite video games over the internet. Both the macOS and Windows operating systems are supported by the application. Professional gamers prefer it because it allows them more access to their sharing screen than any other moniker on the internet.
Although OBS makes working with numerous sources and mixing them a breeze, it is not without flaws, one of which we will discuss today. OBS Studio not working on Windows 10 or 11 is one of the most prevalent difficulties experienced by many gamers. This issue is most prevalent in systems with two graphics options: dedicated and integrated.
As a result, in this post, we’ll discuss how to fix OBS Studio not working on Windows 10/11. So, without further ado, let’s get started.
Common Reasons Behind OBS Studio Not Working On Windows 10/11
OBS Studio may not operate on Windows 10 or 11 for a variety of reasons. The following are a few of the most common:
1. OBS Studio comes in two flavors: 32-bit and 64-bit. You should choose a version based on the sort of operating system you’re using. If you’re using an older version of OBS Studio, there’s a good risk that the application won’t operate.
2. If you overclock your system to improve its performance, you may run into several problems.
3. If any similar application is running in the background on Windows 10/11, OBS Studio will not operate.
4. A machine that hasn’t been shut down in a long time can cause any application, including OBS Studio, to malfunction.
These are some of the main reasons why OBS Studio isn’t compatible with Windows 10/11. So, let’s have a look at how to correct them, as well as some other solutions that may be useful in this circumstance.
How to Fix OBS Studio Not Working On Windows 10/11?
Now that you’ve gone through all of the possible causes for your problem, it’s time to figure out how to solve it. The answers are basic and clear, and no technical knowledge is required. So, let’s take a look at them.
Fix 1. Choose the Correct Version Of OBS Studio
As previously stated, OBS Studio comes in two flavors: 32-bit and 64-bit. The incorrect version of the application might cause a variety of problems, including incompatibility. So, these are the things you should take to assist yourself in this case.
1. Choose “Properties” from the right-click menu on “My PC” on the desktop.
2. The About window will appear, providing all of your system’s information.
3. Make a note of the “System Type”.
4. Now that you know what your system version is, you may download OBS Studio to match it.
Here is a direct download link for OBS Studio for both 32-bit and 64-bit computers for your convenience.
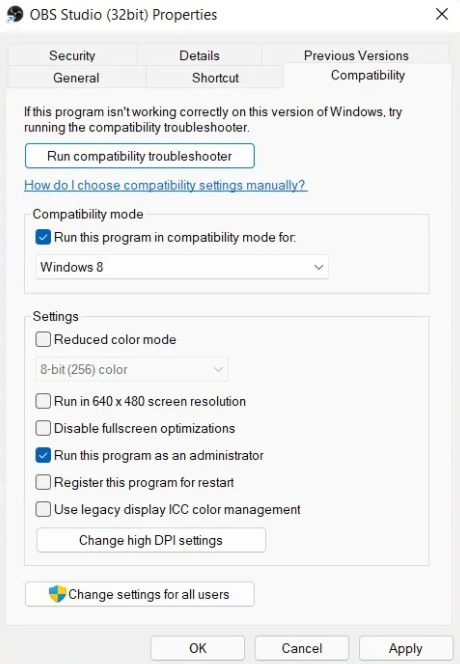
Fix 2: Change OBS Studio’s Compatibility Settings
The interoperability of OBS Studio has long been a point of contention. The most recent version of Windows, Windows 11, was incompatible with the platform. As a result, users had to fiddle with the application’s compatibility settings in order for it to work on the system. This problem can also be resolved simply by turning off compatibility mode. Nonetheless, here are the procedures for changing the OBS Studio compatibility settings.
1. In the task manager, tap on the search icon.
2. Enter OBS Studio in the search box.
3. Select “Open file location” from the drop-down menu.
4. Choose “Properties” from the context menu when right-clicking on the OBS Studio shortcut.
5. Select Compatibility from the Properties window.
6. Check the box next to “Run this program in compatibility mode for.”
7. Select Windows 7 or Windows 8 from the list by tapping on the dropdown icon.

8. Finally, close the Properties box and save your changes.
Try launching the OBS Studio again to see if it works.
Fix 3: Give OBS Studio All The Permission.
Any application will not be able to provide services unless it has all of the required permissions. OBS Studio is a similar example. If you haven’t granted it full administrator capabilities on Windows 10/11, it won’t operate. It’s critical that it has all administrator rights because it’s a screen-sharing platform.
Regardless, these are the actions you’ll need to take to give OBS Studio administrator permissions.
1. In the task manager, tap on the search icon.
2. Enter OBS Studio in the search box.
3. Select “Open file location” from the drop-down menu.
4. Choose “Properties” from the context menu when right-clicking on the OBS Studio shortcut.
5. Select Compatibility from the Properties window.
6. Check the box next to “Run this software as an administrator“.
Exit the properties window after saving the changes. Restart your computer, then relaunch the application to verify if it now functions properly.
Fix 4: Choose the Correct GPU for OBS Studio
You haven’t selected the proper GPU for resources, which is why OBS Studio isn’t working on Windows 10/11. Most modern Windows PCs have two GPUs: one integrated and one dedicated. They may conflict with one another, causing OBS Studio to stop working on your computer. So, here are the things to do to assist you in this scenario.
1. Right-click anywhere on the desktop’s blank screen.
2. Select “Nvidia Control Panel” from the drop-down menu.
3. Tap Manage 3D settings in the Nvidia Control Panel window.
4. Select “Program Settings” from the drop-down menu.
5. A list of all the applications available on your system can be found here. If you can’t find OBS Studio, tap the “Add” option to add it.
6. Select “select the preferred graphics processor for this software” from the dropdown menu.
7. Choose “high-performance Nvidia CPU” from the drop-down menu.
Save your changes and close the window. Launch the application once more to verify if it now functions properly.
See more: How to Fix Black Screen Issue in OBS Studio
Fix 5: Change Local Drive Settings
If you installed OBS Studio on your system’s C drive, it’s likely that even the system’s user won’t be able to adjust the application’s settings. To fix this problem, you’ll need to update the drive permission settings. So, these are the measures you should take.
To change the driver settings, you’ll need to log in with the administrator account.
1. Using the Windows + E shortcut key, open File Explorer on your computer.
2. Right-click the C drive, or any other drive where Windows is installed. Choose “Properties” from the drop-down menu.
3. Go to Security.
4. Click on Edit
5. Check the box next to “Authenticated Users” and then “Full Control”.
By pressing the Apply button, you can save your changes. That is all there is to it. Restart the computer to determine if OBS Studio is still operational.
Fix 6: Turn Off Overclocking
Overclocking isn’t the most effective approach to improve frame rates and system performance. It does, however, have its drawbacks, as does anything else in the world. PCs that have been overclocked have been found to be unable to run OBS Studio. As a workaround, turn off overclocking and any associated application statuses on your machine. Restart OBS Studio to test if it’s still working.
If this solution worked for you, make sure that overclocking is turned off everytime you use OBS Studio.
Fix 7: Remove Conflicting Applications
OBS Studio not working on Windows 10/11 might be caused by any conflicting program installed on your system, as indicated in the explanations. As a workaround, uninstall any application that works in a similar manner as OBC studio. Here are the measures you must take.
1. By hitting the Windows + R shortcut key, you can access the “Run” dialogue box.
2. Enter “appwiz.cpl” into the command prompt. It will bring up the system’s Programs and Features window.
3. Here you will find all of the applications that have been installed on your computer. Uninstall any application that you believe functions similarly to OBS Studio by right-clicking on it.
4. Activate Task Manager.
5. Disable any background applications that you believe are comparable to OBS Studio.
That is all there is to it. Relaunch the app to see whether the problem has been resolved.
Fix 8: Reinstall OBS Studio.
Reinstalling OBS studio is your only choice if none of the other mentioned remedies worked. Any corrupted or outdated files that were causing the problem will be permanently deleted if you reinstall the application. However, make sure you’re getting the correct OBS studio version. Fix 1 includes a download link for the application for your convenience. Download the application that corresponds to your operating system.
Final Words
This is how you can get OBS Studio to run on Windows 10 and 11. As a result, because there isn’t a single remedy for the problem, you may have to try all of the ways listed above to resolve the issue. Furthermore, if you know other options, please leave a comment to let us know.

")


 & Mac OS")
