In this tutorial, learn how to fix DNS Server not responding on Windows 10/8/7.
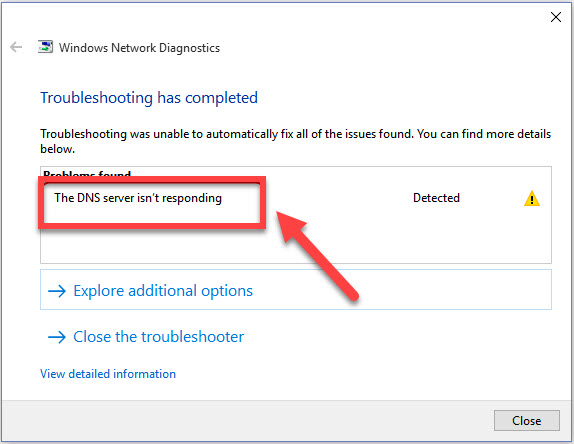
The DNS server isn’t responding
Sometimes, you can’t access any websites through the Internet. After that, you try to troubleshoot the network problems on your Windows. It says you the DNS server not responding error.
The DNS server isn’t responding.
Your computer appears to be correctly configured, but the device or resource (DNS server) is not responding.
Why cannot you browse the Internet when DNS server not responding?
To begin, let me explain first What is a DNS Server? The Domain Name System (DNS) is the phonebook of the Internet. When users want to access our website www.windows10freeapps.com on your browser, DNS is responsible for finding the correct IP address for those sites. Then, browsers use those addresses to communicate with CDN edge servers or origin servers to access website information. Hence you may know if there’s any wrong with your DNS server, you cannot access any website on your browser.
So how to fix up this issue? Please refer below-mentioned suggestions.
How to Fix DNS Server not responding in Windows 10/8/7
Method 1. Change Default DNS Server
This issue could be probably caused by your incorrect DNS server address. In order to fix this problem, follow these to correct your DNS server address:
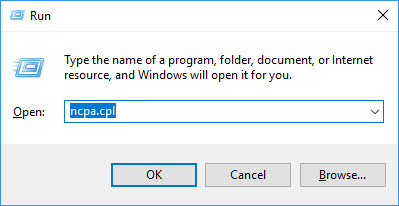
Step 1. Press Windows Key + R then type ncpa.cpl in Run dialog box and press Enter or click OK.
Step 2. When Network Connections window appears, look for your current connection, right-click it and select Properties.
Step 3. Go to the Networking tab, select the option Internet Protocol Version 4 (TCP/IP) and click the Properties button.
Step 4. Tick on “Obtain an IP address automatically” and “Use the following DNS server addresses“. Then put the following values:
Preferred DNS server: 8.8.8.8
Alternate DNS server: 8.8.4.4

Step 5. Click OK to save changes.
Method 2. Clear your DNS cache and reset your IP
Another method to fix “DNS server not responding” error is to clear your DNS cache and reset your IP. To do that, follow these steps:
Step 1. To begin, open a Command Prompt with administrator privilege. You can search for cmd, right-click on the result, and select “Run as administrator“.
Step 2. When Command Prompt pops up, type the following commands and press Enter after each.
ipconfig /flushdns
ipconfig /registerdns
ipconfig /release
ipconfig /renew
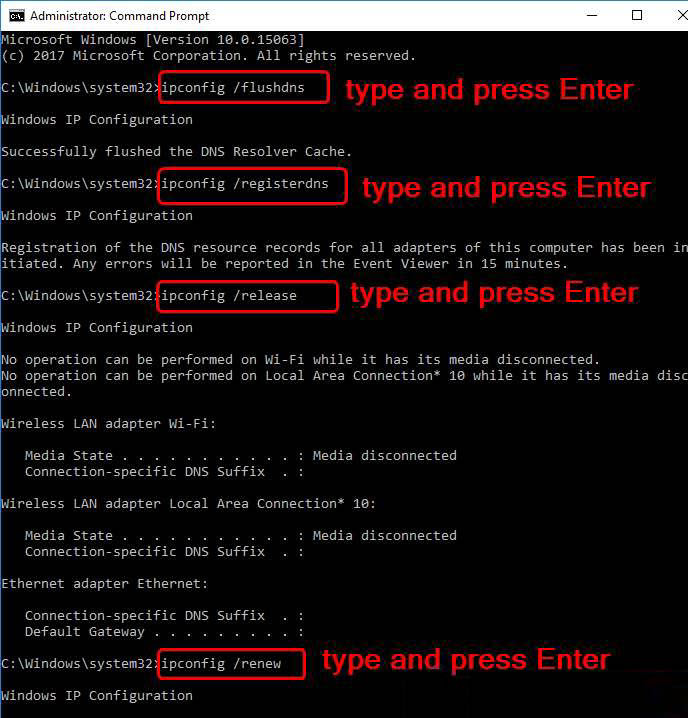
Step 3. Restart your Windows PC and try to access the website you want to go again then check if it succeeds.
Method 3. Restart your modem and router
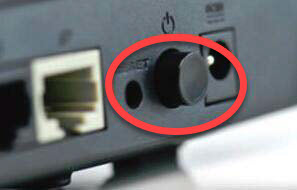
One of the easiest ways is to restart your modem and router and check if the issue is resolved. Probably, your modem or router configuration might not be correct, the DNS server could stop responding. In order to fix that, just hold the power button on your modem to turn it off. Wait for a few minutes, and hold the power button again to start it again. After turning on your modem or router, try to access the website you want to go again and check if it succeeds.
Tips: You can also fix the connection problem by using VPN. See more: Top 10 Best VPNs For Windows 10
VIDEO TUTORIAL: How To Fix DNS Server Not Responding on Windows 10
Hope something helps you.

![How to Configure Proxy Settings on Android Devices [FREE]](https://windows10freeapps.com/wp-content/uploads/2024/12/setting-up-a-proxy-for-a-wi-fi-network-1-150x150.jpeg "How to Configure Proxy Settings on Android Devices [FREE]")
")


