After making announcements about Android app compatibility in Windows 11, Microsoft released the operating system, and the Windows Subsystem for Android (WSA) for Windows 11 is now available in the Beta channel. Since the introduction, developers have been customizing WSA for Win11 due to Android’s open-source nature. If you’re using Windows 11 and want a Root Windows Subsystem for Android using Magisk, check out this guide.
For a short time, developers have been able to supply Google Play Store (GApps) on the Windows 11 Subsystem for the Android platform. For those unfamiliar with Magisk, it’s a systemless rooting solution for Android that doesn’t break or conflict with the system files while providing you with full root access. Thanks to the developer @topjohnwu for creating such a great Android rooting tool.
Apart from Magisk, certain other exploits or rooting tools, such as Riru and LSPosed on Windows Subsystem for Android (WSA) based on Windows 11, are also operational. Well, enabling root access to WSA on Win11 is a lot easier than you might imagine. You’ll need to install a modded Windows Subsystem for Android (WSA) that comes pre-installed with Magisk and GApps, just like you would on Win11.
How to Root Windows Subsystem for Android via Magisk
You’ll be pleased to learn that it’s a completely stock Android 11 version, with the Google Play Store and Play Services pre-installed after rooting using Magisk. As a result, your Windows 11 OS will have a fully functional rooted Android 11 subsystem. Although Microsoft hasn’t yet made Android app support available to all regions, you may start using it right now with the Win11 newest Beta or Dev channel build by changing the system region to the USA.
While Windows 11 can officially allow you to install Android apps and games through the Amazon Appstore, you can also sideload the APK file on your Win11 PC to get a wider choice of programs. Without further ado, let’s get started with the guide below.
Step 1. Uninstall Previous Version of WSA
First and foremost, if you have any version of Windows Subsystem for Android (WSA) installed on your Windows 11 PC, please delete it immediately. To do so, follow these steps:
- Search for Windows Subsystem in the Start Menu, then right-click on it and select Uninstall.
- After that, restart your computer to save the modifications.
Step 2. Install Android SDK Platform Tools
You must install Android SDK Platform Tools (ADB and Fastboot Tools) on your device. This is Google’s official ADB and Fastboot binary for running commands on the machine and doing operations.
Step 3. Download Rooted WSA
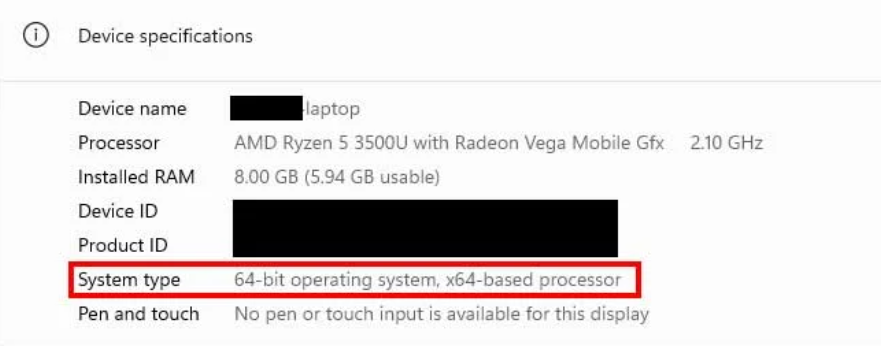
Now, use the link below to get the Rooted Windows SubSystem for Android (WSA) with GApps+Magisk. Make certain to download the appropriate file for your hardware architecture (arm64 or X64). In Settings > System > About > System type under Device specifications, you can see the architecture type you’re using.
- WSA-magisk-GApps-pico_1.8.32822.0_arm64_Release (Nightly)
- WSA-magisk-GApps-pico_1.8.32822.0_x64_Release (Nightly)
Once you’ve downloaded the WSA file to your PC, make a point of extracting it to a folder or another convenient location. [Do not include a space between the folder name and the folder name. Maintain WSA Rooted]
Step 4. Download Magisk for Windows 11
On your Windows, 11 PC that will be used for rooting, make sure to download the Magisk APK file. After you’ve downloaded the zip file, unpack it and copy the magisk.apk file from the folder to the extracted Platform-Tools folder on your computer.
Note that Magisk for Windows 11 is not the same as Magisk for Android. As a result, be sure you don’t make any mistakes while downloading the file. Simply click the link below to get the file.
Step 5. Enable Developer Mode on Windows 11
On Windows 11, Microsoft has provided Developer Mode, which you can enable or disable by following the procedures below:
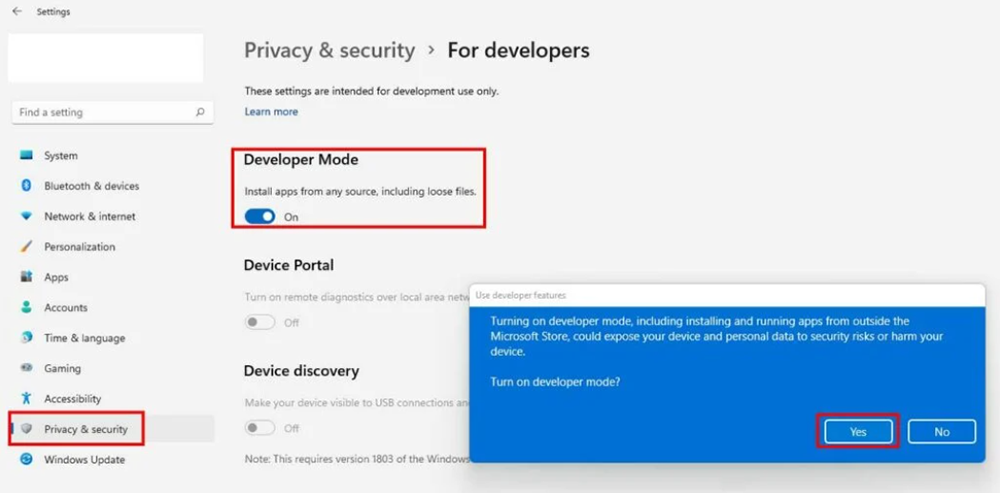
1. To access Settings, hit the Windows + I keys. Select Privacy & Security from the drop-down menu.
2. From the right pane window, select For developers > Turn on Developer Mode by clicking the Developer Mode toggle.
3. A confirmation dialog box will appear > Hit Yes to confirm.
Step 6. Enable Virtual Machine Platform in Windows 11
1. Go to the Start Menu, type Turn Windows features on or off in the search box and then click it to launch it.
2. Select the Virtual Machine Platform option and then click OK.
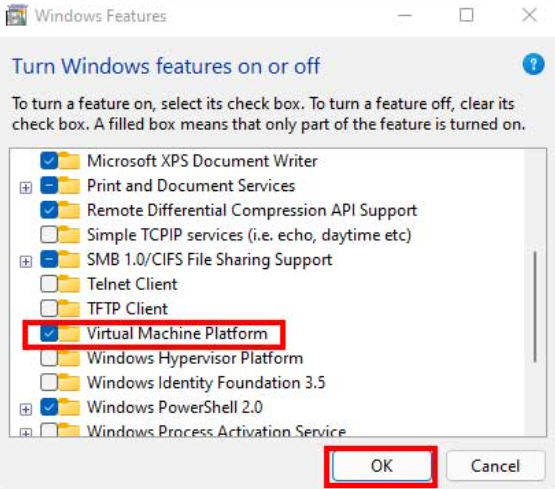
3. Finally, restart your computer to see the modifications take effect.
Step 7. Install Rooted Windows Subsystem for Android
1. Search for Windows PowerShell in the Start menu (by pressing the Windows key).
2. Right-click on Windows PowerShell. Choose Run as administrator from the menu. If UAC prompts you, select Yes to continue.
3. The Windows PowerShell window will now appear on the screen > Run the command below to change the directory to the folder where you extracted the WSA. [For example, if you extracted the WSA folder to D:WSA ROOTED, make sure to modify the directory’s position.]
cd
D:
cd WSA_Rooted
4. Make sure to perform the following command to install the rooted WSA file on your Windows 11 system after you’re inside the place where the extracted WSA folder is available on the PC:
Add-AppxPackage -Register .\AppxManifest.xml
5. Close the Windows PowerShell window and proceed to the next step.
Step 8. Enable Developer Mode in WSA on Win11
You’ll need to enable developer mode inside the Windows Subsystem for Android (WSA) because you just installed it on your Windows 11 machine.
1. Press the Windows key to open the Start menu, then search for Windows Subsystem for Android Settings.
2. Enable the Developer mode by clicking on it.
3. When you’re finished, click the arrow icon next to Files to access the Windows Subsystem for Android.
4. The File Explorer within the WSA will then open, indicating that the installation was successful.
Step 9. Establish Wireless ADB Connection
The Windows Subsystem for Android and the Windows 11 OS must now establish a wireless ADB connection. To do so, follow these steps:
1. In the Windows Subsystem for Android, click the Refresh button next to IP Address.
2. Then, next to the IP address that appears, click the Copy button.
3. To open the Command Prompt window, navigate to the extracted platform-tools folder, type CMD in the address bar, then hit Enter.
4. Now, in the CMD window, type the following command, replacing ‘IP‘ with the IP Address that you copied earlier:
adb connect IP
5. It’s possible that you’ll get an error the first time. But don’t be concerned. To be successful, run the command again or numerous times.
Step 10. Install Magisk in Windows 11
1. To install Magisk on Windows 11, you’ll need to run the following command in the CMD window. Make sure the magisk.apk file is already in the extracted platform-tools folder.
adb install magisk.apk
2. Your Windows 11 PC now has the Magisk software installed > Go to the Start menu and type Magisk into the search box.
3. To open Magisk, click on it > It will now prompt you to create an additional Magisk setup before rebooting. To do so, select OK.
4. It will complete the required task and then reboot the system to apply the modifications.
5. You’ve completed the task. Enjoy yourself!
How to Verify if your Windows 11 PC is Rooted via Magisk or Not?
The procedure is straightforward and standardized, similar to the Android rooting procedure. To do so, follow these steps:
1. Open Google Play Store by going to the Start menu and searching for it.
2. Download and install the Root Checker app > Open the Magisk app now.
3. Enable the toggle next to the Root Checker Basic option in the SuperUser tab at the bottom.
4. Now, on your PC, run the Root Checker program and select Verify Root.
It will display the “Congratulations! Root access is properly installed on this device!”
Note: In the Verify Root Status tab, it will show Android Version: 11 and Device: Pixel 5, which is perfectly alright.
In this video, we are gonna show you how to Root Windows Subsystem for Android via Magisk:
That’s all there is to it, everyone. Now you can enable root access on a Windows 11 machine using the Windows Subsystem for Android with ease. We hope you found this guide useful. You can leave a comment below if you have any further questions.

")
![How to Configure Proxy Settings on Android Devices [FREE]](https://windows10freeapps.com/wp-content/uploads/2024/12/setting-up-a-proxy-for-a-wi-fi-network-1-150x150.jpeg "How to Configure Proxy Settings on Android Devices [FREE]")

 & Mac OS")
