In this post, we’ll show you how to download and install Magisk zip on your Android phone in detail. This guide is also for newbies/noobs who have never rooted their phones before.
Update Note
Finally, with version v23.0, Magisk receives a substantial update, which includes various bug fixes for root access.
Magisk v22 is the most recent major update for Android Jellybean and Kitkat. Only Android 5.0 and higher will be supported by Magisk v23.
Magisk, the popular program for obtaining root permissions on Android devices, has gotten an update that solves some unforeseen flaws and adds the obfuscation capability. If your phone already has magisk root, you can simply update to Magisk Zip v22.0 and Magisk Manager apk to version 8.0.7. If this is your first time installing Magisk root on your phone, you may simply follow our steps.
It’s enjoyable to customize an Android smartphone and conduct complex adjustments like flashing custom kernels, custom ROMs, overclocking and changing system settings, but you’ll need root access to do so. SuperSU was once the most common method of acquiring root access on an Android smartphone; since its debut, Magisk has become the go-to method of rooting a smartphone. With the Magisk Manager apk, you can quickly manage root access and build a variety of features using the many modules provided.
There are various root programs available for gaining root access on your Android device, but Magisk is likely the simplest and easiest to use. Magisk is an Android program that allows you systemless root and administer the Magisk Manager app.
What is Magisk?
The ability to get administrator rights or system-level access is the most crucial of the many possibilities that an unlocked Android smartphone affords. This is known as rooting your device in layman’s terms. Previously, individuals utilized SuperSu to root their devices. The problem was that it changed the system partition directly. This worked perfectly until Google introduced the SafetyNet feature. Because of this technique, if you make any changes to your device’s system partition, the SafetyNet check will fail, and you will be unable to utilize most of the apps.

Magisk entered the picture at this point. Magisk is a flashable ZIP file developed by topjohnwu that can root your smartphone “systemless.” It makes no modifications to your system partition, in other words. Whatever modifications were made were saved on the boot partition. As a result, your device will pass this test when Google checks for the SafetyNet trip. One of the main reasons why Magisk is the favored technique of rooting an Android smartphone is this.
Magisk is a free and open-source rooting application based on the phh supersuser command. It works on any device running Android Lollipop 5.0+.
What is Magisk Manager?
Magisk Manager, on the other hand, is an APK file that can be installed on any Android device, whether it is rooted or not. There are several reasons why you should utilize this tool. To begin, if your device doesn’t have a working TWRP Recovery, you won’t be able to utilize the Magisk ZIP, and you’ll have to rely on the Magisk Manager to root it.
Additionally, it gives a rooted device a way to connect with apps that require root access. Similarly, you may install a plethora of Magisk Modules directly from this app. If you need to unroot your smartphone for any reason, you may do so with ease using the app. Magisk Manager is a must-have for any rooted device, regardless of whether or not it contains Magisk ZIP Installer.
Read more: How to Root Windows Subsystem for Android via Magisk
Advantages of Magisk
There are numerous advantages to rooting your cellphone with Magisk. The first is that it doesn’t make any changes to your device’s /system partition. As a result, SafetyNet will not be triggered, and apps such as Google Pay and Pokemon GO will continue to function normally. Aside from that, On a rooted device, some apps fail to work. You could utilize the Magisk Hide feature in that instance. This conceals root from the apps you choose, allowing them to function as they would on a non-rooted device.
Rooting, on the other hand, brings with it a slew of benefits. These include the option to check out Magisk modules, Xposed Framework, and Substratum Themes to completely revamp your smartphone. You can also get rid of any unwanted programs (bloatware) that are pre-installed on your device. Other advantages include taking a full device backup with Titanium backup or installing a modified Kernel to overclock the device’s CPU. There is no limit to the advantages that a rooted Android handset offers. And Magisk plays a critical role in all of this.
- The main Advantage is their systemless root: Without messing with the system partitions, you can make any system or vendor modification on your Android smartphone.
- MagiskSU: Any application’s authorization can be granted or denied by you.
- Magisk Manager: On your phone, you can install new updates as well as add or remove modules. You can also use Manager to conceal the root to get around the SafetyNet check, download modules, and approve or deny permission to any application.
- ByPass SafetyNet Check: When the system is tampered with, Google’s SafetyNet detects it and prevents specific apps from running properly.
- OTA Updates: You may also experience flawless OTA updates with Magisk without any issues.
- Install Systemless Xposed: Magisk modules can be installed to adjust, enhance, and add functionality to your device. You may use them for a variety of things, including extending the battery life of your Android phone and installing iOS emojis.
Why is Magisk so important?
Many people prefer Google SafetyNet to alternative rooting methods such as SuperSU, Kingoroot, and others. When Google’s SafetyNet detects that the system has been tampered with, it disables specific apps, like Google Pay, Netflix, and Pokemon GO, to name a few. Magisk can entirely hide root from an app, unlike SuperSU, which simply grants or denies root capabilities for certain programs. If you’re rooted, hiding the root from an app, banking app, or Pokemon Go on your rooted device can work.
Magisk Modules
The Magisk, like the Xposed Installer, has its own modules that users may install and utilize. Many modules are available, including Busy Box Installer, AdBlock, Action Launcher, and many others. Installing a module is simple; simply select the module and press the install button.
You can also get other modules from the official repository or from here.
Magisk Changelog:
Magisk v23
1. [App] Snet extension should be updated. This resolves issues with the SafetyNet API.
2. [App] Fix an issue in the stub app that causes the APK to fail to install.
3. [App] When errors are concealed as stubs in logs, they become less unpleasant.
4. [App] When the program is hiding, fix issues with patching ODIN tar files.
5. [General] Remove all pre Android 5.0 support
6. [General] Update BusyBox to use proper libc
7. [General] Fix C++ undefined behaviors
8. [General] Several sepolicy.rule copy/installation fixes
9. [MagiskPolicy] Remove any sepolicy rules that aren’t necessary.
10. [MagiskHide] Validate the name of the package and the procedure.
11. [MagiskHide] Some modifications to avoid zygote deadlock
Magisk v22.1
1. [App] Multiple installation sessions should not be occurring at the same time.
2. [App] When validating the boot signature on PXA boot images, avoid OutOfMemory problems.
3. [General] Proper cgroup migration implementation
4. [General] Rewrite the log writer from the ground up to avoid any crashes or deadlocks.
5. [General] Many scripts have been updated to fix regressions.
6. [MagiskHide] When the signal arrives, avoid a possible impasse.
7. [MagiskHide] If necessary, match process names in part.
8. [MagiskBoot] Preserve and patch AVB 2.0 structures/headers in boot images
9. [MagiskBoot] Remove data encryption flags correctly.
10. [MagiskBoot] Prevent the possibility of an integer overflow.
11. [MagiskInit] Fix sepolicy.rule mounting strategy
12. [resetprop] Always delete existing ro. props before updating. This will stop boot loops from occurring as a result of changing device fingerprint settings.
Magisk v22
1. [MagiskHide] Fix a bug in which halting MagiskHide had no impact.
2. [MagiskBoot] Fix bug when unpacking lz4_lg compressed boot images
3. [MagiskInit] Support Galaxy S21 series
4. [MagiskSU] Libsqlite.so was caused by improper APEX routes. As a result, loading is not possible.
Magisk v21.4
1. [MagiskSU] Su -c behavior that broke a lot of root apps has been fixed.
2. [General] Handle read/write over sockets correctly (the broken pipe problem)
Magisk v21.2
1. [MagiskInit] On legacy SAR devices, detect 2SI after mounting system_root.
2. [General] Ensure that post-fs-data routines do not take longer than 35 seconds to complete.
3. [General] Fix the magisk –install-module command
4. [General] Trim Windows newline when reading files
5. [General] To avoid logcat strangeness, log directly to a file.
6. [MagiskBoot] For header v3 pictures, fix header dump/load.
Magisk v21.1
1. [MagiskBoot] Support for v3 of the boot header (Pixel 5 and 4a 5G)
2. [MagiskBoot] Distinguish lz4_lg and lz4_legacy (Pixel 5 and 4a 5G)
3. [MagiskBoot] Boot images from vendors are supported (for dev, not relevant for Magisk installation)
4. [MagiskInit] Support kernel cmdline androidboot.fstab_suffix
5. [MagiskInit] Vendor-supplied boot images are supported (for dev, not relevant for Magisk installation)
6. [General] Compatibility with sepolicy.rule should be significantly expanded.
7. [General] Add Magisk binaries to PATH when executing boot scripts
8. [General] Update –remove-modules command implementation
9. [General] Make Magisk survive a factory reset on Android 11 properly.
10. [MagiskSU] Add APEX package com.android.i18n to LD_LIBRARY_PATH when linking libsqlite.so
11. [MagiskHide] Apps installed in secondary users should be able to be hidden (e.g., work profile)
12. [MagiskHide] Improve the accuracy of zygote detection
Magisk Manager Changelog:
Magisk Manager v8.0.7:
1. When upgrading, fix sepolicy rule migration.
Magisk Manager v8.0.4:
1. There have been numerous adjustments to the stability of the system, as well as minor problem fixes.
2. When saving logs in the logs menu, collect device properties, app logcat, and Magisk logs.
Magisk Manager v8.0.0:
1. Complete rebuild of the app! The functional changes will be highlighted below.
2. Add detailed device information on the home screen to make user installation easier.
3. Magisk v21.0 communication protocol is supported.
4. Patching current Samsung AP.tar is supported.
Download Magisk Zip and Magisk Manager
Latest version Magisk 22 and Magisk Manager 8.0.7
Magisk-v23.zip – Stable
Magisk-v22.1.zip – Stable
Magisk-v22.0.zip – Stable
Magisk-v21.4.zip – Stable
Magisk-v21.2.zip – Stable
Magisk-v20.1.zip – Stable
Magisk-v20.4.zip – Stable
Magisk – v20.4.zip – Beta
Magisk-v20.3.zip – Stable
Magisk – v20.3.zip – Beta
How to Install Magisk Zip on Android phone:
There are two ways to get this installed on your device. If you have TWRP Recovery installed, you can now easily flash the flashable zip. To use systemless root and its benefits on your device, simply download the newest version from the URL provided below. Also, be sure to get the most recent Magisk Manager apk file.
There are numerous ways to install Magisk on your Android smartphone, and the one you choose is determined by the present state of your device. If your phone isn’t already rooted, you can use TWRP Recovery to install Magisk and acquire systemless root access in one go. If you don’t have TWRP Recovery, you can either download it or use the second option, which involves patching the stock boot image (kernel) and flashing the changed boot image to your device.
If your phone is already rooted and you want to use Magisk, you’ll need to unroot it, delete any current root software, and then install Magisk via TWRP. Here’s all you need to know about switching over from SuperSU to Magisk. In this guide, I’ll go over each of these strategies in detail.
Method 1: Install using TWRP Recovery
First and foremost, let’s look at how to set up TWRP Recovery on your Android device.
TWRP Recovery is a modified recovery for Android that has considerably more features and functions than the stock Android recovery. You can only execute a factory reset, wipe data and cache, and perform a few other small tasks with the default Android Recovery. TWRP Recovery, on the other hand, allows you to install custom modules, flash custom ROMs, install custom firmware, root your Android smartphone, do a full Nandroid backup, and perform a variety of other tasks.
TWRP stands for TeamWin Recovery Project and is an open-source custom recovery image for Android handsets created by TeamWin (you guessed it). We’ll use TWRP Recovery to install Magisk and root your Android device in this tutorial.
Fastboot is the quickest solution to create TWRP (pun intended), and as most Android handsets have fastboot, I’ll only cover this approach in this post. You can skip this step if you already have TWRP installed.
Steps to Install TWRP Recovery:
Many tips on how to install TWRP Recovery on each device have already been published. If you’re new to the site, let’s get the basics out of the way first. Make sure you have all of the necessary drivers and files on your computer.
In this video, we are gonna show you how to download and install Magisk Manager and Root your phone:
Pre-Requisite:
- Get the most recent Android USB drivers.
- TWRP Recovery for your smartphone can be downloaded here.
- On your computer, download ADB drivers and extract them to the C:/ disk.
- Your device’s bootloader must be unlocked.
Installation Guide:
1. To begin, download and install ADB and Fastboot on your computer.
Install ADB and Fastboot on Windows.
Install ADB and Fastboot on Mac.
2. Tap the Build Number on your phone About Phone settings repeatedly to enable Developer Mode on your Android smartphone.
3. Toggle on OEM Unlocking settings in the Developer Settings by opening the Developer Settings and going to the OEM Unlocking tab.
4. The next step is to unlock your bootloader. You’ve probably done this before if you’ve done an advanced tweak on your device, so you can skip this step. It’s worth noting that unlocking the bootloader wipes your device’s data.
5. With your device connected via a USB connection, run adb on your PC.
6. Run the commands below if your smartphone is running Lollipop (Android 5.1) or lower
fastboot oem unlock
if it’s running on Marshmallow (Android 6.0) or higher, run
fastboot flashing unlock
7. Use your Volume buttons to move up and down and highlight Yes, then confirm the process by pressing the power button, and your bootloader will be unlocked.
8. Here‘s where you can get the current TWRP image file, which you should unzip into the same location where you installed ADB and Fastboot.
9. Turn your device off.
10. Enter the bootloader on the device. To do so, hold down the Volume Up and Power buttons simultaneously until the bootloader menu appears.
11. Connect the device to your computer using a USB cable.
12. Navigate to the ADB installation location on your PC. While holding the shift key on your keyboard, right-click on any empty place within the folder and select Open command window here.
13. In the open command prompt, type the following command.
fastboot flash recovery [filename.img]
[su_note note_color=”#fefdef” text_color=”#000000″]Please replace [filename.img] with the name of the TWRP Recovery img file you downloaded followed by the .img extension.[/su_note]
14. The procedure of flashing will commence. After that, reset the device with
fastboot reboot
TWRP has now been installed on your Android device.
Install Magisk using TWRP Recovery
1. You may simply boot into TWRP Recovery if you’ve already moved the latest Magisk zip to your internal storage root.
2. Tap the Install button in the TWRP Recovery Interface.
3. Proceed to the internal storage location where you transferred or downloaded the Magisk zip file. Continue by tapping on the file.
4. After you’ve made your choice, swipe to confirm the flash.
5. After the flashing procedure is finished, tap the reboot button to restart your phone.
That’s it! To enjoy systemless root on your smartphone, you may now download and install the Magisk Manager app.
How to Verify if your phone has a systemless root?
1. After you’ve downloaded and installed the APK, open the Magisk Manager app.
2. Check the top of the screen to see whether you have a systemless root and if you see all options with Green Tick, which means you have successfully rooted and bypassed SafetyNet.
Method 2: Install Magisk using Patched Stock Boot Image
You’ll need to tweak the stock boot image to accomplish this. Install the Magisk Manager on your device to follow this method.
Requirements:
- First and foremost, you must obtain the stock boot image for the current firmware on your phone. You can always retrieve this file from the stock firmware or use tools like CM2, Miracle Box, NCK, and others to extract (Read) it.
- Install the newest Magisk Manager APK from the link above.
- Download the ADB drivers to your computer and save them to C:/Drive.
1. If you have the Stock Boot image, copy it to the internal storage of your phone.
2. Magisk Manager will be launched. When prompted to install Magisk, select INSTALL and then install once more.
3. Select “Patch Boot Image File.”
4. Select your phone’s boot image that you transferred earlier from internal storage.
5. Allow a few seconds to pass. The boot image will be patched by Magisk.
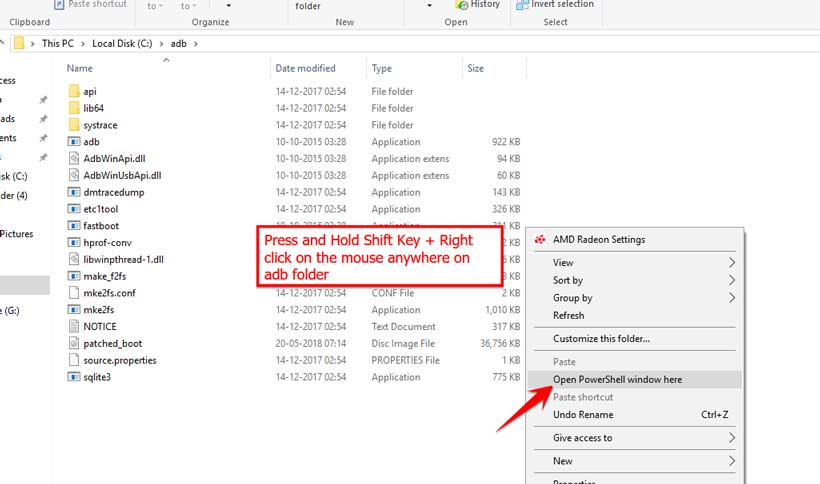
6. Copy the “patched_boot.img” from the internal storage to the C:\ drive adb folder on your PC once the boot image has been modified.
7. Hold the SHIFT key and right-click on an empty space in the same folder.
8. Click “Open PowerShell window here.”
9. Now you must enter Bootloader/Fastboot mode on your device.
10. Using a USB cable, connect your phone to your computer.
11. In your command window shell, execute the following line to install Magisk and root your Android device.
fastboot flash boot patched_boot.img
12. After that, reset your phone by following these steps:
fastboot reboot
Open the Magisk Manager when your phone has rebooted and confirm that the installation was successful.
If you need to uninstall Magisk for any reason, the steps below will guide you through the process. The Magisk Manager software is the most reliable method to do this. Make sure to disable and delete all modules before uninstalling Magisk.
How to Uninstall Magisk and Unroot Android
You can now uninstall Magisk on your device. Here are the steps:
1. On your phone, open the “Magisk Manager” app.
2. Now Select “Uninstall” from the drop-down menu.
3. Select the “COMPLETE UNINSTALL” to validate the removal.
4. You can reboot your device after the uninstalling procedure is completed.
Note: To uninstall, you can use TWRP Recovery to flash the Magisk Uninstaller zip.

![How to Configure Proxy Settings on Android Devices [FREE]](https://windows10freeapps.com/wp-content/uploads/2024/12/setting-up-a-proxy-for-a-wi-fi-network-1-150x150.jpeg "How to Configure Proxy Settings on Android Devices [FREE]")
")
 & Mac OS")

