Whether you use Windows 10, Windows 11, or macOS makes no difference. The device will eventually stop starting for a variety of reasons, such as corrupted files, hardware malfunctions, or bug updates. You can use a macOS bootable USB with the installation media to fix any unforeseen issues with an Apple computer.
When your machine is operating properly, this is one of the primary reasons you should think about making a macOS bootable USB. However, you can utilize a Windows computer to save your Apple device if none of your devices—MacBook, MacBook Air, MacBook Pro, iMac, Mac Pro, or Mac Mini—are functioning when you need them most. To reinstall macOS Ventura, Monterey, Big Sur, Catalina, Mojave, or Sonoma on your Mac, you may easily make a USB bootable installation media using a PC running Windows 11, 10, 8.1, or 7.
You can reinstall or upgrade the Apple OS by following the instructions in this post to build a macOS bootable USB installation on Windows 10 (or 11).
Requirements
To complete this challenge, you will need:
- macOS on a broken Mac PC (optional).
- A TransMac software trial version.
- One 16GB USB flash drive of superior quality.
- A macOS copy (DMG file).
Download macOS DMG file: Official Link
Create macOS bootable USB installation media
Here are the steps to create a bootable USB drive with macOS:
1. First, download and install TransMac on Windows 11/10 PC.
Quick note: Although this software is paid for, you have a 15-day trial period, which is more than sufficient. (If this is successful, buy the full version to help the developer.)
2. Connect the USB flash drive.
Important: Since everything on the flash drive will be erased during this operation, make sure you backup any data you may have on it.
3. Launch TransMac.
4. Click the “Run” button. (Wait 15 seconds if you’re using the trial version.)
![]()
5. Choose the “Format Disk for Mac” option from the left pane when you right-click the USB flash drive.
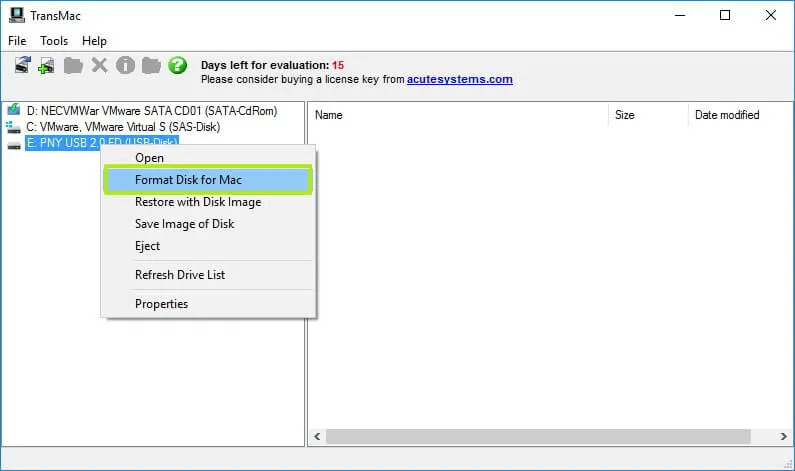
Quick tip: Since the drive was probably formatted using a Windows device, you should complete this step before making the bootable media. If so, it is most likely utilizing an MBR partition, and the USB drive requires a GPT partition in order to function on a Mac.
6. To format the drive in the warning message, click the Yes button.
![]()
7. Verify the drive’s name. Consider “macOS bootable USB”. Click on OK button.
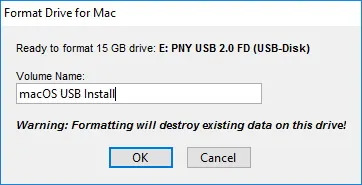
8. Press the “Yes” button.
![]()
9. Press the OK button.
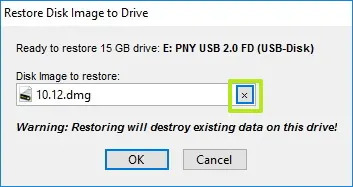
10. Right-click the USB flash drive, choose the “Restore with Disk Image” option from the left pane when
![]()
11. To verify that the data on the USB flash drive has been deleted, click the Yes button.
![]()
12. On the right, click the browse button.
13. With the macOS installation files, choose the “.dmg” file.
14. To make a bootable USB drive, choose the DMG macOS file.
15. Press the “Open” button.
16. Press the OK button.
17. Press the “Yes” button.
![]()
After completing the procedures, you can install, reinstall, or upgrade the operating system to the most recent macOS version (Ventura, Monterey, Big Sur, Catalina, or Mojave) by inserting the USB flash drive into your Mac.
How to Create a GPT partition on a USB flash drive
It can still be a partition issue if the USB flash drive is not functioning with the TransMac. You might have to start the entire process over in this situation. But this time, you should do the following to create the correct GPT partition using the Diskpart command-line software on Windows 10 (or 11), and then proceed as directed above.
Here are steps to create a GPT partition on a removable drive:
1. Open Command Prompt as Administrator.
2. Type the following command and hit Enter:
diskpart
3. To see every drive attached to your computer, use the following command and hit Enter:
list disk
4. After entering the USB flash drive’s number, hit Enter to execute the following command:
select disk 4
In the command, change “4” to the number corresponding to the USB flash drive.
5. To clean the drive, type the command below and hit Enter:
clean
6. To change the drive’s format to GPT, use the following command and hit Enter.
convert gpt

7. Make a primary partition by typing the following command and hitting Enter.

create partition primary
Following the aforementioned instructions, you can use TransMac to generate a bootable media after formatting the USB flash drive with a GPT partition. However, this time, skip steps 5 through 10 and proceed to step 11.
After the procedure, which may take up to an hour, plug in the USB flash drive, press the “Option” key to switch on your Mac, and choose the USB drive to install macOS.
Related Posts:
3 Methods to Extend C Drive in Windows 11/10 (Easily)
How to Delete All Partitions Windows 11/10
") How to Mirror iPhone to Windows 11 for Free (3 Best Methods)
How to Mirror iPhone to Windows 11 for Free (3 Best Methods) 4 Best Tools to Convert MOV to AVI In High Quality
 How to Download & Install BlueStacks Android…
![How to Configure Proxy Settings on Android Devices [FREE]](https://windows10freeapps.com/wp-content/uploads/2024/12/setting-up-a-proxy-for-a-wi-fi-network-1-150x150.jpeg "How to Configure Proxy Settings on Android Devices [FREE]") How to Configure Proxy Settings on Android Devices [FREE]
How to Configure Proxy Settings on Android Devices [FREE]
