Follow these expert suggestions from a seasoned video editor to get the most out of Adobe Premiere Pro.
Adobe Premiere Pro CC isn’t the most stable or bug-free NLE on the market, but it is one of the fastest, most robust, and codec-friendly software solutions available. And, if you’re like me, you don’t mind if your software is a little buggy as long as it’s cutting-edge and performance-oriented.
Using ProRes Proxy files is the best approach to get the maximum performance out of Premiere… but the client needs this edit tomorrow and there’s no time to transcode everything! We need to start editing now and we need Premiere to be able to keep up with our blazing fast editing skillz!!! So, let’s talk about how to get the most out of our favorite, crash-prone software:
How To Optimize Adobe Premiere Pro For Best Performance (Without Using Proxies!)
Method 1. Enable GPU Previewing
Premiere can preview video in real-time in three ways: CPU (software only), OpenCL (AMD graphics cards), and CUDA (graphics cards) (Nvidia graphics cards). Because not all computers have graphics cards, software only is selected by default. You won’t be able to select the GPU Acceleration options if your system doesn’t have a dedicated GPU (graphics card), therefore you’ll have to settle for the poor Software Only option.
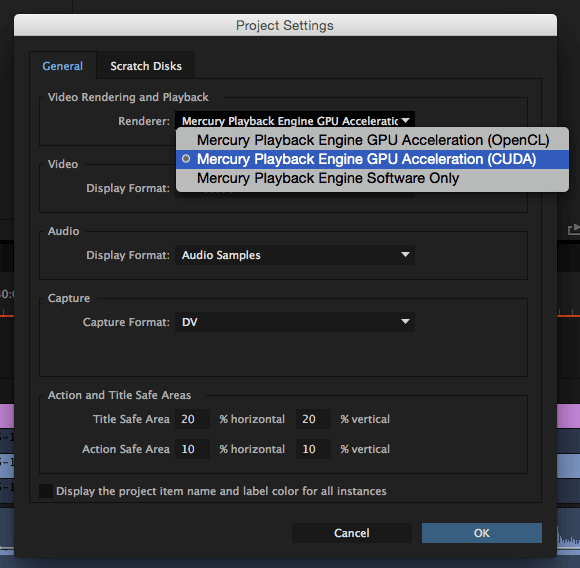
If you have a dedicated GPU, which is recommended, you should choose the GPU Acceleration option. To alter this setting, go to File/Project Settings/General… and select your renderer preference from the Renderer dropdown menu. Select OpenCL rendering if you have an AMD GPU. Select CUDA if you have an Nvidia GPU.
It’s worth noting that Nvidia GPUs with more CUDA cores will provide superior performance, so go for the largest number of CUDA cores you can afford. Also, if you have an Nvidia GPU, ensure sure the CUDA driver is installed and updated. Nvidia CUDA takes the cake!
Method 2. Point Media Cache To Different Drive From OS
Your Media Cache files are saved on your OS drive by default. This is fine, but it isn’t optimal for performance because your OS drive should be focused on providing the best read/write speed to your OS and programs.
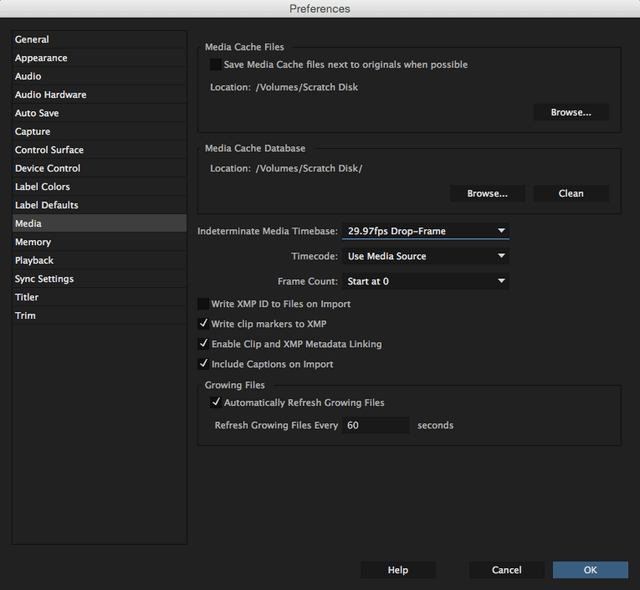
Move your Cache to a different drive instead of allocating these valuable resources to your OS drive. When I construct systems, I always set up a 500GB SSD for cache and direct the cache files to that disk. The cache disk should be as quick as possible. So, if possible, utilize an SSD or, better yet, an M.2 SSD. If you must utilize a spinning disk drive, make it a 7200rpm drive at the very least.
Method 3. Decrease Preview Resolution If Necessary
Premiere makes every effort to show you your timeline in real-time so you don’t have to transcode your videos or wait for render previews. However, even with a powerful computer and GPU, the amount of activity in your timeline might sometimes be too much to handle, resulting in stuttering visuals and sluggish performance.
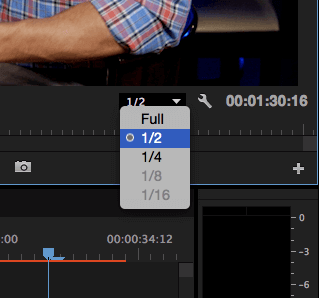
If this occurs, consider lowering the preview resolution in the Program monitor window. Unless you have a monster system, this is usually required for RAW footage. Furthermore, unless your program monitor is set to full screen, there is usually no need to preview in full resolution because your monitor is unlikely to be able to display all of the video pixels (i.e. your timeline preview monitor is only occupying the upper right portion of your computer monitor).
Method 4. Disable Clips When Not In Use
Premiere shows you a preview of your timeline’s top video track layer. If you have many clips on video tracks below your top layer, you’d think that performance wouldn’t be harmed because only the top track is previewing…right? …NO! Even clips below the top layer video track consume system resources and cause performance to suffer.
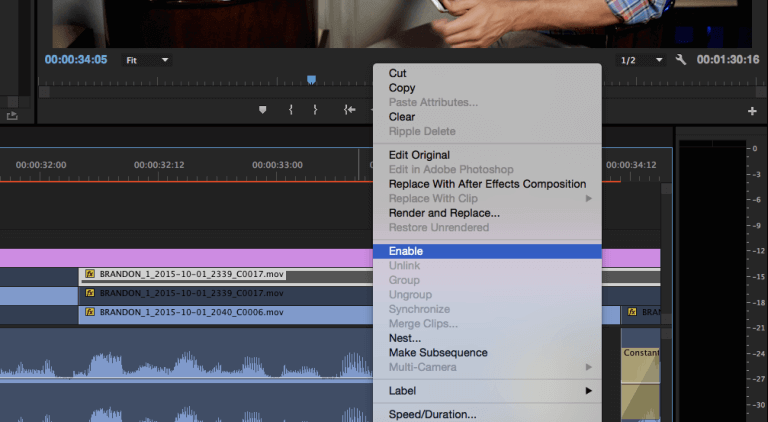
Rather than being destructive and removing these clips, simply right-click on them and uncheck the Enable option to disable them. This ensures that you can use this clip again by re-enabling it, but it won’t eat up resources and slow down your timeline preview in the meantime.
Note: Instead of right-clicking, use the cmd+shift+e (ctrl+shift+e on Windows) keyboard shortcut to enable and disable clips.
Method 5. Edit In A Sequence That Matches Your Footage Settings
When previewing a sequence that matches the natural qualities of your film, Premiere performs best. As a result, while making your sequence, right-click on an imported clip and choose New Sequence From Clip.
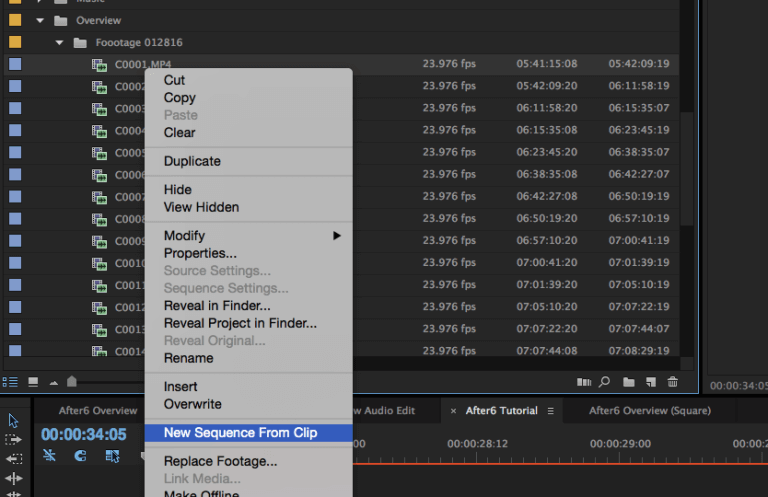
The premiere will then construct a new sequence that is compatible with your clip’s quality, codec, and frame rate. “But I like to construct a 1080p sequence and import my 4K footage so I can downscale it to reframe,” I know many of you are thinking. While this is a fantastic strategy and far superior to upscaling (never upscale! ), Premiere suffers as a result of all the downscaling.
Rather, I advise you to complete all of your modifications in native resolution and then create a new 1080p sequence and copy and paste the material from your native sequence into your new 1080p sequence whenever you’re ready to make your reframes. Then perform all of your reframes because you won’t worry as much if your video stutters at this point because you’ve completed all of your edits and are simply fine-tuning.
BONUS TIP: Use An Adjustment Layer For Color Correcting
To make an adjustment layer, first, choose the Project window (it should be indicated by a narrow blue box), then File/New/Adjustment Layer… In your project window, Premiere will create an adjustment layer file that you can place into your timeline. When editing, keep in mind that an adjustment layer impacts all layers underneath it, so keep that in mind if you don’t want your graphics to be influenced by the color corrections of your adjustment layer. Simply place your graphics above your adjustment layer if this is the case.
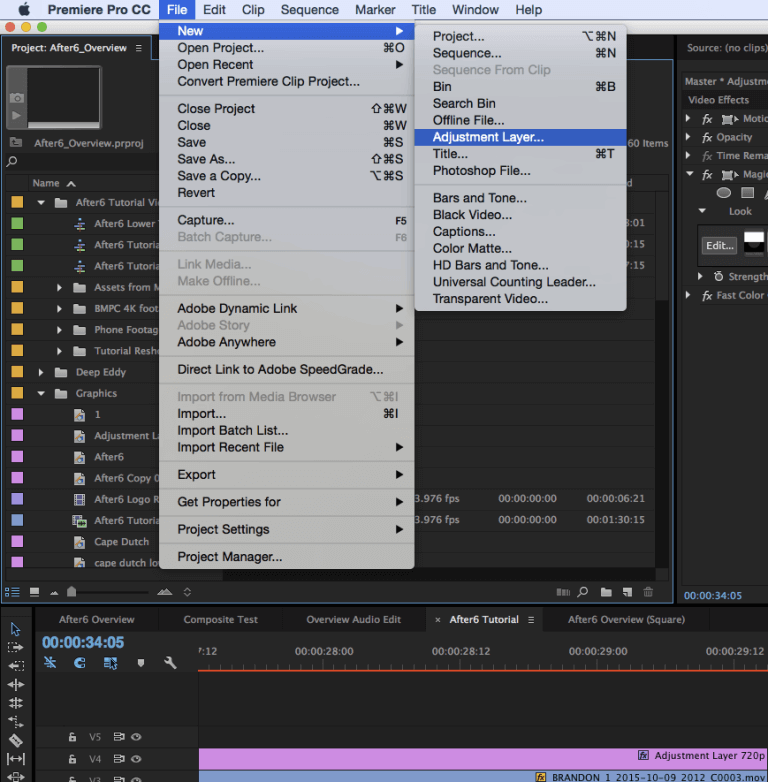
Adjustment layers are useful since they allow you to turn your color grade on and off at a global level (instead of going into the effect controls of each clip independently). There is also a performance benefit to this because if you want to watch your timeline for edits, you want to see it play back as smoothly as possible, so simply eyeball off your adjustment layer and watch your timeline glide by like butter. Simply eyeball back on your adjustment layer when you’re ready to alter the grade.
Because adjustment layers are based on your sequence resolution, they can improve performance if your sequence resolution is lower than your clip resolution. As a result, instead of being rendered at the greater resolution of your clips, all of the effects on your adjustment layer will be presented at the lower resolution of your sequence.
Check this video for more help:
Wrap Up
When Premiere becomes so sluggish that you want to throw your computer against the wall, try adopting these performance-enhancing strategies to see if it helps. If you have any more performance-enhancing techniques, please share them by leaving a comment below since I’m all about maximizing efficiency!

![How to Configure Proxy Settings on Android Devices [FREE] How to Configure Proxy Settings on Android Devices [FREE]](https://windows10freeapps.com/wp-content/uploads/2024/12/setting-up-a-proxy-for-a-wi-fi-network-1-150x150.jpeg)
